ArtH
Well-Known Member
I started this project awhile back and I finally had time to get part of it done.
The right spring was broken and the clamp was also badly rusted and broken.


Just to the left of the shock you can see a gap between the clamp and the upper spring plate. The OEM's were not like that. Looking at the left one, the camp is actully distorted (bent) upwards to so that the clamp comes in contact with the spring plate. They must have used some bodacious torque to accomplish that. I'm thinking about shimming that space evenly across the clamp to spring plate surface. You will also notice I sheered off the stabilizer bar link nut when removing it. I'm not sure about the fix for that yet.
- - - Updated - - -
The front part of the old spring had completely broken off, it's gone, the clamp is shot. The hardest part was removing the old clamp and the rear shackle. I ended up wringing off every single nut due to the rust. I sprayed with Rost Off and PB Blaster to no avail. I would recommend using a torch to cut off the old U bolts. Save yourself some serious PT. You can't or shouldn't reuse them any way.

- - - Updated - - -
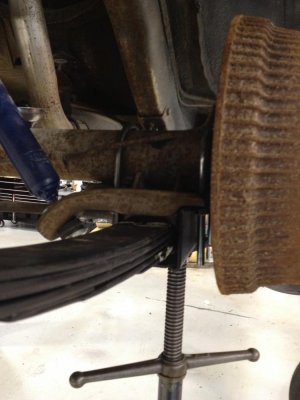
While I was at it, I decided to change the differential grease and reseal the cover.

According to my tech manual, it should have 4.4 pints or just over two quarts (US measure); it probably had about half that. I'm going to let it sit like that over night as the cover is soaking in cleaning solvent removing a ton of grit and grease (mostly on the outside). Besides, I got tired.
- - - Updated - - -
Word or picture about using cheap tools,

Yea, wrung that sucker off in fact that was the second one. I should have used the 1/2 inch drive. A cheap 3/8 is no match for the mounting hardware here.
The right spring was broken and the clamp was also badly rusted and broken.
Just to the left of the shock you can see a gap between the clamp and the upper spring plate. The OEM's were not like that. Looking at the left one, the camp is actully distorted (bent) upwards to so that the clamp comes in contact with the spring plate. They must have used some bodacious torque to accomplish that. I'm thinking about shimming that space evenly across the clamp to spring plate surface. You will also notice I sheered off the stabilizer bar link nut when removing it. I'm not sure about the fix for that yet.
- - - Updated - - -
The front part of the old spring had completely broken off, it's gone, the clamp is shot. The hardest part was removing the old clamp and the rear shackle. I ended up wringing off every single nut due to the rust. I sprayed with Rost Off and PB Blaster to no avail. I would recommend using a torch to cut off the old U bolts. Save yourself some serious PT. You can't or shouldn't reuse them any way.
- - - Updated - - -
While I was at it, I decided to change the differential grease and reseal the cover.
According to my tech manual, it should have 4.4 pints or just over two quarts (US measure); it probably had about half that. I'm going to let it sit like that over night as the cover is soaking in cleaning solvent removing a ton of grit and grease (mostly on the outside). Besides, I got tired.
- - - Updated - - -
Word or picture about using cheap tools,
Yea, wrung that sucker off in fact that was the second one. I should have used the 1/2 inch drive. A cheap 3/8 is no match for the mounting hardware here.