• When you click on links to various merchants on this site and make a purchase, this can result in this site earning a commission. Affiliate programs and affiliations include, but are not limited to, the eBay Partner Network.

Suggestions on Bodywork

You will be glad you did it Jim, take some good pics of how the pan lays as far as meeting with the tail pan and the side pans , also the application of the seam sealer if its still in there, It should or prob is really blobbed on around the wheel house area LOL,
Trunk pan is not to bad , spot welds and seam sealer, not like your trying to finish off a qt panel.
Besides now you will get a 1st class look see at your rear frame rails from the inside. :D

Sorry not sure what you are saying here about pictures. Are these for me or you? The rest of the trunk looks like new. A lot of the seam sealer was starting to fail and there was surface rust under it but I have stripped any seam sealer that was loose or had separated from the metal and sanded the surface rust out The underside of the trunk pan, where the gas tank mounts, you would never guess the inside looks like that. It is still a nice grey color of the factory dip process. If you look really close you can see the pin holes I mentioned. I plan on sandblasting this area as well to remove all traces of rust as well.
 
BTW is your '67 the Dark Red (71552) for 1967? Seems similar to the 1968 Burgundy. Still debating with the wife on the color. She hates white, I see potential in it though. I have her narrowed down to Bronze, Dark Turquoise, Burgundy (my preference of order).

Jim
 
image.jpeg
image.jpeg image.jpeg image.jpeg image.jpeg image.jpeg
 
I see you have the grinder fired back up, looks better.
My 67 is a 2007/08 ford color {cinnamon pearl} I call it brown, lol.
We had shot a box side at the shop on a new 08 back then, I was trying to decide on a color and seen that sprayed out. Figured what the heck.
 
I see you have the grinder fired back up, looks better.

If your talking about the fine particles lying around that was my cheapo sandblaster making a mess trying to just sandblast out the rear window corners to eliminate all traces of surface rust. Aircraft stripper and a wirebrush is way cleaner but does not remove the rust :)
 
Crap put the welder away to soon..... Looks like a window leak on the passengers side and to many wet shoes keeping the carpet wet on the drivers floorboard

image.jpeg image.jpeg
 
I'm sure your trying to cut cost, but i just had a 69 charger blasted underneath with a dustless media blaster, unbelievable results. 30mins and it was spotless. Just a thought.
 
I'm sure your trying to cut cost, but i just had a 69 charger blasted underneath with a dustless media blaster, unbelievable results. 30mins and it was spotless. Just a thought.
Just for fun what did they charge you? I was quoted up to $2200 for top and bottom with the car on a rotissorie. That seemed very steep to me.
 
I had the outside blasted first, then replaced the roof and quarters, then the rotisserie for underneath. I had a friend to give a great deal on the media work, but he charges for how many bags of media he uses. $1000.00 would get the body blasted, price goes up from there. That's seems steep to me too, he could blast your whole car in 2hrs.
 
Oh yea FORWARD progress for a change! The SPI epoxy primer goes on like glass. I like it!

image.jpeg image.jpeg
 
epoxy is 100% waterproof, great moisture barrier,,,,,, money + work = nice car. I will try to post pictures of my project too, nice job bud,,,,,,,,
 
epoxy is 100% waterproof, great moisture barrier,,,,,, money + work = nice car. I will try to post pictures of my project too, nice job bud,,,,,,,,

The SPI epoxy is also a rust converter. Really nice stuff ( really expensive stuff :) )

Jim
 
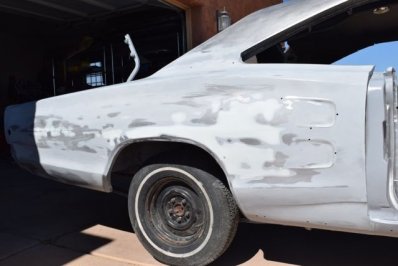
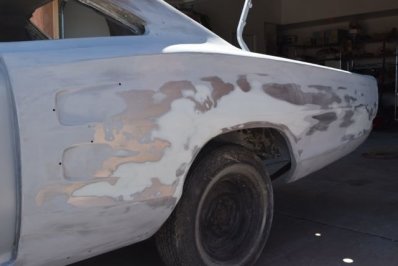
Here is the results of my hacking at filler. I used 3M (Marcel) Platinum with the SPI epoxy. Both sand amazingly well. As I was looking at photos of 68's it became clear the body line that runs the middle of the quarter panel seems to be tricky. Very few photos I see have a crisp line the length of the panel. Most vanish above the wheels then reappear. A few were crisp. I decided to test my skills and build these lines up with the filler. I think it came out reasonable. The rest of the work should be able to be finished with high build primer and blocking a few times.

DSC_0010.jpg DSC_0013.jpg
 
Hey Guys, looking at the filler work, you probbaly sanded off to much filler, i can see the blount shapes of the filler, this generally takes alot of primer to fill. keep up the hard work. Here is a pic of my sons 69 Charger, this is when I cut out the rust.

053.jpg 055.jpg
 
Auto Transport Service
Back
Top