• When you click on links to various merchants on this site and make a purchase, this can result in this site earning a commission. Affiliate programs and affiliations include, but are not limited to, the eBay Partner Network.

Where did you mount your aftermarket ignition control box?

Sniper user here. I put the ignition box under the battery as well but I made a mounting bracket for it. Obviously can't see it behind there but it faces forward so the connector is facing front. You can see the wires poking out a little.
View attachment 1084577

I put my coil on the passenger side inner fenderwell.
View attachment 1084578

The handheld lives in my console.
View attachment 1084579

To be clear, the harness that comes with the Sniper leaves a lot to be desired because it was most likely designed around a small block Camaro. NOTHING was good or easy about it, the wires were not long enough, the fuses and relay were all bunched together to just hang there on the firewall... my fuel pump relay is now under the dash.

If the people who designed the harness had a big block B body in their shop and tried to install one they would have been appalled at how close to impossible it is to make it work without resorting to doing outright stupid things.

I literally removed every wire from the connectors and started over from scratch so I could put stuff where I wanted it.

Same with the fast 2.0 system , wires were long enough , the throttle body to ecu being the worst in my opinion , and the ext. fuel pump wires had to be extended a little , which was no big deal .
The plug ins were all gm , and had to be changed to mopar , with exception of the headlight plug ins.
The throttle body needs a plug so a guy could unplug it when removing the intake and or heads , and lay it out of the way on a bench , with the ecu in the cab , have to lay the throttle body aside best I can , in which the wiring isnt long enough to really do that .
Had the wiring pretty neat , after rewiring the whole car , then decided to switch to the efi , now its a mess again, but works ----------
 
I spent a LOT of time trying to track down all the correct wiring and terminals. Holley does list some wiring stuff on their website but not nearly enough to build a new harness just ordering from them. I haven't looked recently so maybe they updated their offerings.

I found a lot of what I needed from here; https://www.eficonnection.com/ They sell pre-cut lengths of TXL wire. Was a good place to order from. I think I used Del City too.

I can't remember exactly where I found it but somewhere in the Sniper instructions there is a list of the wire gauges for the provided harness. I ended up making my own list using that as a template because I was so far away from what comes in the box. Obvious, bolded notes included.

To compound my problems while installing the Sniper, I was in the midst of re-wiring my entire car with an aftermarket wiring kit. My goal with both harnesses was to eliminate any extra wire and to integrate everything to make it all work like it was designed that way. Only so much you can eliminate from each. The 10-pin ECU connector is pretty useless unless you have A/C or electric fans which I don't. So basically there's this large, unused connector just laying there coiled up at the back of my intake. I hate stuff like that. Anyway...

Please don't take my list here as gospel. I don't know if I ended up using everything exactly because there were a couple things I had to re-do and may have wound up using different terminals or wire. Do your own homework but the list should at least give you a place to start.

Again, I'm not kidding when I say that I replaced every single wire in the useless, Holley supplied harness - not one, not 10, ALL of it. Maybe their product development team should think of a way to provide a non-terminated kit for the non-Chevy DIY types. Just a thought.

FYI, the 8 digit part numbers are from EFI connection.

Terminals
For main harness red 12ga. wire fuse holder connector
12033997 Metri-Pack 630 Series “pull to seat” Female Terminal, 12-10 ga.

7 pin female connector from TB to 40A 5 Pole fuel pump relay -
12084200 Metri-Pack 150 Series Female Terminal, 22-20 Ga.
20g Switched 12v Ignition Wire pink,
20g fuel pump relay trigger wire blue

20 ga. Pink Wire = 12V Switched - Should be connected to a switched +12 volt power source. Power source should only be active when the ignition is on. Make sure source has power when engine is cranking.

12 ga. Red Wire = Battery Positive – Connect directly to the battery post. This powers the Sniper EFI system.
12. ga Black Wire = Battery Negative – Connects directly to battery negative post.
20 ga. Blue Wire = +12v Fuel Pump Relay Power Output - Used to directly power the fuel pump (max current 15A). Make sure to terminate blue wire properly if not utilizing blue wire to provide power to the fuel pump.

For fuel pump relay female terminals
Delphi 12015865 Metri-Pack 630 Series Female Terminal with tang, 22-20 GA
Delphi 12084588-L Metri-Pack 630 Series Female Terminal with tang

16 ga. Pink wire from 3 way connector to switched 12v power

12g Main Battery Power Wire red
12g Main Battery Ground Wire black

20g Crank Signal Positive Wire purple
20g Crank Signal Negative Wire green

Cable seals
Blue seal 15324974, 12048087 for 1.70-1.29 mm wire
for 20 ga. Red switched 12v ignition box wire,
fuel pump relay to 7 pin connector blue & pink wires

Dark Red seal 15324973, 12048086 for 2.85-2.03 mm wire
for 16ga. pink switched 12v distributor wire

Can bus gauge module white w. blk. stripe signal wire pin
TYCO # 3-1447221-3

Where did you connect your 12V switched? I have mine on the drivers side of the Ballast resistor. I still need a spy for the Hyperspark.

So, how many miles did it take, before yours finally calibrated to your engine?
 
Same with the fast 2.0 system , wires were long enough , the throttle body to ecu being the worst in my opinion , and the ext. fuel pump wires had to be extended a little , which was no big deal .
The plug ins were all gm , and had to be changed to mopar , with exception of the headlight plug ins.
The throttle body needs a plug so a guy could unplug it when removing the intake and or heads , and lay it out of the way on a bench , with the ecu in the cab , have to lay the throttle body aside best I can , in which the wiring isnt long enough to really do that .
Had the wiring pretty neat , after rewiring the whole car , then decided to switch to the efi , now its a mess again, but works ----------


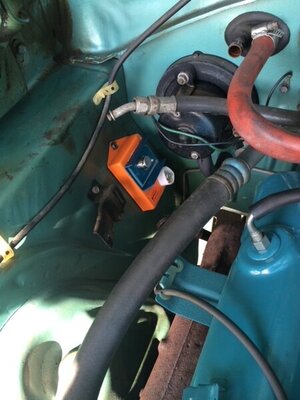
Great hiding spot, my Charger has a vacuum can there for the headlights.
 
Where did you connect your 12V switched? I have mine on the drivers side of the Ballast resistor. I still need a spy for the Hyperspark.

Guess I can sort of understand why you would attach the pink wire there since it's an easy spot but if it were me, I would ditch the ballast resistor completely. How are the ignition circuits tied together? The Sniper won't work unless IGN1 and IGN2 are tied together because it needs the full 12v in both crank and run. Does it work the way you have it now?

As for how I wired mine, I have an aftermarket wiring harness which has a switched ignition bus in the fuse box. All the Sniper components' pink wires are run through the firewall to dedicated taps on the bus. Ballast resistor is long gone.

So, how many miles did it take, before yours finally calibrated to your engine?

I don't think you can quantify self-tuning by how many miles it takes. I've had to restart the tuning process a few times due to various problems or changing something. Plus, I don't actually have an odometer so I couldn't say anyway!

A good rule of thumb to go by is when the values in the learn table are under 10 the tune is pretty good since it's not adding or subtracting large amounts of fuel. There will always be some values that are constantly updating due to weather compensation or other driving conditions so it will never be perfect.

Once you get to a steady point, the software allows you to limit the amount of learning to keep the tune in place. At that point you can save the GCF and base whatever your next steps would be off that or go back to it as a baseline if necessary. That whole concept took me a while to understand but it becomes pretty clear once you get there.

This is a screenshot of my learn table from the other day. It's pretty good save for the blue area just under 4,000 rpm where it wants more fuel so those values are higher. Frankly, the car does not spend a lot of time over that rpm so those areas have not really been populated beyond what's in in the configuration file base fuel table.

Overall it drives very well proven by the data logs which are fairly consistent and steady.
learn table.png
 
Where did you connect your 12V switched? I have mine on the drivers side of the Ballast resistor. I still need a spy for the Hyperspark.
I just did this today! I bypassed the ballast resistor. Connected the single blue wire with the blue/brown wire with a jumper wire that has an empty terminal. Then I had a 12v switched wire that went to the coil. I went a step further by adding a Pertronix 2001 relay for a clean 12v switched power wire that has 12v during crank and run. All that gave me good power for my pink wires from the Sniper ECU and Hyperspark distributor. Fired right up! Lots of good help on this forum!
 
I have an MSD 6AL mounted in place of the am radio in my Charger. Since my car was ordered sans radio, it is nicely hidden behind the radio delete plate. Also easily removeable through that opening if necessary.
 
Damn , reminds me of computer memory
 
The Holley Sniper ignition box is very similar to an MSD box the differences being the Holley has a slightly smaller footprint and uses a totally different wiring harness connector.
 
Auto Transport Service
Back
Top