• When you click on links to various merchants on this site and make a purchase, this can result in this site earning a commission. Affiliate programs and affiliations include, but are not limited to, the eBay Partner Network.

My charger restoration dream car

showard

Well-Known Member
Local time
3:40 AM
Joined
Aug 14, 2014
Messages
1,105
Reaction score
1,493
Location
Southern Utah
After many years of looking and saving I finaly found and bought the car that I have always wanted, a 1968 Dodge Charger. :hello2: I have owned it for 7 years and have slowly been working on restoring it. After seeing how much work is involved in restoring I have had many ask me why I don't just buy one already restored. It is the restoration process that I am fastinated with. I love to build and restore things. I have never done this before so I am learning as I go. I have been loving it. I have often looked on the internet for help and have found this site and the members very helpful.
I will be posting some of my processes that will hopefully help others and I plan on getting advice from anyone I can.

The car that I am restoring has sat without a windshield for over 20 years. Because of that it had some rust and cancer in the interior. I will start by posting some of the parts that I have been cleaning and refinishing.

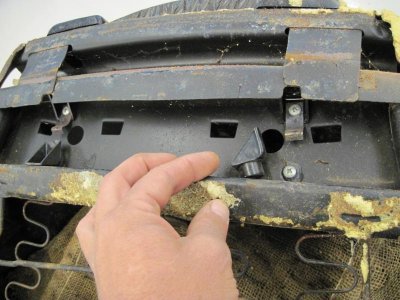
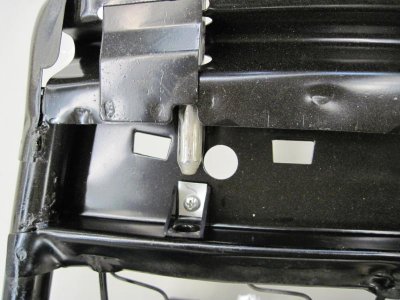
Here are my front bucket seats and some of the things that I had to do. passenger bucket seat 002.jpg

passenger bucket seat 006.jpg
After removing all of the upholstery I dismantled it and sandblasted it in my cabinet blaster. My seat frame was broken and split so I had to straighten it and weld it back together.
passenger bucket seat 008.jpg
I will add some more tomorrow.

passenger bucket seat 002.jpg passenger bucket seat 006.jpg passenger bucket seat 008.jpg
 
good luck on your build. when you get a chance, you should put up a couple pictures of the car as it sits.
 
Come on you can't start a 68 Charger restoration thread and only post a pic of a seat. More pics please.
 
Come on you can't start a 68 Charger restoration thread and only post a pic of a seat. More pics please.


You'r right.
I will get some pictures tomorrow.
 

Attachments

  • passenger bucket seat 004.jpg
    passenger bucket seat 004.jpg
    72 KB · Views: 2,066
  • IMG_0529.jpg
    IMG_0529.jpg
    67.8 KB · Views: 2,145
Looking forward to seeing the progress! I lurked for a long time before started posting any of my own, it's really helped me on both tips on how to do things right the first time as well as motivation to keep on keeping on.
 
On the previous pictures the lower plastic headrest guides were broken. I found I can buy new ones but they are expensive. I used a drilled piece of sheet metal to support the bracket.
 
I have been working on the seats right now so that is what was on my mind. Here are a couple pictures of my car and the progress that it is making.
68 charger 1.jpg
68 charger 4.jpg
105_3254.jpg
105_3276.jpg
 
...that beast is looking great already!
 
The driver side seat was in rough shape. The rear of the lower seat was rusted, the side rail was cracked and the outside spring was broken.
driver bucket seat 015.jpg
driver bucket seat 014.jpg
After sand blasting, cleaning it, and welding it Ibuilt some reinforcement for the back of the seat. For the broken spring I used a piece of spring from a doner seat and splinted the spring.
driver bucket seat 024.jpg
driver bucket seat 023.jpg

- - - Updated - - -

To sand blast and paint the springs I used a hack saw frame to stretch it.
passenger bucket seat 009.jpg
I cleaned the old grease and dirt out of the sliding rail barings with a solvent and re greased them for smooth sliding then I repainted all of the parts.
My front bucket seats are ready for upholstry now.
IMG_0530.jpg
Next I need to work on the bent rear seats.
 
This summer I spent a lot of time disassembling, taking pictures, storing, and logging all of the parts. I would lable or point to each part and take a picture of it. I would then bag the parts with a lable and a black & white print of the picture where the part was taken from. I know that when I start reassembling this car I will not remember where things go.
Here are a few of the pictures that I have taken.
68 in garage.jpg
This is the car's interior before taking it appart.
68 interior.jpg
I made note of all the thisng that would need to be fixed. This is a split in the sheet metal on the drivers side.
metal split.jpg
 
Here is the driver side window support. As you can see, I will need all new bushings and I need to do a lot of cleaning.
68 restorarion 013.jpg
 
Auto Transport Service
Back
Top