• When you click on links to various merchants on this site and make a purchase, this can result in this site earning a commission. Affiliate programs and affiliations include, but are not limited to, the eBay Partner Network.

Installing Sail Panels - 1971 Roadrunner

PlyGTXSat

Active Member
Local time
7:51 AM
Joined
Jan 11, 2019
Messages
34
Reaction score
0
Location
Huntsville
Hi Guys -


Redoing the interior of my Roadrunner and dont want to screw up my headliner but putting my sail panels in wrong. How do I go about putting them in right? Do you guys have any pictures of yours installed?
 
Sorry, I have a 73, similar but a little different. No pictures either. However, welcome aboard from NJ. I see you are down where the great electronics facility once was. Sad they are closed. You should always post first in the welcome wagon where you will be pestered to post pictures of your car. At any rate, I am sure that someone will chime in. Good Luck! :)
 
They cover the headliner but go under the trim and upper trim panel. Best pics I have. :welcome:

IMG_0092.JPG
IMG_0116.JPG
 
they are simply installed after headliner, sliding it over the quarter glass opening. It gets one screw on bottom of the "C" quarter glass opening ( down the quarter upper panel ). Then install the side headliner moldings and its screws ( it shares same attaching screw on top of the "C" opening ), rear package tray and rear glass trim... lower quarter panel and upper panel. That's the order.

Editing... A pillar panel must be installed too, to be able to install the headliner side moldings
 
Last edited:
they are simply installed after headliner, sliding it over the quarter glass opening. It gets one screw on bottom of the "C" quarter glass opening ( down the quarter upper panel ). Then install the side headliner moldings and its screws ( it shares same attaching screw on top of the "C" opening ), rear package tray and rear glass trim... lower quarter panel and upper panel. That's the order.

Editing... A pillar panel must be installed too, to be able to install the headliner side moldings
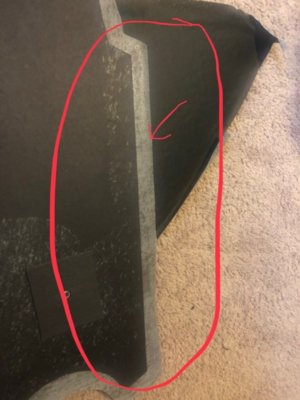
Okay but my concern is the upper flap that goes on top and meets the headliner. is this suppose to be glued to the headliner or cut off?

FullSizeRender.jpeg
 
they are simply installed after headliner, sliding it over the quarter glass opening. It gets one screw on bottom of the "C" quarter glass opening ( down the quarter upper panel ). Then install the side headliner moldings and its screws ( it shares same attaching screw on top of the "C" opening ), rear package tray and rear glass trim... lower quarter panel and upper panel. That's the order.

Editing... A pillar panel must be installed too, to be able to install the headliner side moldings
Okay but my concern is the upper flap that goes on top and meets the headliner. is this suppose to be glued to the headliner or cut off?
 
Oh God!!! did you bought one of those repro panels? forgett it! I'm talking about originals... those repros doesn't worth a $hItT. Retunr it and get your money back!!!

I can't understand how a manufacturer ( and vendors ) gets the courage to sell those as a sail panel replacement!
 
Oh God!!! did you bought one of those repro panels? forgett it! I'm talking about originals... those repros doesn't worth a $hItT
Yes I did. Any advice for getting them to work? Dont really have the originals.
 
edited the previous reply:


Return it and get your money back!!!

I can't understand how a manufacturer ( and vendors ) gets the courage to sell those as a sail panel replacement!

I can't tell you how to make it work!!! never have had them in hands, but I know from the distance they don't work! will leave a HUGE gap around the glass, where the weatherstrip should be attached
 
Last edited:
They just could work if you still have in hands the old panel and cut the curved area what folds against the glass attaching it to that panel you got!
 
Last edited:
Try to find some originals. You can place an ad on the WTB section. Good luck
 
Nice originals are out there and not too expensive.

...and black is the easiest color to dye to if necessary.
 
Nacho, the cloth panels use a metal banana-shaped piece that bridges the gap. You are supposed to reuse your originals. I do not know what controlled which cars got the full vinyl panels vs. the cloth panels.

It's possible you could use the metal pieces from a 71-72 plymouth. I have a set of each but haven't compared the shape. I know the 73-74 Charger pieces are thicker with a slightly different grain pattern but the curve seemed very close.

It's hard to tell from the pics in the link but I think there may be a metal trim on the passenger side where the cloth panel isn't fitting up to it properly. If so, it's also possible that the cloth sail panels are the same part for both 71/72 plymouth and 73/74 Charger (using the same shape but different grain), causing the issue. You could trim them to fit but that might leave you short on the glass end. I wish I saved my old ones for a pattern now.
 
Last edited:
I'm looking at Classic's website. Basically they have one board for 71-74 plymouth and another 71-74 Charger. Obviously we know that isn't right but it's possible that the plymouth boards would be a better fit in a 73/74 Charger. I'm at a loss to think of what the Charger boards would actually fit - they can't possibly fit 71/72 or 72 SE, and if they don't fit 73/74 then they are just useless.
 
Ok, my panel is hard plastic, one piece from end to end, is not cloth or vinyl!
 
Auto Transport Service
Back
Top