• When you click on links to various merchants on this site and make a purchase, this can result in this site earning a commission. Affiliate programs and affiliations include, but are not limited to, the eBay Partner Network.

5.7 Hemi Engine swap on 70 RR (Project)

Darius - great build. I just went through your entire build thread, congrats with sticking with it and seeing it through.
 
Not trying to hijack this thread but I offer my build thread for those who have not seen it and are anticipating this swap. 5.7/NAG1 plus into a '70 GTX.
https://www.forbbodiesonly.com/moparforum/threads/b-body-stiffening.1121/
Your thread was amazing (read all 20 pages). I have done a few mopars and learned that you have to start with a good body. Was lucky with this one - no rust. You did a lot of work that I'm glad I not doing. I loved you interior work (truly amazing), and your work on the frame rails has convince me to install some on this project. The struggles you experienced are similar as it seems everything is custom, but I believe it's important to document - some other nut is going to do this and this documentation may help. Like you the money is adding up and the time is no charge - because it keeps me busy and I love doing it.
 
Update; Really no custom/conversion work to talk about. Presently doing the back brakes - hoses, new lines, actually new everything. Interesting part was the previous brake job - what a mess - the cable that manages the brake adjuster was cut out and the emergency brake rod was missing. It amazes me - these cars go and the stock brakes are already suspect - have to make them as good as possible. Also got sick of dealing with "Strange Engineering" to make me a drive shaft - messed with them for over a month and they were just difficult to do business - finally gave up. I looked on ebay and found this guy yesterday - I sent him a few video's with measurements and talk to him on the phone - he made it this morning and sent it to me today. If you need a driveshaft give him a call - 832-289-9495 (it was so easy). Put the 10" Cregars on the back with 8" on the front - really looks good.
 
Not much done over the holiday's. My wife bought me a "vintage air" for the RR - (I going to be cool). Also bought myself something for Christmas - had my air grabber custom painted. Came out great - done by Travis at Shine Custom Paint in Rice, MN. (3202916070). Good people and easy to work with..... Fantastic job, thanks Travis

air grabber.JPG
 
Not much done over the holiday's. My wife bought me a "vintage air" for the RR - (I going to be cool). Also bought myself something for Christmas - had my air grabber custom painted. Came out great - done by Travis at Shine Custom Paint in Rice, MN. (3202916070). Good people and easy to work with..... Fantastic job, thanks Travis

View attachment 699402
Very cool !!!!! ( the custom paint job, not just the vintage air )
 
Vintage air - lots of bolts, nuts and hoses but I don't think it going to be to bad. Was missing a few parts from the order and talked with VA folks - they seem like good folks. I noticed on u-tube that nobody has documented a 70 RR build (because I had questions) even though VA specifically makes a "surefit" package for the 70 RR. Anyway they asked me to document the build and add to u-tube for others. Will add links here ASA I get things done. It will be cool to have AC (first for me), especially here in Texas.
 
Installing the Vintage Air parts 1,2,3,4,5,6,7 ;


https://youtu.be/i_ePl0wDYYI
https://youtu.be/rDNV0MWRWXo


Still messing with things. The AC is almost done still have to install grills and hoses and charge system. My windshield wiper motor was bad so I don't want to install anything under dash until I replace motor. And the price they want for wiper motor (ridiculous) - see some for 300, 400 and up to 800 for the "show quality" shiny ones (did I already say ridiculous). I did find the same motor I believe for a 73 Fury from Summit for 60
https://www.summitracing.com/parts/...MI556V2-H_4AIVFHrBCh3cAwTREAEYASABEgLsIPD_BwE
but they don't have any. Did find one in the country (Denver) from Carquest for 80, but it's better that 400.
Every-time I buy parts for a mopar I feel like I'm being robbed. But if you look around you can save a bunch, for example I needed some new defroster hoses for my SB - just a couple of cloth hoses - 70 bucks. Found them at;
https://www.oldairproducts.com/products?keyword=heater hose&mainc=
for 17 (insane).
Enough of my bitching - the good news is all my lights work and while I was messing with the wiper motor my screw driver accidentally hit the starter relay and it turned over (glad it wasn't in gear). More to follow someday soon...
 
Ok, ready to start. Turned the key and the starter turn on but didn't engage the flywheel. Investigated if I had the wrong starter but don't think so. After talking to a few folks there is apparently two flywheels for the 5.7 one where the ring gear is on the tranny side and one with the ring gear on the engine side. Mind is on the tranny side so my question is, do I have the replace the flywheel or is there a starter that will work for the flywheel I have in the car, with the starter being on the passenger side? Anyone run into this? Help
 
Ok, ready to start. Turned the key and the starter turn on but didn't engage the flywheel. Investigated if I had the wrong starter but don't think so. After talking to a few folks there is apparently two flywheels for the 5.7 one where the ring gear is on the tranny side and one with the ring gear on the engine side. Mind is on the tranny side so my question is, do I have the replace the flywheel or is there a starter that will work for the flywheel I have in the car, with the starter being on the passenger side? Anyone run into this? Help
Well got my answer from Holly/Quicktime. There are two flywheels for the 5.7 and most likely the 6.1 and 6.4. The trucks motors have the starters on the drivers side and the ring gear on the flywheel is on the side of the tranny. Car motors have starter on passenger side and the ring gear is towards the motor. Make sure you check this because the crate motor that I have has the truck flywheel, and I have the "8076" bell housing which puts the starter on the passenger side. This is very important because it all bolts together and everything looks great until you try and start it. Now I have to take it all apart and replace the flywheel - what a bummer....
 
Ok, put the new flywheel on with the ring gear towards the motor - turns right over. Put the drive shaft on and bled the brakes - ready to put it on the trailer to get the pipes put on - don't want to start without pipes - may spit fire everywhere.
 
Haven't updated in a while but go out and try to do at least one thing a day on the RR (when Im home).
I finished putting in the vintage air duct work - all plastic crap - would of be a little nicer if they chromed the vents - oh well, it is what it is - blows air!!
6135.JPG
6135.JPG
61310.JPG


Pictures also show the gear shift - it came out OK. I got an extra large boot and riveted it into floor - though maybe screws would hit the tranny. I had to cut and modify the original gear shift (with off setting holes) to make it work. But it feels great - has a tight ratio and shifting from 1st to 2nd is like 4 inches - should be quick. The interior is stock but is coming out good.

6136.JPG

6138.JPG


6139.JPG

61315.JPG


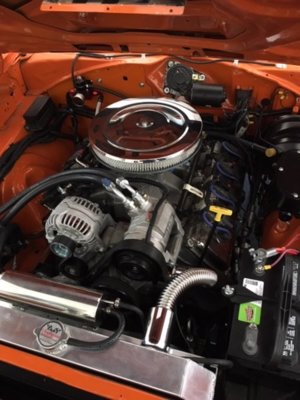
The engine bay is done, but I need to put it on the trailer and get some pipes put on before starting.

6134.JPG


I had nowhere to mount the catch can so I mounted it on the fan housing sideways - hope it doesn't leak. 61313.JPG
 
Ok, my next big test is to try an put the air grabber on - don't think it's going to happen. I going to have to butcher the crap out of the existing piece that goes over the old air cleaner. All I need are the parts that open the door. This is going to be a challenge. Already had to move my catch can as it was in the way of the vacuum canister. I'd asked for suggestions but don't know if anyone has ever done one.

61311.JPG


61312.JPG


It's going to be tight.
One thing I pick up a few weeks ago were some wheel dollies. Makes it nice to move the car around the garage.

61314.JPG


More updates to follow - it's getting there!

61316.JPG
 
For my 69 Air Grabber I had to shorten the center duct and cut pie pieces out of each side ducts. Then the air cleaner base funnel had to be cut out and re-centered because the carb in in a different place front to rear. I had to remove parts of the front edge of the base plate and make another front edge and then replaced the Dodge compressor with a Sandin so the lines would clear. Also took 3 different voltage regulators to get the positive terminal away from the air cleaner base. Mine works, just without any extra room. I have the MP intake.
 
For my 69 Air Grabber I had to shorten the center duct and cut pie pieces out of each side ducts. Then the air cleaner base funnel had to be cut out and re-centered because the carb in in a different place front to rear. I had to remove parts of the front edge of the base plate and make another front edge and then replaced the Dodge compressor with a Sandin so the lines would clear. Also took 3 different voltage regulators to get the positive terminal away from the air cleaner base. Mine works, just without any extra room. I have the MP intake.
Hey, someone has done it. Would be nice to see a picture of what you did - might help me along..
 
I am in the middle of fixing a screw-up I didn't see until it was riveted back underneath the hood. When we were flaring the rivets we did one duct with the rivets facing the wrong direction and had to remove it, grind the "claws" off the rivets and am now fixing all the damaged holes so I can repaint and flare the new rivets hopefully the right direction this time.

Spent a full week modifying the duct-work with Fiberglas. The "Air Grabber" decal just fits.

I cut 2"+ off the horn and 1-1/4" from the front of the base and it just kisses the alternator and compressor. The brace that bolts to the carb across the top had to be remade since the center moves 3/4". We rolled some flat stock to make a circle that sits like a spacer between the base plate and the EFI and welded it on. I was lucky and still had my other Runner to compare location and the height of the top of the carburetor.

I will take some pictures before the base goes to the powdercoat shop.
 
Took the RR down to the muffler shop this morning, waiting for them to call so I can pick it up - it's a bitch taking it on and off trailer without power. Installing 2.5" pipes to turbo mufflers with an x pipe - should be kind of quite. Going to throw some gas in it on the way home. Have to make some adjustments for fuel pressured, and have to make sure wires and hoses are not touching pipes, but I'm going to start this bitch up....
Should have some pictures this evening - I'm excited....
 
Got the car home and after priming the fuel pump the car start right up, and ran great. Tried to adjust fuel regulator and couldn't get it down to 52psi, couldn't get it down under 100 psi to rails - no good. I watched a few videos to see if I had it hooked up wrong and even put the hoses in the opposite direction. I got in touch with the manufacture of the regulator and they are going to send a new one - should get it in a few days. Other problems - the power steering pump started winding - had to fill a few times but seem to be good. Underneath car now making sure nothing is touching pipes - need to reroute speedometer cable as it just started melting, and the air shock hoses.. Transmission wasn't shifting well so I pumped the clutch and found air - seems to be working now. Won't know until I get the new regulator. The air filter is hitting the accelerator and making it stick - going to have to take a hammer after it! Going to have some demons but it's almost there - seems like lots of power. Can't wait to drive it.
reg1.JPG
reg2.JPG
reg3.JPG
 
Auto Transport Service
Back
Top