I mounted the retractor on the diagonal bracing with a big a$$ seat belt washer and grade 8 hardware. I figure if that doesn't hold in an accident, then it was so bad that no one would have survived anyway.I'm curious if the package tray is where the retractors get hidden. If so, I'd think that additional reinforcements would be necessary.
You are using an out of date browser. It may not display this or other websites correctly.
You should upgrade or use an alternative browser.
You should upgrade or use an alternative browser.
Rear shoulder belts in a 1970 Charger
- Thread starter Kern Dog
- Start date
furious70
Well-Known Member
I welded it to that brace in my carsI mounted the retractor on the diagonal bracing with a big a$$ seat belt washer and grade 8 hardware. I figure if that doesn't hold in an accident, then it was so bad that no one would have survived anyway.
Coelacanth
Well-Known Member
- Local time
- 10:48 PM
- Joined
- May 10, 2024
- Messages
- 2,062
- Reaction score
- 3,516
- Location
- Edmonton, Alberta, Canada
I'd be interested to see your (or someone's) setup that added back seat shoulder belts. I see those slots on my '70 Charger and it would be nice to add the extra safety for the rear passengers. What retractors and belts did you install?I mounted the retractor on the diagonal bracing with a big a$$ seat belt washer and grade 8 hardware. I figure if that doesn't hold in an accident, then it was so bad that no one would have survived anyway.
- Local time
- 9:48 PM
- Joined
- Apr 13, 2012
- Messages
- 41,135
- Reaction score
- 148,611
- Location
- Granite Bay CA
I'm curious if the package tray is where the retractors get hidden. If so, I'd think that additional reinforcements would be necessary.
I copied your pictures:I mounted the retractor on the diagonal bracing with a big a$$ seat belt washer and grade 8 hardware. I figure if that doesn't hold in an accident, then it was so bad that no one would have survived anyway.
I see here that the mounting position is square with the opening in the package tray.
- Local time
- 9:48 PM
- Joined
- Apr 13, 2012
- Messages
- 41,135
- Reaction score
- 148,611
- Location
- Granite Bay CA
I am curious as to HOW the seat belts are installed.
Bolting up a retractor is the easy part. The hard part is how do you get a belt through the horizontal slot when both ends of the belt have something attached to it? On one end is the retractor mechanism. On the other is the metal end that attaches to an anchor in the floor of the car. In between you have the buckle itself. I can't see how the belt can go through the package tray with the buckle in place.
Bolting up a retractor is the easy part. The hard part is how do you get a belt through the horizontal slot when both ends of the belt have something attached to it? On one end is the retractor mechanism. On the other is the metal end that attaches to an anchor in the floor of the car. In between you have the buckle itself. I can't see how the belt can go through the package tray with the buckle in place.
They are on my build thread referenced in post #9 on this thread: Rear shoulder belts in a 1970 ChargerI'd be interested to see your (or someone's) setup that added back seat shoulder belts. I see those slots on my '70 Charger and it would be nice to add the extra safety for the rear passengers. What retractors and belts did you install?
Kern Dog also pasted them above.
My process was this:I am curious as to HOW the seat belts are installed.
Bolting up a retractor is the easy part. The hard part is how do you get a belt through the horizontal slot when both ends of the belt have something attached to it? On one end is the retractor mechanism. On the other is the metal end that attaches to an anchor in the floor of the car. In between you have the buckle itself. I can't see how the belt can go through the package tray with the buckle in place.
1) First feed the metal end that attaches to the floor through the slot (work from under the package tray).
2) Feed the buckle through the slot. It's been 10 years, but I think turning it sideways and wiggling it worked fine.
3) Attach the retractor.
4) Move to the back seat area and bolt down the belt.
Coelacanth
Well-Known Member
- Local time
- 10:48 PM
- Joined
- May 10, 2024
- Messages
- 2,062
- Reaction score
- 3,516
- Location
- Edmonton, Alberta, Canada
Thanks HawkRod, I missed some of that detail. What seatbelts did you use? Also, I like the detail of adding the plastic trim inside the seatbelt holes, what did you use for that?

This was 10, almost 11 years ago. I believe the seatbelts were from SeatbeltPlanet, but there really was nothing special about the seat belts. I think any retrofit seat belt will work. I did cut off the bracket that normally connects the belt to the roof of the car, as this is not needed for the rear belts.Thanks HawkRod, I missed some of that detail. What seatbelts did you use? Also, I like the detail of adding the plastic trim inside the seatbelt holes, what did you use for that?
View attachment 1930484
The little trim piece? Unfortunately I do not recall where I got it, but likely from a seat belt manufacturer like SeatbeltPlanet.
Please note: I do not specifically endorse (or not endorse) SeatbeltPlanet. This is my recollection of where I got mine from, but as stated, I think almost any reputable vendor will work.
I can likel get additional pictures of my rear seat belts in the next couple of days if people need - I am just not in a position at the moment to take anything apart as I have just had eye surgery and need to "lay low" for a couple of weeks.
- Local time
- 9:48 PM
- Joined
- Apr 13, 2012
- Messages
- 41,135
- Reaction score
- 148,611
- Location
- Granite Bay CA
A few observations after some "hands on" stuff today:I am curious as to HOW the seat belts are installed.
Bolting up a retractor is the easy part. The hard part is how do you get a belt through the horizontal slot when both ends of the belt have something attached to it? On one end is the retractor mechanism. On the other is the metal end that attaches to an anchor in the floor of the car. In between you have the buckle itself. I can't see how the belt can go through the package tray with the buckle in place.
The Chrysler 300, Dodge Challenger and Charger models all have similar, if not identical rear seat belt arrangements. The outer retractors do attach to the C pillar, the anchor is in the floor.
After removal and inspection, it appears that these can be mounted parallel with the body of the car or perpendicular, side to side.
What really matters is that they are mounted true plumb/vertical.. They cannot be at any angle or the belts lock up. These are inertia locked so as long as the retractor frame is mounted in a true vertical position, the belt moves freely and then only locks when the belt goes out really fast, as in a collision.
For $45 per side, these might work with minimal work. The mounting position might be just like these:
...But since the seat back does have a rearward lean/tilt, I'll have to make a wedge shaped mounting bracket to get the mounting surface to be plumb and vertical. The seat belts we got today would lock in the position shown above. They really are sensitive to being out of plumb.
A side note....
Most people tend to use the word level when referring to angles. That is not correct. For an example, when a pole is perfectly upright, it is not "level", it is Plumb. Tradesmen, construction guys know this but many people do not. I use terms that were what we used in wood framing jobs.
Todays efforts were part "fact finding" and parts collection. We are going to do this mod in Rich's 69 Coronet first. I will follow with my Ginger and Jigsaw Chargers.
CoronetDarter
Well-Known Member
Retractable rear shoulder belts
Greg met me at Pick n Pull this morning and we had a productive venture. I was looking for rear shoulder belts out of a Charger/300/Challenger, and PnP had several Chargers and 300s to choose from, but no Challys. No matter, all three models use the exact same restraints. The removal is straightforward; remove the seat cushions, and then the plastic cladding going up the C pillars. The retractors are bolted in with T50 torx bolts; the receivers are a regular 17mm or 18mm socket.
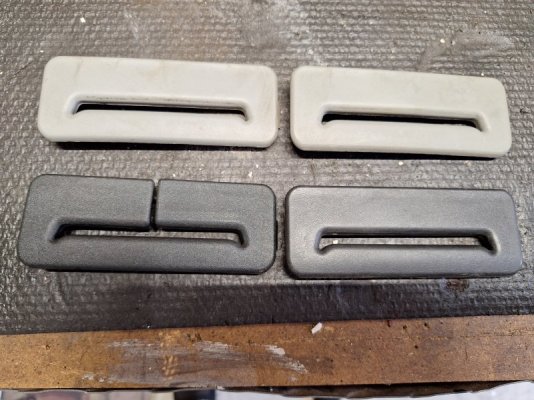
For $110, we got the retractor, receivers and plastic belt guides. The red buttons match the Motorsports XV front shoulder belts.
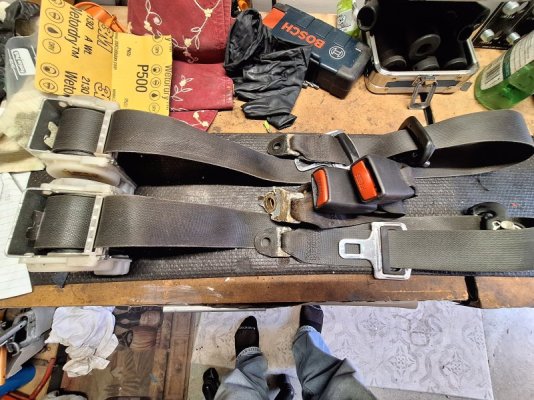
I'm saving the two grey guides in case I want to install shoulder belts in the Dart. I'll paint them SEM Landau Black.
We found something interesting on the retractors. Right and Left are the same part number. They bolt perpendicular to the C pillar; when we removed them and started testing them, the belts locked in placed and would not extend. Took a few seconds to realize that the unit has to be perpendicular, +/- maybe 10 - 15° fore and aft, otherwise they lock in place. Obviously a safety mechanism in case of a rollover.
Perpendicular, belt extends.
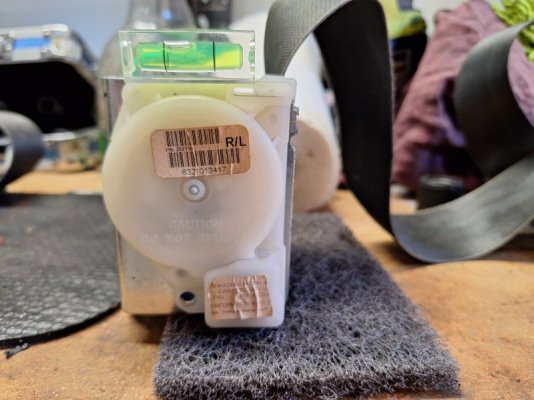
Tilted forward a few degrees, the belt still extends.
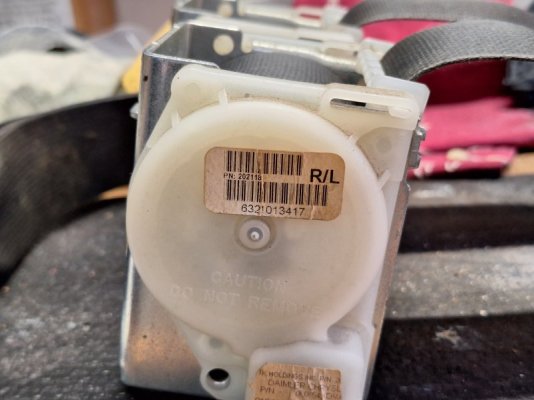
Tilted back several degrees the belt extends.
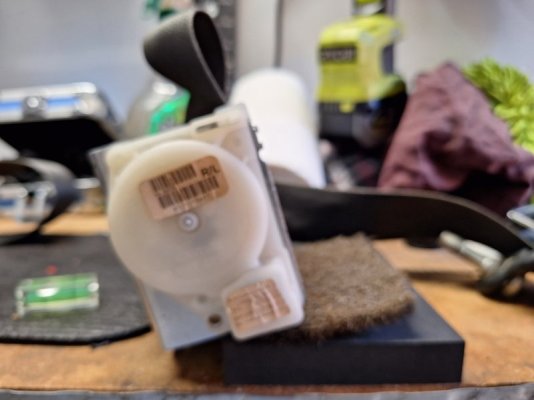
I had to physically tilt it backwards this far before the retractor dug in.
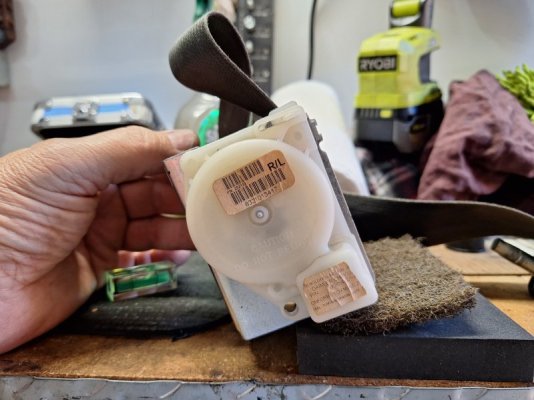
This isn't scientific, but it proves that there's some wiggle room to mounting the unit. I'd like to mount the units in roughly the same vicinity that Hawk mounted his. This is the mounting face:
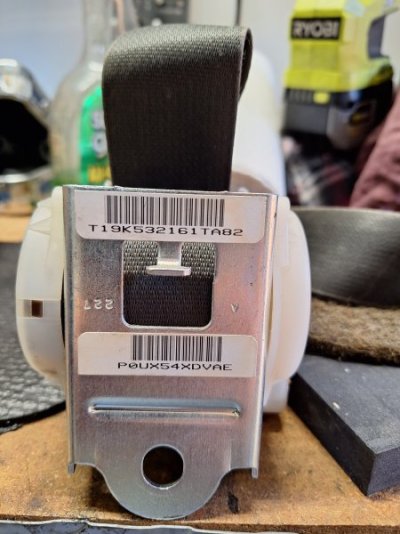 I'll mock it up and continue adding shims until the retractor finds its happy spot. First they need a deep cleaning, and then possibly some Rit black dye.
Greg met me at Pick n Pull this morning and we had a productive venture. I was looking for rear shoulder belts out of a Charger/300/Challenger, and PnP had several Chargers and 300s to choose from, but no Challys. No matter, all three models use the exact same restraints. The removal is straightforward; remove the seat cushions, and then the plastic cladding going up the C pillars. The retractors are bolted in with T50 torx bolts; the receivers are a regular 17mm or 18mm socket.
For $110, we got the retractor, receivers and plastic belt guides. The red buttons match the Motorsports XV front shoulder belts.

I'm saving the two grey guides in case I want to install shoulder belts in the Dart. I'll paint them SEM Landau Black.

We found something interesting on the retractors. Right and Left are the same part number. They bolt perpendicular to the C pillar; when we removed them and started testing them, the belts locked in placed and would not extend. Took a few seconds to realize that the unit has to be perpendicular, +/- maybe 10 - 15° fore and aft, otherwise they lock in place. Obviously a safety mechanism in case of a rollover.
Perpendicular, belt extends.

Tilted forward a few degrees, the belt still extends.

Tilted back several degrees the belt extends.

I had to physically tilt it backwards this far before the retractor dug in.

This isn't scientific, but it proves that there's some wiggle room to mounting the unit. I'd like to mount the units in roughly the same vicinity that Hawk mounted his. This is the mounting face:
 I'll mock it up and continue adding shims until the retractor finds its happy spot. First they need a deep cleaning, and then possibly some Rit black dye.
CoronetDarter
Well-Known Member
Greg, just saw your post. While we were at the junkyard, it did appear that the retractors had to be perfectly plumb to work. After I got home and started playing with them, I found that there is a little wiggle room.A few observations after some "hands on" stuff today:
The Chrysler 300, Dodge Challenger and Charger models all have similar, if not identical rear seat belt arrangements. The outer retractors do attach to the C pillar, the anchor is in the floor.
After removal and inspection, it appears that these can be mounted parallel with the body of the car or perpendicular, side to side.
What really matters is that they are mounted true plumb/vertical.. They cannot be at any angle or the belts lock up. These are inertia locked so as long as the retractor frame is mounted in a true vertical position, the belt moves freely and then only locks when the belt goes out really fast, as in a collision.
For $45 per side, these might work with minimal work. The mounting position might be just like these:
...But since the seat back does have a rearward lean/tilt, I'll have to make a wedge shaped mounting bracket to get the mounting surface to be plumb and vertical. The seat belts we got today would lock in the position shown above. They really are sensitive to being out of plumb.
A side note....
Most people tend to use the word level when referring to angles. That is not correct. For an example, when a pole is perfectly upright, it is not "level", it is Plumb. Tradesmen, construction guys know this but many people do not. I use terms that were what we used in wood framing jobs.
Todays efforts were part "fact finding" and parts collection. We are going to do this mod in Rich's 69 Coronet first. I will follow with my Ginger and Jigsaw Chargers.
Here is what I did in my Coronet for rear shoulder belts. I used the 3 point conversion belts from SeatBeltsPlus at the link below. But I had them customize them so they would work for the rear. I ordered the customized belts for the rear from them in November 2024. At that time, the customized belts were $208 for the pair. At the same time last year, the belts at the link below were either $289 or $299.
1968-70 Mopar B Body Seat Belts - 3 Point Conversion - Bucket Seats
The part that the belt slides through for where it would typically mount at the roof for the front seat, I had them just use one of the small oval pieces that the belt slides through, like in the picture below.

I attached this oval piece exactly over the slot in the rear deck. This way when the belt is pulled out, it rides against the smooth oval piece instead of the slot in the rear deck. It does hold the rear package tray up slightly more than the insulation, but nothing that is noticeable when the seat is installed.

The retractor which SeatBeltsPlus use locks via inertia. I mounted the retractors to the bottom of the rear deck. After the belts were mounted, I tested them a few times by giving a quick tug on the belt and only about 1-2" would come out before the lock engages. Also before I mounted them, I added 1/8" thick steel to the bottom of the rear deck for some added strength. The retractors are located so the part where the belt exits is centered in the rear deck slot. I did this so that it couldn't rub on the rear deck and tear up the belt.

Where I cut the rear package tray for the belts to come through, I used plastic trim pieces from a Subaru WRX. They are black, pretty small and clip nicely into the rear deck. Here is a link to them.
https://parts.subaruonlineparts.com...pMJ7926NDzrXdW-W19AB7ZQ5cxBJNWqjEO-ANSuKpT9dM

1968-70 Mopar B Body Seat Belts - 3 Point Conversion - Bucket Seats
The part that the belt slides through for where it would typically mount at the roof for the front seat, I had them just use one of the small oval pieces that the belt slides through, like in the picture below.
I attached this oval piece exactly over the slot in the rear deck. This way when the belt is pulled out, it rides against the smooth oval piece instead of the slot in the rear deck. It does hold the rear package tray up slightly more than the insulation, but nothing that is noticeable when the seat is installed.
The retractor which SeatBeltsPlus use locks via inertia. I mounted the retractors to the bottom of the rear deck. After the belts were mounted, I tested them a few times by giving a quick tug on the belt and only about 1-2" would come out before the lock engages. Also before I mounted them, I added 1/8" thick steel to the bottom of the rear deck for some added strength. The retractors are located so the part where the belt exits is centered in the rear deck slot. I did this so that it couldn't rub on the rear deck and tear up the belt.
Where I cut the rear package tray for the belts to come through, I used plastic trim pieces from a Subaru WRX. They are black, pretty small and clip nicely into the rear deck. Here is a link to them.
https://parts.subaruonlineparts.com...pMJ7926NDzrXdW-W19AB7ZQ5cxBJNWqjEO-ANSuKpT9dM
CoronetDarter
Well-Known Member
Child seat LATCH hold down
Securing child seats was the first objective, with the rear should belt install a natural extension. I can count on one hand the number of times that adults have sat in the back seat of the Coronet in the last 10 years. But as I've mentioned, my granddaughters love being driven around in the Coronet. And even though its only around town and I don't jump on it (except for when they ask), their seats are only held in by the seat belts.
Dodge sells the LATCH hooks separately; $8.50 ea.
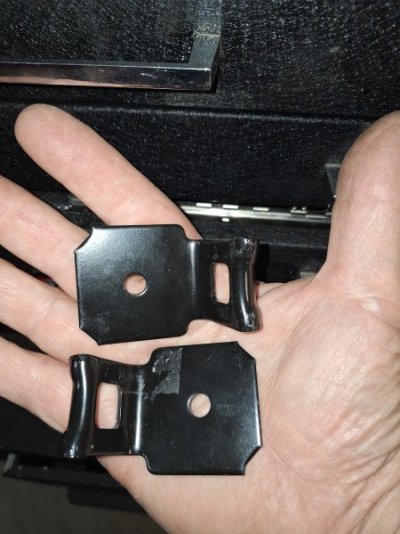
Even though there's a drilled hole, we saw today that Chrysler slips the mounting tab into a "pocket" in the package tray and it's spot welded. There's a corresponding hole in the package tray that lines up with the bracket, but its unused.
The quickest, easiest solution in the Coronet would be to line up the bracket, drill a hole in the package tray and secure them with Grade 8 bolts. I could even tack weld the corners, if I can figure out a way not to burn down my interior. Naturally, I would first remove the seat cushions and package tray cover.
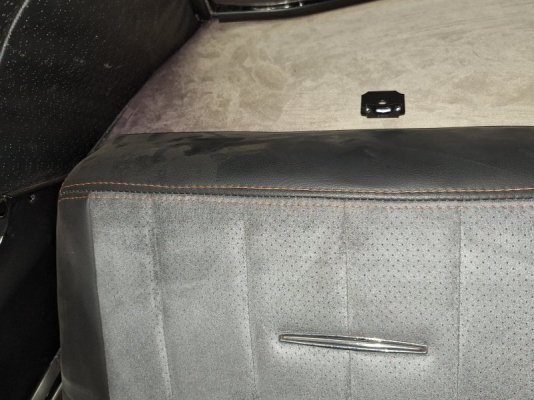
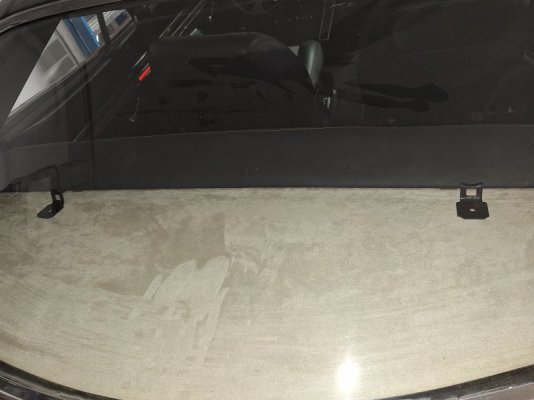
But the masochist in me tends to over think things and over-engineer pieces that don't need barely a second thought. The Chargers, 300s, Challengers have pre-formed package tray covers that rise above the metal package tray to hide the accessories. With the cover in place, the latch brackets are beneath and accessed by flipping the lid of the plastic escutcheon (thanks to Greg for bringing up that word today). I bought 3 escutcheons on Ebay, and grabbed 3 more today. The problem is, on a flat surface the latch bracket protrudes above the face by about 1/2". I need to find some MDF board, or equivalent, to raise the cover high enough to close over the bracket.
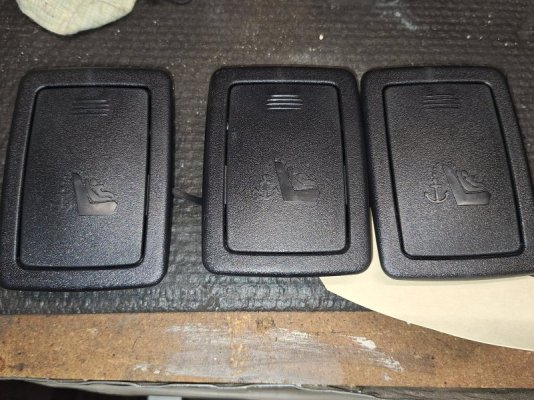
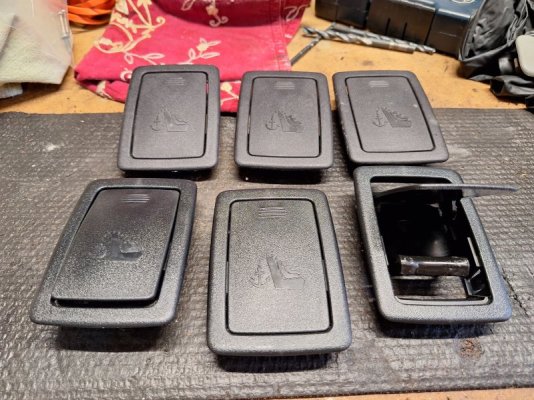
Any suggestions on what type of material to use to cover the package tray? And then I still need to find a material (suede, vinyl) to wrap over the cover for a finished look.
Securing child seats was the first objective, with the rear should belt install a natural extension. I can count on one hand the number of times that adults have sat in the back seat of the Coronet in the last 10 years. But as I've mentioned, my granddaughters love being driven around in the Coronet. And even though its only around town and I don't jump on it (except for when they ask), their seats are only held in by the seat belts.
Dodge sells the LATCH hooks separately; $8.50 ea.

Even though there's a drilled hole, we saw today that Chrysler slips the mounting tab into a "pocket" in the package tray and it's spot welded. There's a corresponding hole in the package tray that lines up with the bracket, but its unused.
The quickest, easiest solution in the Coronet would be to line up the bracket, drill a hole in the package tray and secure them with Grade 8 bolts. I could even tack weld the corners, if I can figure out a way not to burn down my interior. Naturally, I would first remove the seat cushions and package tray cover.


But the masochist in me tends to over think things and over-engineer pieces that don't need barely a second thought. The Chargers, 300s, Challengers have pre-formed package tray covers that rise above the metal package tray to hide the accessories. With the cover in place, the latch brackets are beneath and accessed by flipping the lid of the plastic escutcheon (thanks to Greg for bringing up that word today). I bought 3 escutcheons on Ebay, and grabbed 3 more today. The problem is, on a flat surface the latch bracket protrudes above the face by about 1/2". I need to find some MDF board, or equivalent, to raise the cover high enough to close over the bracket.


Any suggestions on what type of material to use to cover the package tray? And then I still need to find a material (suede, vinyl) to wrap over the cover for a finished look.
CoronetDarter
Well-Known Member
That is a nice, clean install. The advantage to using an aftermarket company is that the seat belt clasps are original looking. I like that your retractor is mounted directly underneath the package tray. The units I got today won't work in that position.Here is what I did in my Coronet for rear shoulder belts. I used the 3 point conversion belts from SeatBeltsPlus at the link below. But I had them customize them so they would work for the rear. I ordered the customized belts for the rear from them in November 2024. At that time, the customized belts were $208 for the pair. At the same time last year, the belts at the link below were either $289 or $299.
1968-70 Mopar B Body Seat Belts - 3 Point Conversion - Bucket Seats
The part that the belt slides through for where it would typically mount at the roof for the front seat, I had them just use one of the small oval pieces that the belt slides through, like in the picture below.
View attachment 1930852
I attached this oval piece exactly over the slot in the rear deck. This way when the belt is pulled out, it rides against the smooth oval piece instead of the slot in the rear deck. It does hold the rear package tray up slightly more than the insulation, but nothing that is noticeable when the seat is installed.
The retractor which SeatBeltsPlus use locks via inertia. I mounted the retractors to the bottom of the rear deck. After the belts were mounted, I tested them a few times by giving a quick tug on the belt and only about 1-2" would come out before the lock engages. Also before I mounted them, I added 1/8" thick steel to the bottom of the rear deck for some added strength. The retractors are located so the part where the belt exits is centered in the rear deck slot. I did this so that it couldn't rub on the rear deck and tear up the belt.
View attachment 1930856
Where I cut the rear package tray for the belts to come through, I used plastic trim pieces from a Subaru WRX. They are black, pretty small and clip nicely into the rear deck. Here is a link to them.
https://parts.subaruonlineparts.com...pMJ7926NDzrXdW-W19AB7ZQ5cxBJNWqjEO-ANSuKpT9dM
View attachment 1930858
- Local time
- 9:48 PM
- Joined
- Apr 13, 2012
- Messages
- 41,135
- Reaction score
- 148,611
- Location
- Granite Bay CA
Maybe they can if we make brackets to mount them that way. (Sort of)The units I got today won't work in that position.
Metal. Welder. Grinder. We can do it. We can make a cage to mount the retractor to the underside of the package tray.
CoronetDarter
Well-Known Member
Definitely we can look at the different mounting points.Maybe they can if we make brackets to mount them that way. (Sort of)
Metal. Welder. Grinder. We can do it. We can make a cage to mount the retractor to the underside of the package tray.
You guys do nice work! I like the idea of rear seat belts. Anyone ever consider installing a door beam for side impact strength? If you have the doors gutted for work is it worth it? Also anyone have have any ideas on shoulder belts for a b body convertible that would look good/ stock appearing? Just spitballing
Some great discussion and pictures above. A couple of points to add to the discussion:
1) Regarding vertical alignment of the retractor:
Mine seem to work on the principal that a rapid belt movement locks them. Per my recollection, they did not seem to be sensitive to vertical alignment. I can say that as mounted, they have worked very well. The only requirement for both front and rear belts in my car is that you need to pull them out SLOWLY to put them on. I've learnt this now, but new passengers often lock the belts trying to put them on.
2) Regarding the installation done by @Toxic Orange 493 :
This is a nice clean install, and I really like how the retractor is mounted right below the package tray. On my 1970 Road Runner, the seat belt slot in the package tray has a rounded metal flange that the belt rides on, so I felt there was no need for the extra piece to be added as shown below. In fact, I cut this piece off.

So far, my rear belts have no chafing or damage whatsoever. My rear passenger side belt has actually been used quite a bit, as I have done several trips with three of us on the trip.
1) Regarding vertical alignment of the retractor:
Mine seem to work on the principal that a rapid belt movement locks them. Per my recollection, they did not seem to be sensitive to vertical alignment. I can say that as mounted, they have worked very well. The only requirement for both front and rear belts in my car is that you need to pull them out SLOWLY to put them on. I've learnt this now, but new passengers often lock the belts trying to put them on.
2) Regarding the installation done by @Toxic Orange 493 :
This is a nice clean install, and I really like how the retractor is mounted right below the package tray. On my 1970 Road Runner, the seat belt slot in the package tray has a rounded metal flange that the belt rides on, so I felt there was no need for the extra piece to be added as shown below. In fact, I cut this piece off.
So far, my rear belts have no chafing or damage whatsoever. My rear passenger side belt has actually been used quite a bit, as I have done several trips with three of us on the trip.
furious70
Well-Known Member
Some shots of mine


CoronetDarter
Well-Known Member
Also a very nice install. Where did you get your seat belts?
Similar threads
- Replies
- 12
- Views
- 2K


