• When you click on links to various merchants on this site and make a purchase, this can result in this site earning a commission. Affiliate programs and affiliations include, but are not limited to, the eBay Partner Network.

68 RM23 Roadrunner, The rebuild of an old friend

I forgot to mention that the LCA's were expertly kissed by the "Chick" herself at Phoenix Specialty Coatings.
When we hammered the lower ball joints into them it barely marred the surface. I've seen lesser coating jobs flake and split with that kind of force. Superior work.
The color we chose is perfect for my vision. Not looking forward to getting under there to keep them clean. :rolleyes:
Thanks Leanna!

Thank you for that Brian!! I've been sick with some nasty flu for almost two weeks and you gave me a much needed smile.
A little car wash soap is all you'll need if they get dirty.
 
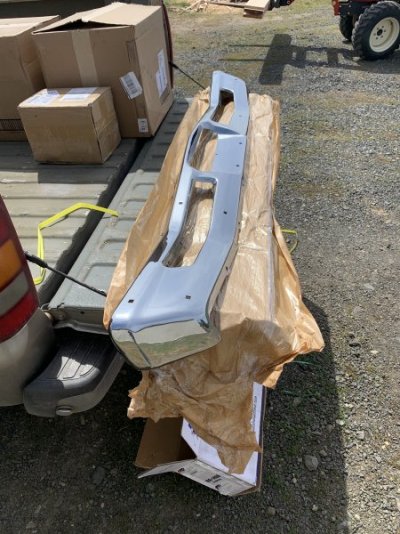
I started looking at bumpers a month or so ago and discovered they were around 6 months out for a 68. Found a place down in Texas that had two in stock and bought one. AMD, best available aftermarket bumpers out there these days supposedly. We put one on my son's Duster a few years ago and it was fairly descent. This one is a piece ****. Wavy as hell. It will get me through this show season and I will try to sell it next winter. I have my original cores scheduled to go to Smitty’s Chrome in Oshkosh, NE next month to have them properly refinished. I should have them back this fall. Will order an AMD front bumper soon. They are readily available. It will be sold as well.

My son was down for spring break and helped me pop this piece of **** on today while waiting on driveshaft, exhaust and front brakes.
By the way, the red on the trunk trim is fairly correct... I think. It is supposed to match the tail / brake lights when they are on from my research. Not sure of Ma-Mopar’s wisdom there.

IMG_3748.jpg


This unit showed up today. 3/8” aluminum, made for a 68 B Body. Bolt on, no drilling, fully adjustable. Nice piece. The new Strange drive shaft should be here Wednesday. Looking forward to putting it all together.

IMG_3750.jpg
 
The front brakes from Baer showed up yesterday, two weeks early. Nice units but as always, one hiccup.
2" drop spindles which are all based on the ‘73 and up spindles.
The brakes bolted on perfectly with one exception. The flex hoses are just a bit too short when steering is pinned left or right. I wonder if the ’73 and up on a ’68 has something to do with it.
I’ll talk to Baer next week, no worries that they will make it right. Good company.
Glad I figured in the 1/8” wheel spacers. Math is a wonderful thing. The big calipers “Baerly” fit the back spacing on these rims. This was anticipated. Everything else cleared perfectly.
**** below.

IMG_3751.jpg
IMG_3752.jpg
IMG_3753.jpg
IMG_3754.jpg
IMG_3755.jpg
IMG_3758.jpg
 
Pushing hard to be road worthy by June 1st. I hate deadlines but think it’s a good goal at this point. Part delays continue to confound.
Shocks bolted up today. QA1 double adjustable on all four. Coil overs are cool but a little over the top for this build I think, maybe I'm wrong. Easy enough to change out down the road.
Drive shaft loop bolted up. Seems fairly solid. 3/8” aluminum bar stock. Used the "short" Strange drive shaft they sent for mock up purposes. (look at the slip joint). It’s ~1” too short. The new one should be here this coming week. Great company but this F@ck up could have been avoided.
TTI exhaust unboxed and laid out. We should be able to get it all welded up next weekend barring any “Oh ****” issues.
**** below.

IMG_3767.jpg
IMG_3768.jpg
IMG_3769.jpg
IMG_3770.jpg
IMG_3771.jpg
IMG_3775.jpg
 
Had to ditch the driveshaft loop. Too bad. Nice piece but it wouldn't fit with TTi X Pipe. It was a "nice to have" not a "need to have". Just a bit of extra protection. I almost pole vaulted a car back in the day. Scary stuff. Maybe I'm just paranoid in my old age. This car will never see the track.

Exhaust buttoned up this weekend. No real clearance issues with the 3” exhaust but it is defiantly tight. ~1/2” between the tail pipe and fuel tank but once everything was torqued down, it shouldn’t move. Pretty damned solid.

We had to relocate the fuel lines from the tank to the inner frame rail mounted regulator but no big deal. Cutouts buttoned up great. No speed bumps for this car. I will need to be careful. The correct Strange driveshaft is in.
TTi makes great products but the brain trust needs to get their $hit together when it comes to tailpipe hangers.

The first pic below is an example of the 68-70 tailpipe hanger compared to all the other B-Bodies. Charger hangers are on the bottom. I never received a good explanation from TTi as to why they only provide the Charger hangers with their kits. Their stuff fits great so I’ll give them a pass on this one. They would work on the other B Bodies but would be week as there in no provision in the frame for the straight out tab on the Charger version. All other B Bodies have a provision in the frame for the locking tab that hooks back into the frame (top one). The Chargers have an extra frame piece that accepts the straight tab. Not sure what Ma Mopar thinking back then but I’m sure they had their reasons.
**** below. My youngest son photo bombed the last pic. Very proud of that young man. He did all the welding. Second pic is tacking it up. We pulled the assembly for the full welds. No leaks. Better than I could have done by far.

No speed bumps for this car for several reasons.

IMG_3801.jpg
1713754039261.png
IMG_3820.jpg
IMG_3825.jpg
IMG_3822.jpg
IMG_3828.jpg
 
Summit Racing SUM-681300 Summit Racing™ Lap Joint Band Clamps | Summit Racing
To late now, but these band clamps really work nice on exhaust joints that will eventually need to be taken apart. Especially mufflers. It is always such a pain with getting those u-bolt joints apart, and then straightened out enough to reuse the pipe. Slobber some antiseize inside the band clamp, and they come apart easily.
Car is looking marvelous by the way....
 
Loving this rebuild ...what an amazing job you are doing on the car. :thumbsup:
 
Summit Racing SUM-681300 Summit Racing™ Lap Joint Band Clamps | Summit Racing
To late now, but these band clamps really work nice on exhaust joints that will eventually need to be taken apart. Especially mufflers. It is always such a pain with getting those u-bolt joints apart, and then straightened out enough to reuse the pipe. Slobber some antiseize inside the band clamp, and they come apart easily.
Car is looking marvelous by the way....
Thanks Elk, not to late to swap them out. They look cleaner too. Can they be spread over the pipe without pulling the joint apart?
 
Beautiful machine! coming together nicely. Your post about getting a wavy AMD bumper is making me nervous now I just ordered a set last week thru Summit. Not real surprised though after dealing with a POS AMD hood.
 
Beautiful machine! coming together nicely. Your post about getting a wavy AMD bumper is making me nervous now I just ordered a set last week thru Summit. Not real surprised though after dealing with a POS AMD hood.
It doesn't look as bad on the car as it did on the bench. I'm a picky bastard. 10 footer maybe. See pics above.
 
The remaining interior parts will show up this week / early next week.
Good to be done with the sound deadener. What a pain in the @ss. Probably 50 pounds over the entire car. Roof, trunk, inside the doors, firewall, floor.

Popped the door mirror on so I could button up the moisture barrier on the driver door before panel installation. I think the mirror is fairly correct. Let me know what you Gurus think.
I purchased this mirror about 18 years ago on E-Bay. Very nice original. $25 back then. The Chinese repops go for $130 these days.

IMG_3833.jpg
IMG_3832.jpg
IMG_3834.jpg
 
"BEAUTIFUL" car. Your many hours are paying off.
I have a question out of curiosity.

Does your ash tray open by sliding it down or flipping it open?
And, if you don't mind, what is the SPD of your car and what plant was it built at?
It appears, from my research (I know - get a life) that most RRs built after Mar '68 had Flippers with a few exceptions.
Thanks
Frank
Thanks Frank, the ash tray is a slider. Not familiar the acronym SPD?
It's an LA plant car. It's obvious by some of the welds on this car they were smoking dope on the job back then.
I have crawled over every square inch of this car multiple times. By and large they did a pretty good job on this one.
 
Thanks
SPD - Scheduled Production Date
Bottom line on the fender tag
3 digit group to the left of the far right 6 digit group
First number (1 to 9) = Month Jan to Sep
A = Oct
B = Nov
C = Dec
Next two digits = day of the month

Quality control was something to behold back then.

Your work is impeccable
 
Unfortunately I don't have my original fender tag. One screw fell out of it many years ago. I took the other one out and put the tag in a safe place. Can't remember where that safe place is unfortunately.
I do have the build sheet. According to it in the shipping order block, (I believe that corresponds to that line of the fender tag.) it says 23167 which would be February 31, 1967, how is that even possible?
See below. I had a joke tag made up which is what is on the car now. I'm sure some of you have seen it posted on here.

Broadcast_Sheet.jpg

I've done some playing around trying to decode the build sheet and here is what I came up with how the fender tag should appear. How did I do?

1714163826738.png
 
Auto Transport Service
Back
Top