• When you click on links to various merchants on this site and make a purchase, this can result in this site earning a commission. Affiliate programs and affiliations include, but are not limited to, the eBay Partner Network.

For the Love for my Father, My 69 GTX Restoration

Status
Not open for further replies.
Front lower gravel pan installed. I was told by Frank Badalson that these are painted in flat black. The finish on my original was gone just remnants where the outer end attached to the bumper brackets. It appeared to to be flat black. I have also seen others state they were semi gloss. I chose flat black and the original hardware was black phosphate...

IMG_0517.JPG
IMG_0518.JPG
IMG_0519.JPG
IMG_0520.JPG
IMG_0521.JPG
IMG_0522.JPG
 
Steering column is my #3 thing I procrastinate.....

Be sure to document everything during disassembly it saves you tons of time.....It has been debated that the ends of the columns were dipped to the level of the bearing or they were natural. Many experts side that they were dipped and few say was plant dependent. However, there is no question my was dipped, see pics below...
DSC02922.JPG
DSC02929.JPG
DSC02930.JPG
DSC02960.JPG
DSC02962.JPG
DSC02963.JPG
IMG_0488.JPG
DSC02958.JPG
 
So let the fun begin....First, gathered all the parts up...but one...that one is MIA but I have one coming..All the Red metal parts were done by Instrument Specialties in the correct lacquer finish....

IMG_0408.JPG
IMG_0409.JPG
IMG_0410.JPG
IMG_0411.JPG
IMG_0412.JPG
IMG_0413.JPG
IMG_0414.JPG
IMG_0415.JPG
IMG_0416.JPG
IMG_0417.JPG
 
More pics of the parts.....My bare metal tube had a black and green mark originally...

Here is how I tackle a column rebuild

First I start with the main housing tube and the inner housing tube. Be sure to grease the area where the spring slide on the tube and the upper end of the main tube. Notice the large tension washer, do not forget it...Years ago I made that mistake. Also the grease helps to hold the washer in place. Then slide the inner tube into the main housing.

IMG_0419.JPG
IMG_0420.JPG
IMG_0421.JPG
IMG_0422.JPG
IMG_0423.JPG
IMG_0425.JPG
IMG_0426.JPG
IMG_0427.JPG
 
Next is the lower collar. Be sure to grease all areas on this piece shown in pictures. It only goes on one way. My column is a non tilt non column shift so no need to discuss the tube alignment etc...So slide the collar down all the way and on to the next step...The hardware that was restored is very tricky to install and if you have never done it...well you will talk like a sailor for awhile. They hold the top and lower collar to the main tube...

IMG_0428.JPG
IMG_0429.JPG
IMG_0430.JPG
IMG_0432.JPG
IMG_0433.JPG
IMG_0434.JPG
IMG_0435.JPG
IMG_0437.JPG
IMG_0438.JPG
 
Next is the upper collar. Be sure to grease the areas I pictured. So the bolts..uggh, the worst part....Here is what I do. I place them on the collar first(you have to) but I screw the nut almost where one little turn and it is off. One hand I hold the collar and the other I hold the two nuts again the collar and slide it on aligning one slot. If one is aligned the other one is as well but the key is DO NOT move the collar....Fun huh...So with the column on its side the one square head bolt falls in the slot. Then I finger tightening slightly. Then I slowly rotate the column to do the other bolt. Same thing slowly tighten. Once both are set. I turn each one a half turn and go back and forth. If you screw one side in first the other will pull out and your back at square one..

IMG_0438.JPG
IMG_0439.JPG
IMG_0440.JPG
IMG_0441.JPG
IMG_0442.JPG
 
Next is the steering shaft. Make sure to snap the lower ring on the app shaft where the bearing rests on prior to install. Also, is a good time to remove the coupler pin so you can get the seal on. Slide the lower bearing and then the coupler sealer and cover.

NOS bearing vs repro, self explanatory

Index on the shaft does not matter yet....Slide shaft into inner housing. The duct tape on the shaft allows me to see where the shaft distance to gearbox is...

Bearing hardware old vs new
IMG_0443.JPG
IMG_0444.JPG
IMG_0445.JPG
IMG_0446.JPG
IMG_0447.JPG
IMG_0448.JPG
IMG_0449.JPG
IMG_0450.JPG
IMG_0452.JPG
 
Next is to install the upper bearing. I got a new bearing from Mega Parts and the remove/install kit also. Yes it is worth it....(kiwi btw this kit will be heading your way:thumbsup:)

I reused the original rubber cover with part number and installed the bearing. Slide the bearing in place and I start it with my fingers first then use the stall tool.

Place the turn signal hold down bracket in and tighten screws. I do this so you can seat the bearing and place the snap ring in place...


IMG_0453.JPG
IMG_0454.JPG
IMG_0455.JPG
IMG_0456.JPG
IMG_0457.JPG
IMG_0458.JPG
IMG_0459.JPG
IMG_0460.JPG
IMG_0461.JPG
 
Last edited:
Do you or do you not want a correctly positioned steering wheel????

INDEXING the shaft to the coupler is critical and easy. Both indexes point north. Just pay attention when you install the coupler. The seal and cover came from Bill Rolik...Correct black seal(orange is wrong for 69) with PN... The two pics show them northward....

Anyone seen the bracket in the last pic? It is an NOS one I got plated.....Not factory line installed but an over the counter Mopar part back in the day....Yes, it is going on the X...

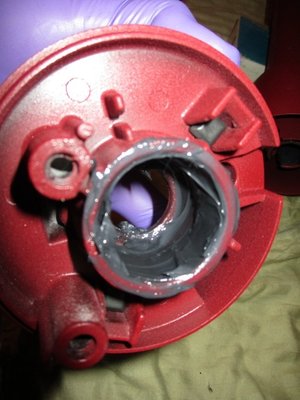
The coupler I put a 1/4 from the bottom with grease and then slide on and fill the cavity with some room to spare at the top...


IMG_0478.JPG
IMG_0479.JPG
IMG_0480.JPG
IMG_0481.JPG
IMG_0482.JPG
IMG_0483.JPG
IMG_0484.JPG
 
Next going on is the column bracket to firewall. These are gloss black and hardware is black phosphate. I had a repro O ring but I stayed with he original it just didn't fit well....

Next is the column bracket to main tube it is also gloss black. The original ground strap was cleaned up and had nice part numbers.

IMG_0485.JPG
IMG_0486.JPG
IMG_0487.JPG
IMG_0492.JPG
IMG_0493.JPG
IMG_0495.JPG
IMG_0496.JPG
IMG_0497.JPG
IMG_0498.JPG
IMG_0500.JPG
 
Of course I am not going through the hassle of dipping the coupler and shaft. One it would waste a lot of paint and is messy and two I do not want any issue getting the roll pin in or onto the steering box. So I sprayed it with high heat resistant low luster black....

IMG_0512.JPG
IMG_0513.JPG
IMG_0514.JPG
IMG_0515.JPG
IMG_0516.JPG
 
NOS turn signal switch. This is the real deal, correct PN switch. The other distinct features are the wires, they are flat and together. That is how they originally were. All NOS you see today are the supreceeded versions. They will work, no doubt but the PN is wrong and the wires are loose, not flat...

I put a small amount of lube on the turn signal post....

IMG_0536.JPG
IMG_0537.JPG
IMG_0538.JPG
IMG_0539.JPG
IMG_0540.JPG
IMG_0541.JPG
IMG_0542.JPG
IMG_0543.JPG
IMG_0544.JPG
IMG_0545.JPG
 
Next on was the column cover I cleaned up earlier.....

Wire connect was next.....

Last was the firewall gasket....

All done except for one part....the wire cover bracket. It is a thin piece of bend metal and goes on the button of the column between the lower cover and the black bracket to lower dash frame. No worries should be here in a week or so from IS and is easy to put on...

IMG_0544.JPG
IMG_0545.JPG
IMG_0546.JPG
IMG_0547.JPG
IMG_0548.JPG
IMG_0549.JPG
 
Whats next? The dash but I am patiently waiting for a couple dash parts to come back from IS......

Until then,

Unknown.jpg
 
Justin, as always, excellent work. First time I have seen this retainer. Where do I get one? Damn good idea.

DD
Steering Coupler Retainer.JPG
 
Justin, as always, excellent work. First time I have seen this retainer. Where do I get one? Damn good idea.

DD
View attachment 506622
Darrin

Thanks for the compliments again my friend!

Years ago browsing on DC.com a member posted this retainer along with an eBay link. Ma mopar back in the day offered these to correct the notorious problem of the seal bracket coming off. Until then I had no idea they existed or I may have overlooked it.

This is the guy I purchased it from and then I sent it for plating(not that you need too) I thought the black shaft with the plated piece would look nice and gain questions. Before you place it on, dry fit on another unit first. They require a little manipulation...

http://www.ebay.com/itm/Rare-Mopar-...ash=item462dce1f89:g:-PcAAOSwj0NUeURR&vxp=mtr

Justin
 
I bought one for my green 68 Charger & it does the trick. And yes, just as Justin says, they do require a bit of manipulation to get them on.
 
Status
Not open for further replies.
Auto Transport Service
Back
Top