• When you click on links to various merchants on this site and make a purchase, this can result in this site earning a commission. Affiliate programs and affiliations include, but are not limited to, the eBay Partner Network.

Hawk-Rod: The Restoration

great job on your RR.
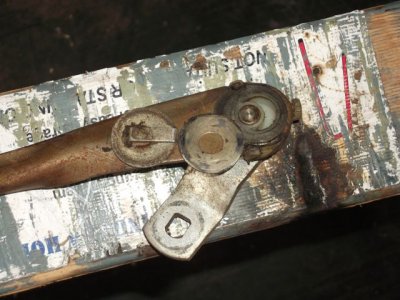
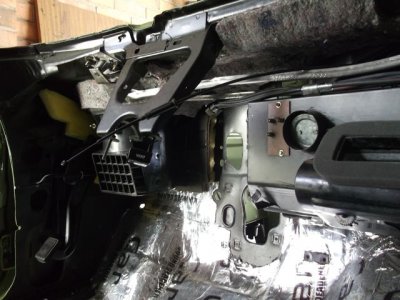
the top picture are wiper linkage transmissions arms.
cleaned the rust on the linkage arms and used some rust converter and painted after it was dry
I just cleaned mine up with some steel wool and wax and grease remover and resealed.
the black one that goes against the cowl outer when stretching it around the spline broke opps. I soaked the 2nd one in hot water and lubed before installing that one.
I cleaned the wiper motor basically the same way with some 0000 steel wool and repaired the bare wires.

Rodney,

Thanks for the post! How did you get the linkage transmission arms apart? Do you pull the seals from the wiper arm side?

Thanks,

Hawk
 
Rodney,

Thanks for the post! How did you get the linkage transmission arms apart? Do you pull the seals from the wiper arm side?

Thanks,

Hawk

i have never taken the transmissions completely apart I just let some penetrating oil seep down the shafts.
 
Hawk you have a pm I think I can help with some of the last questions

Thanks Kim for hooking me up! My wiper motor is on its way...

I am sure everyone would have beat me and demoted me to drive Chevy's if I had stuck the old crusty wiper motor on the car!!! :tied up:
 
Rodney,

Thanks for the post! How did you get the linkage transmission arms apart? Do you pull the seals from the wiper arm side?

Thanks,

Hawk

G'day Hawk. I pulled the arms apart on mine and then hit them with the wire wheel. I'm at work at the moment but when I get home I'll post a couple of pics. I thought I had them on my thread, but must have forgotten to post that bit because I couldn't find 'em. If I remember right you can still get the washers and clips from RT specialties.
 
G'day Hawk. I pulled the arms apart on mine and then hit them with the wire wheel. I'm at work at the moment but when I get home I'll post a couple of pics. I thought I had them on my thread, but must have forgotten to post that bit because I couldn't find 'em. If I remember right you can still get the washers and clips from RT specialties.

Glenn, that would be great as it might minimize the chance that I mess anything up. If they were shot it wouldn't be much to lose, but these would probably work fine if I slapped them on as they are - I just want to try and improve them a bit... :toothy12:

Many thanks...
 
Wiper linkage teardown

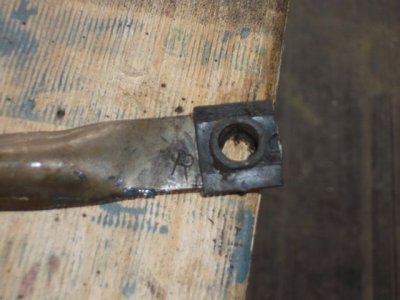
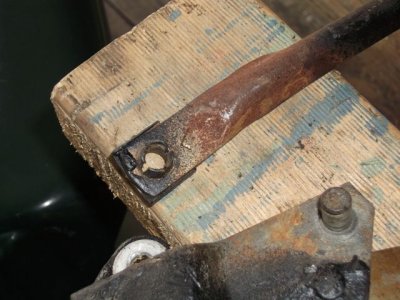
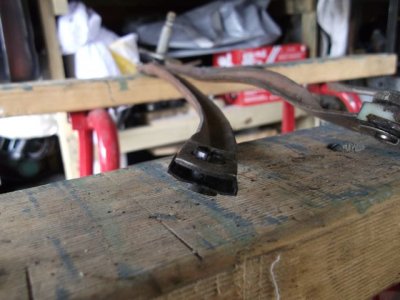
Here you go Hawk. These come apart fairly easily which makes it a whole lot easier to clean 'em up. I checked on RT Specialties website and they still sell the bushing's and the linkage retainers, either singly or a bushing kit. So if they look to be a bit brittle, just check before pulling apart to make sure you can get a replacement for what you want. But I think you should be good. After cleaning and painting with clear I forgot to take pics of when I put 'em back together again. :head_smack: so I added one of installed back in car. One other thing regarding the painting. If your painting them clear be extra careful on prepping them. I think I may have rushed it because mine have discoloured a bit under the clear now. I can only assume that I didn't clean them well enough before applying the clear. Something I'll have to take care of way way down the track lol.
Wiper 2.jpg Wiper 1.jpg Wiper 3.jpg Wiper 4.jpg Wiper 5.jpg Wiper arm installed.jpg
 
Here you go Hawk. These come apart fairly easily which makes it a whole lot easier to clean 'em up. I checked on RT Specialties website and they still sell the bushing's and the linkage retainers, either singly or a bushing kit. So if they look to be a bit brittle, just check before pulling apart to make sure you can get a replacement for what you want. But I think you should be good. After cleaning and painting with clear I forgot to take pics of when I put 'em back together again. :head_smack: so I added one of installed back in car. One other thing regarding the painting. If your painting them clear be extra careful on prepping them. I think I may have rushed it because mine have discoloured a bit under the clear now. I can only assume that I didn't clean them well enough before applying the clear. Something I'll have to take care of way way down the track lol.

Glenn, much appreciated. Thank you for taking the time to post the pictures. :headbang: By the way, the under dash area looks great!

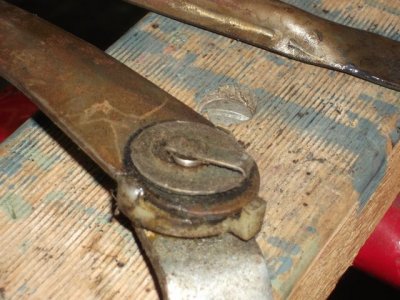
Your pictures are very helpful for the linkages, so it is good to know I can get the grommets - thanks for the link. I still am unsure on the transmission arms themselves (see picture below). It looks like they are pressed together and do not readily come apart. I may just leave them as is, or do as Rodney suggests and see if I can get some penetrating oil in there - I just don't want to do more harm than good.

Thanks,

Hawk

View attachment 229927
 
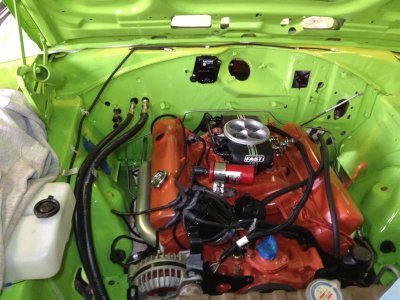
So I temporarily "installed" the engine and K-Member to try and finish routing A/C lines and fuel lines. I spent a lot of time routing and thinking about the way I wanted things. Also, a good vender alert! Dwight from Classic Air was fantastic; he spent over two hours with me over the phone so I could design and customize my A/C the way I wanted it, rather than the stock kit.

The A/C lines come out of the firewall in the stock heater hose locations, so I decided to route them in the heater hose location. Both these hoses will drop down to the frame area on the passenger side below the alternator. One gets hooked to the compressor, and the other passes through to the dryer. The stock kit dryer location is where the blue tape is in the picture, but I will instead hide it behind the grill. The heater hoses will route below the A/C lines. Hopefully the quick visual will be a fairly stock "non-A/C" look.
IMG_3635.jpg

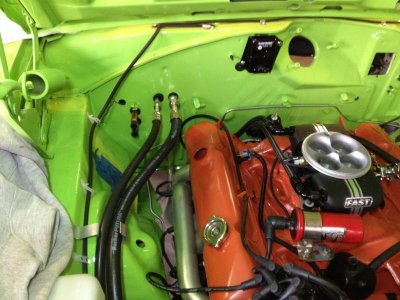
I also finished the fuel lines. They route to the fuel sensor (hidden in this picture behind the passenger head) and to the fuel regulator (almost fully hidden in this picture). Again, this should leave me a clean firewall that looks pretty stock. My goal is to have these modifications be as unobtrusive as possible.
IMG_3633.jpg
 
Glenn, much appreciated. Thank you for taking the time to post the pictures. :headbang: By the way, the under dash area looks great!

Your pictures are very helpful for the linkages, so it is good to know I can get the grommets - thanks for the link. I still am unsure on the transmission arms themselves (see picture below). It looks like they are pressed together and do not readily come apart. I may just leave them as is, or do as Rodney suggests and see if I can get some penetrating oil in there - I just don't want to do more harm than good.

Thanks,

Hawk =QUOTE]

No probs Hawk. I just opened them up a little with a small flat blade screwdriver whilst levering another screwdriver underneath and they came right off. The retainer clicks into a groove on the pin, once the groove is cleared they come right off. That's the bit i referred to as checking to see if they are brittle or not. Luckily mine were still flexible, they don't need to be opened much, just a small blade between the tabs and the pin, one at a time as you're applying light pressure from underneath the retainer between that and the other arm.
And your ac is piping is looking excellent, very neat and tidy. Well done.
 
if it ain't broke don't fix it :} {the wiper transmission}

I'd be concerned that your fuel system is going to cook back behind the engine?
Here in Oregon if you were going to run your car down our NHRA drag strip that wouldn't pass Tec.
no fuel related anything mounted on the firewall for safety reasons if the flywheel blows :{
and the fuel regulator needs to be 12 - 18 inches? {don't remember exactly} from the fire wall

I guess it's a good thing this isn't a drag car!!! (smile)

The funny thing is, the fuel lines are further from the hot headers back there than they would be if they were on the inner fender. I think there is less chance of them cooking there. To be on the safe side, I just checked directly with FAST. They stated the firewall is fine to mount the regulator and fuel components. I can certainly understand NHRA not wanting fuel system components near the flywheel if it disintegrates, but that is not likely with this car. I would assume NHRA might only require that in a very fast car???

How will it all work? I will hopefully find out in a few months. Now you gave me something else to lay awake and worry about at night!
 
Engine compartment is looking great, very nice and neat! As far as the wiper pivot goes I just drilled and tapped mine for a grease fitting, it also helps seal them having grease in them.
 
I guess it's a good thing this isn't a drag car!!! (smile)

The funny thing is, the fuel lines are further from the hot headers back there than they would be if they were on the inner fender. I think there is less chance of them cooking there. To be on the safe side, I just checked directly with FAST. They stated the firewall is fine to mount the regulator and fuel components. I can certainly understand NHRA not wanting fuel system components near the flywheel if it disintegrates, but that is not likely with this car. I would assume NHRA might only require that in a very fast car???

How will it all work? I will hopefully find out in a few months. Now you gave me something else to lay awake and worry about at night!

it should be fine

drilling and a grease fitting is a good idea wish I hadn't already installed mine.. I'll do that to the rr
 
Hawk - Thanks for all the detailed pics and descriptions. I'm not too far behind you and plan on doing a lot of the same things - your thread is has been invaluable help to me during my resto.
BTW, I talked to Dwight at Classic Air a couple of weeks ago about my car. Even though I wasn't ready to pull the trigger just yet I had some basic questions and he patiently answered them all. He's definitely on my list of vendors to call back.

Glad the thread is useful to you! I get so much inspiration from all of the threads here, so it is nice to hear some others are checking out mine too!

Just my humble opinion: If you are going with aftermarket A/C, I REALLY like the idea of the hidden compressor. I am sure it may make some maintenance work a bit more of a pain, but I like the idea of keeping my engine compartment neat and clean. I'll post some more pictures shortly with additional components, but I need to wait for my new dryer before I can work out some of those kinks. My additional "stealth" on my A/C job cost me an additional $100 in getting additional parts, but hopefully they will be well worth the cost - I'll keep you posted...

Hawk

- - - Updated - - -

Engine compartment is looking great, very nice and neat! As far as the wiper pivot goes I just drilled and tapped mine for a grease fitting, it also helps seal them having grease in them.

Great idea with the grease fittings!
 
I like the hidden compressor trick - gonna check it out when I'm ready to pull the trigger. And I might have missed an earlier post - did you go with the DER controls?
 
Brakes

So I did some work on the brakes today. Of course, there were the usual small parts, plates and junk to clean up and paint, and that is made harder by the fact that it is cold. I have semi heated my garage, but it really is not quite warm enough, so I keep the parts and paint indoors until I am ready to paint. Then I go outside and quickly paint the parts and then use a heat gun to try and keep some warm air on the parts. Then they come inside for final drying. It is a time consuming process, but it seems to work OK.

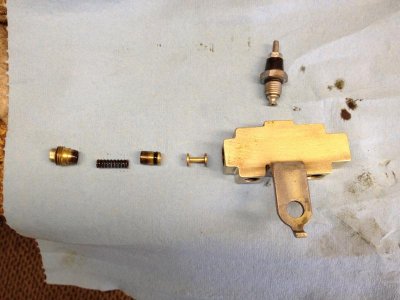
First major thing I cleaned up was the brake distribution block. I cleaned this up by disassembling it. Note that mine is from a 1970 B Body with manual drum brakes. Others are often different. Here is an exploded view:
IMG_3645.jpg

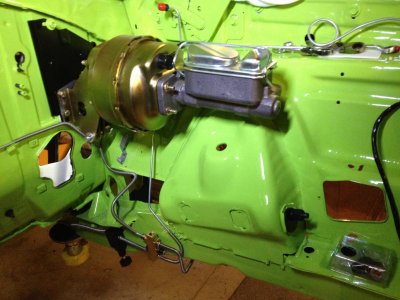
I then mocked up the brake booster and master cylinder. I have to say, I am not pleased with the brake booster. It somehow feels like a Rube Goldberg add on, but the worst thing is that the round gasket does not properly seal the odd shaped Mopar firewall hole where it passes through. Not sure what to do about it, so I took the rest of the night off to think about it. I'll wait until next year to do something about it... :icon_fU:
IMG_3649.jpg
 
Auto Transport Service
Back
Top