• When you click on links to various merchants on this site and make a purchase, this can result in this site earning a commission. Affiliate programs and affiliations include, but are not limited to, the eBay Partner Network.

Headlight wiring route

machelis

Well-Known Member
Local time
8:17 PM
Joined
Dec 27, 2017
Messages
105
Reaction score
33
Location
Montreal
Howdy,

My 1967 Satellite wiring is pretty bastardized, so nothing is even remotely where it should have been from the factory.

I'm trying to properly route the headlight wires right now. I know some members have original cars, so some pictures from their cars would be mucho appreciated.

I have 3 questions.
1) The wires off the bulkhead went over or under the brake booster before running along the inner fender?
2) The wires came through the upper or lower square on the radiator support? (I've seen both online)
3) After the rad support, did the driver's side wires run over or under the stiffener behind the highbeam?

Thanks
 
1) over, there should be a rubber coated holder for them Do you have drum or factory 4 piston disc?
2) bottom hole for headlight wires, top for body ground wire.
3) they run across the front of the radiator support, should be tabs there to retain it.
 
I have a disc conversion. I guess I'm missing said holder over the booster.

I know how they're run to the passenger side, it's the short run to the drivers side lights i need help with.

Thanks
 
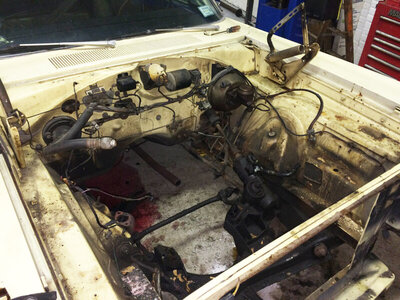
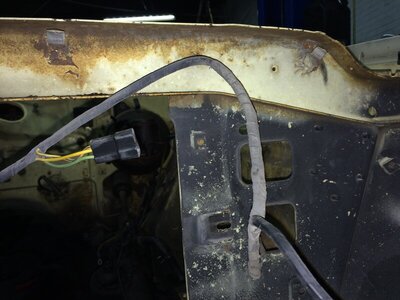
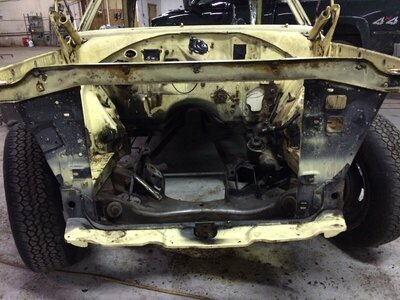
These are pics from the deconstruction of my '66 Belvedere. One owner so I know nothing has been tampered with. Note the tabs on the upper edge of the core support. They hold the wires to the passenger side in place.
Hope they help.

Engine bay.jpg IMG_2998.JPG View attachment 1085675 View attachment 1085676
 
Those pictures help. In the second picture, If you could turn the camera about 20 degrees to the right for the routing behind the highbeam, that would be perfect.

How much of the section behind he grill and headlights is painted black? I might do that as well.

Thanks
 
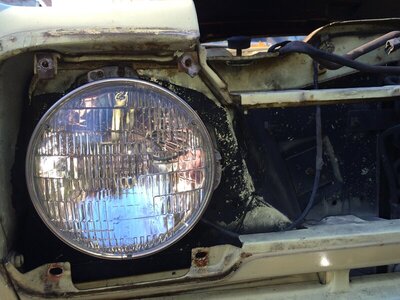
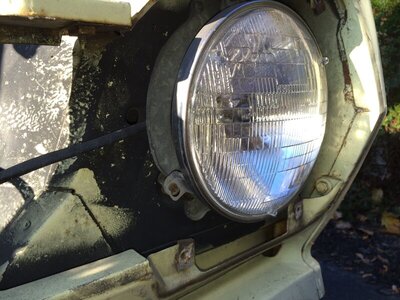
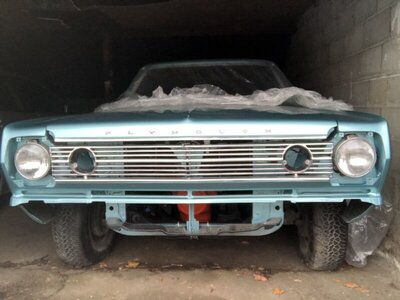
These photos are from the deconstruction 3 years ago so I can't take new photos, but these should show you where things were painted black behind the grill. Obviously I've changed the body color to Light Turquoise and have chosen to leave the area behind the grill body color. Your choice. Hope these help.
Also note where the wiring is routed behind the headlight buckets. It's a small V shaped indentation and the wires are tight when the buckets are screwed into place, but that's where they fit.

IMG_2930.JPG IMG_2932.JPG IMG_3047.JPG IMG_1684.jpg
 
Also, when this area was painted on the assembly line, the painter was under the car shooting up and was not that thorough. So there were some areas that didn't get complete coverage. Just telling you if your going for a 'factory' finish.
Lastly, on the front pic of the yellow body, the yellow painted horizontal areas 3/4 of the way down is over spray from a repaint years ago. That area should be completely black like the rest of the core support.
 
The Irish side of my family is from Hochelaga. I'd visit Montreal more often but I don't speak French, and you guys seem to get a little peeved when I say good morning instead of bonjour.:canada:
 
The Irish side of my family is from Hochelaga. I'd visit Montreal more often but I don't speak French, and you guys seem to get a little peeved when I say good morning instead of bonjour.:canada:
I don't speak much french either, don't worry :rolleyes:

Thanks for the pictures. With a darker color i wouldn't bother painting behind the grill and lights, but with a white car it really stands out.
 
Auto Transport Service
Back
Top