• When you click on links to various merchants on this site and make a purchase, this can result in this site earning a commission. Affiliate programs and affiliations include, but are not limited to, the eBay Partner Network.

MAD/Bulkhead Ammeter Question

Bruzilla

Well-Known Member
Local time
5:16 AM
Joined
Jan 11, 2012
Messages
7,644
Reaction score
7,817
Location
Orange Park, FL
I'm a bit confused here. I'm trying to get the savaged wiring harness of mt 74 Roadrunner into order, and I'm getting a bit lost when it comes to the primary wire coming off the alternator and to the bulkhead connector and that goes out to the starter relay.

Looking at the wiring schematics, the wire runs from the alternator to connector 18 on the bulkhead connector. Then a wire comes from connector 16 and goes to the relay.

But looking at the photos on the MAD Electrical site, it looks like they are running the wire through connector 17.

amp-ga35.jpg


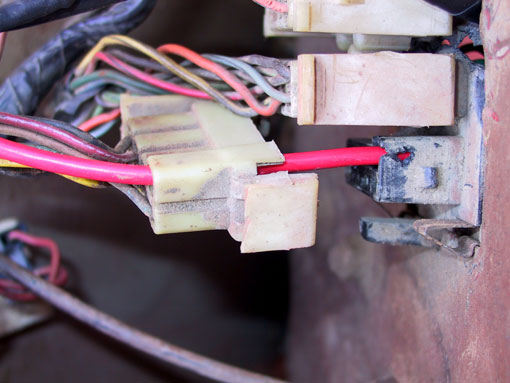
Is this just a different model's connector or is there a conflict somewhere?
 
???? It's hard to help since I don't have the wiring diagram you're looking at. What is the problem? Is this the picture of the "MAD electrical site" or a picture out of your car? I'd have to take a look at my car, but that looks like the correct hole for the alternator wire.
 
- - - Updated - - -

That is the pic from MAD Diagram. It should be thru the 18.

Mikey
 
The red wire from the starter relay doesn't have to go through the bulkhead connector. I ran mine through another grommeted hole in the firewall and spliced into the wire that came off of the ammeter.
 
#16 & #18 are correct. #17 was the wire to the oil pressure switch. Looks like someone might have converted to a mechanical oil pressure gauge and used the #17 hole as a path to the inside.
 
I did the same thing. I ran a new red wire off the starter relay directly to the ammeter through a grommeted hole in the firewall. My original red wire in the bulkhead connector is dead.
 
If you have an open hole in your bulkhead it really not an issue where it passes through. As others have mentioned, you can pass it through a grometted hole in your firewall.

Yes the line usually has a fusible link in it. I think mad suggested connecting the black from alt and red wires together and running a fusible link at the starter relay. Lots of ways to do this.

I usually remove the ammeter totally from the system as doing a wire around, Alt charge stud to Starter Relay direct, effectively makes the ammeter read inaccurately anyways.

I build a bunch of electrical upgrades including wire around solutions.
 
The MAD site used a mid 70s Dodge truck as their test model.
I used their suggestions as a guideline, not a line-by-line recipe. I replaced the alternator charge wire with a #10 to the relay. I then used a #10 wire from the relay, through the bulkhead and into the welded splice. The MAD routine shows a "loop" through the inside and back out when there is no clear reason for that. A single wire from the relay to the welded splice is enough, any more is redundant.
I changed to a new guage cluster from Dakota Digital. It uses a voltmeter instead of an ammeter anyway.
 
I did the upgrade as well. Eliminated the ammeter and changed my non-rally gauge to a working Voltmeter.
 
I did the upgrade as well. Eliminated the ammeter and changed my non-rally gauge to a working Voltmeter.

Sport Satellite do you have any photo's of your standard dash? I have standard dash and want to do this upgrade but don't know what voltmeter will work in the stock standard dash.
 
Click on my user name and see one of my two interior thread for photos.

Sport Satellite do you have any photo's of your standard dash? I have standard dash and want to do this upgrade but don't know what voltmeter will work in the stock standard dash.

- - - Updated - - -

I didn't select the voltmeter. I had Redline gauge works install one with the guts only. Face of gauge looks the same except I had them add a voltage scale on the gauge face. All solid state. Give Shannon a call at Redline Gauge Works and he'll hook you up. His company is great and he's very cool to deal with.

Click on my user name and see one of my two interior thread for photos.
 
I'm starting the "modified" MAD wiring to eliminate the ammeter. Where is this "welded splice"? Is it wrapped up in OEM tape? Should I connect the ammeter wires with a solder butt splice and then run a solid wire from the relay to the welded splice, and I'm done on the inside? I already have a 10 AWG from the alternator to the starter relay. It seems like you could just connect the inside wire directly to one of the ammeter wires and make the other one dead, thus eliminating one more splice.
 
Drew,

I don't like the MAD approach. When people use my alt to starter wire, I suggest leaving all the oem wiring in place. Bypassing the ammeter is a good thing IMO.

The welded splice is wrapped in your harness in pass compartment.
 
Thanks for the info and feedback on this. So unwrap to find the welded splice and solder to it? It would seem easier to tap into the hot wire on the back of the removable fuse block (red wire). Thoughts?
 
Don't have to mess with the welded splice at all.

Mad wants you to splice the red and black wires together headed out the starter relay. Crimp in a 14 or 16ga fusible link, IIRC. I don't like this approach.

Look over the mad diagram, it shows what they want you to do.

My way is leave all the factory wiring alone if in good shape, EXCEPT for bypassing the ammeter. Hook the ammeter red/back ring terminals together or butt crimp them.
 
My way is leave all the factory wiring alone if in good shape, EXCEPT for bypassing the ammeter. Hook the ammeter red/back ring terminals together or butt crimp them.
Right, wrong or indifferent, that's what I did.
 
Don't have to mess with the welded splice at all.

Mad wants you to splice the red and black wires together headed out the starter relay. Crimp in a 14 or 16ga fusible link, IIRC. I don't like this approach.

Look over the mad diagram, it shows what they want you to do.

My way is leave all the factory wiring alone if in good shape, EXCEPT for bypassing the ammeter. Hook the ammeter red/back ring terminals together or butt crimp them.

Big thanks Crackedback! I like your thought process on this. I've spliced the ammeter together. Glad I don't need to mess with the welded splice. What do I connect the new power wire to (coming in from the relay)? Thanks, Drew
 
Auto Transport Service
Back
Top