• When you click on links to various merchants on this site and make a purchase, this can result in this site earning a commission. Affiliate programs and affiliations include, but are not limited to, the eBay Partner Network.

My 1967 Belvedere Convertible Plans and Restoration (aka - Mad Scientist Build)

Very nice work......about how many hours in the spring relo and mini tubs?

Ugh . . . I was afraid that someone was going to ask me that question, and I don't know if I can really tell you how much time I've got in it . . .

1 - I do it because it's fun and I'm doing it the way I want to do it
2 - I have not done much welding in the past, prior to this, so I'm still learning ( but doing better )
3 - I'm still working on the passenger side wheel well - so it's not really done yet
4 - learning on the passenger side, it took longer, and the driver side went much faster ( had more confidence )
5 - I did a slightly different version of the spring relocation to keep the mounting points at the same height front and back
6 - I also did the de-humping of the outer-inner wheel well too ( might as well if I'm this far into it )

And I don't want to scare anyone off from doing the work - it's well worth it ! !
 
"And I don't want to scare anyone off from doing the work - it's well worth it ! ! " Buddy you said it perfectly i think! And number one is the one we ALL who do these cars has to agree on, That's what its all about when done and workin on it... :)... :)
 
Alright . . .I've had enough of this . . . something needs to change . . .

Working on my car Wednesday night in the driver wheel well area, tight quarters, trying to get it ready for epoxy primer, so I'm sanding with 80 grit, grinding the high welds down a bit, NOTE - I'm wearing my eye protection, always do . . . must have been the tight quarters.

Woke up about 4AM and both my eyes were really sore - so I made a trip to the ophthalmologist to have my eyes looked at . . .

Pulled 1 piece of metal from the cornea of my right eye
Pulled 3 pieces of metal from the cornea of my left eye . . .

Needless to say, when the numbing agent wore off, my eyes were really sore . . .

Outside of getting a full face mask, and having it fog up on me, I need to find a way to try and keep this metal scraps out of my eye . . . needless to say the Doctor was not too happy - DUH ! !


Oh - the good news - I'm looking at getting the driver quarter and wheel well in epoxy primer so I won't have to worry about them rusting on me after all that work I put into them . . . YAY ! ! !
 
Khan, That sucks big time!!! I cant seem to keep my goggles from fogging, pain in the back side for sure but the alternative is depressing.. A full face out fit maybe you could cut a hole in some place, a spot to breath out as you work, may take some practice but it's better then holding your breath as you are now to try to stop the fogging.. I know they make things as this but the price would send an insane man to my state with the nuts like me.. Ok, but, check this out, ive tryed different ways but thought i would see if this could help in some way, my way is a towel, and keep wiping[video=youtube;XcElZTlXVnI]https://www.youtube.com/watch?t=61&v=XcElZTlXVnI[/video], sucks but helps!
 
safety glasses update . . .

Well . . . I needed to give my eyes a couple days to heal, but it's driving me crazy not to be making progress on the Belvedere . . . and, to say the least, I'm a little gun shy to get more "cr@p" in my eyes again . . .

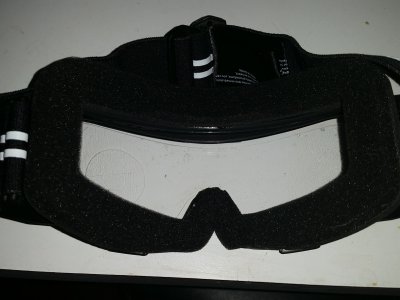
So while I was at the local sporting goods store, I went to the "paintball" section and found this pair of goggles on clearance for $5.00 . . . WOW ! ! !

Close fitting . . . and if they wear them for paintball, would they "maybe" not fog up ? ?
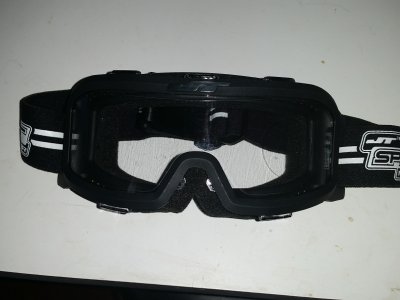
sm_newgoggles01.jpg

On the back, the entire face has a foam seal to protect anything from getting in . . .
sm_newgoggles02.jpg

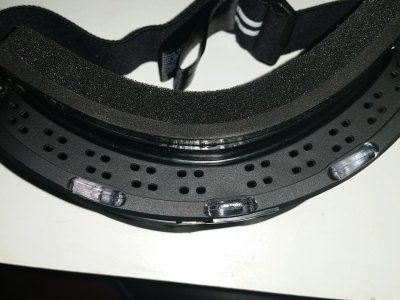
This was my only concern . . . on the top, these holes "could" let stuff in - so I ripped a piece of an old t-shirt, rolled it up, and placed i on top of the holes - and put on a baseball cap too
sm_newgoggles03.jpg

So, now for the test, working in the driver side wheel well is where I got the stuff in my eyes last time, so back at it . . . 2 hours working in there ( did I just admit to working 2 hours in a wheel well that nobody will ever see ? ) and the glasses never fogged up, and they worked great - might be heading back to the store to buy a couple more pair of these glasses.

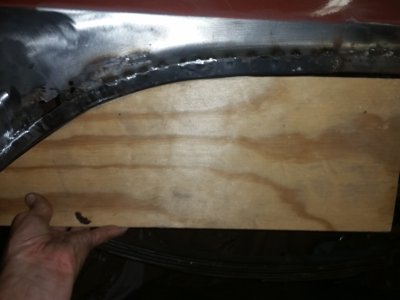
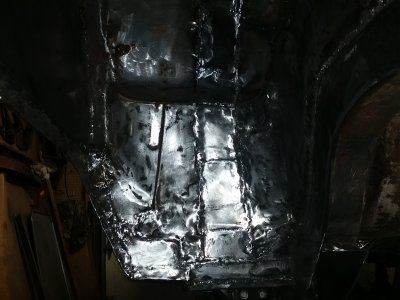
Here's the front of the wheel well - how "perfect" do I need to make these things inside ? ?
sm_drwell01.jpg

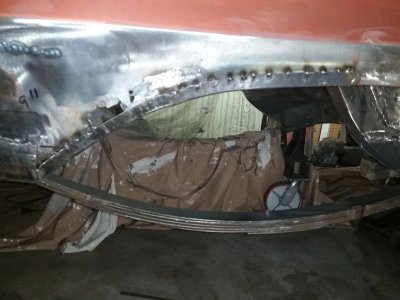
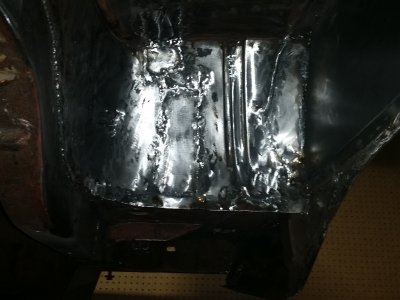
And here's the back of the wheel well . . .
sm_drwell02.jpg

Trying to get this side ready to put epoxy primer on it . . . coming along quite nicely ! !

Epoxy Primer:
Want to get the primer on, but it's a bit humid here, and if I place a fan in the window blowing the over spray out, it'll pull in humid air - is that bad ? ?

Don't think that I've got much of an option - gotta do what you gotta do . . .


Fogging goggles update:
Got a suggestion, that I'd like to pass along . . . it was suggested to pick up Rain-X, the inside non fogging version, and coat the inside of your goggles to help stop fogging.

Sounds like a great idea to me - just passing it along to share with FBBO ! !
 
ALL B.S.ASIDE. PROTECT THEM PEEPERS. and I suggest it while spraying too!!!! the wheel houses look really really good Khan. you probably ought to get some primer on them before you decide there is something you don't like or want better. I think it looks great.
 
I'm taking your advice . . . and that's the story I'm sticking to . . .was a good DAY

Thanks A68postcar . . . good advice . . . so I followed it . . .

got the shop cleaned up a bit, laid down some drop cloths, set up an exhaust fax to get rid of the over spray, and got the paint mixed up . . .

Then I got the respirator out, the goggles, the baseball cap . . . I looked like Darth Vader . . .

pssst pssst . . .Luke . . . I am your father . . . pssst . . .

Well . . . for not having a clue what I'm doing . . . it didn't turn out too badly . . .

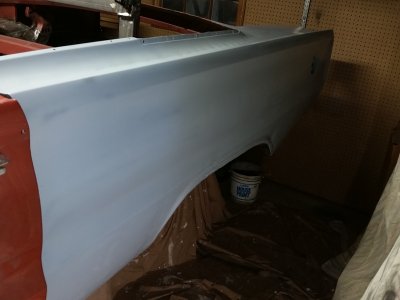
Got the full driver quarter panel in primer . . .

sm_epoxyprimer01.jpg

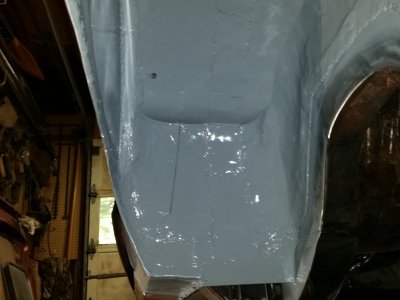
The front of the wheel well . . . NOTE: see the hole, that's the weep hole that will channel the water from the convertible top track into the well well instead of dumping it into the quarter panel and helping to rust it out.

sm_epoxyprimer02.jpg

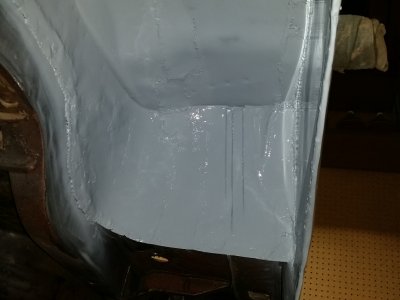
The back of the wheel well ( and the top and sides too ) . . .

sm_epoxyprimer03.jpg

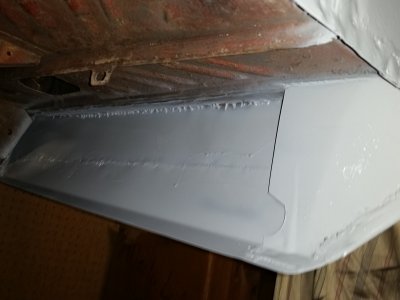
The back side of the lower quarter that was replaced . . .

sm_epoxyprimer04.jpg

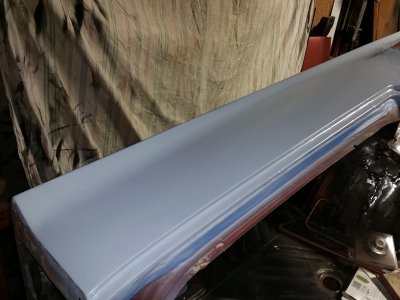
And the top of the quarter panel . . .

sm_epoxyprimer05.jpg

Did get a couple runs in the primer . . . but just left them for now, I'll get them wet sanded out later ) I think that's what I'll need to do ) . . . at least I'l not have to worry about it rusting on me anymore ! ! !

Nice to have it in primer too . . . that feels so good ! ! !
 
Last edited:
So, now for the test, working in the driver side wheel well is where I got the stuff in my eyes last time, so back at it . . . 2 hours working in there ( did I just admit to working 2 hours in a wheel well that nobody will ever see ? )

Hey Kahn,
I read this and laughed!!!
Let me explain, I have been working on my wheel wells for something close to 2 months!
I am de-humping them and had to completely start over on one side, among a few other problems but yeah like almost 2 MONTHS!
And do you know how many times my wife has asked me, why so long when you will never see them?

Anyway thought I would just share that!

I think the wheel wells look great!
Seeing it in paint sure makes you feel good!

Thanks a bunch Don . . .nice compliment coming from you.

Take a look at post 1701 - how long did you take on the mini tubs and spring relocation . . . and my response . . . I don't want to scare people away . . . LMAO . . . remember , I de-humped mine too - only thing that made sense since I was this far into it ! ! !

I'm on the same track as you . . . 2 months ? ? probably . . . just think, I "only" spent 2 hours TODAY with grinding and getting it ready for primer . . . GAWD ! ! !

I think all of us on this site are gluttons for punishment ! ! ! But I love what I'm doing . . .and I'm doing it MY WAY ! !

Keep up that great work on your car, love to check out your progress . . . and good luck with getting you wheel wells done, even thought no one will ever see them . . . ( I promise I'll look when I come and see your car ! )

Thanks for the chuckle . . . loved it . . .
 
Woohoo....81,500 views, and I only have about 30 of them :icon_wink:

Nice progress on the car buddy, I'm about one third through reading the entire build so far :icon_thumright:
 
Looks great Kahn, always nice to get that bare metal sealed up! By the time you get done seam sealing and undercoating the tubs they'll look even better yet, way to go!
 
thanks for the call this evening Khan. I almost hacked a lung, but it was good to hear from you. if I knew 30 years ago what I know, I would still be able to breathe. I am taking Jeffs car to the front end shop on Friday. then I will be out of town for a short time. I would really like to meet you, but timing is everything brother. don't loose my number. thanks again, Lenny.
 
Plan of attack for the passenger side quarter panel . . . it's not there

The passenger side quarter panel is in pretty good shape, considering, except for the lower part behind the wheel well ( already replaced ) and the wheel well lip - it's rotted out pretty bad. SO the plan of attack os to try and figure out how to "match" the shape of the driver side wheel well opening to the passenger side opening ( when there's nothing there ) . . .

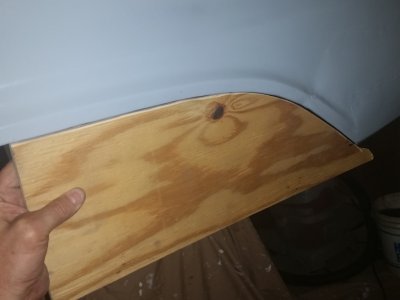
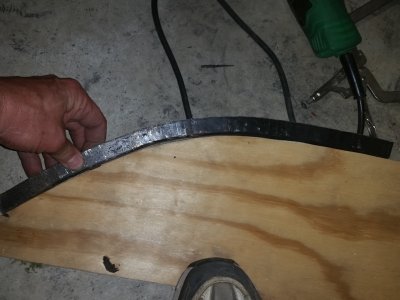
SO the plan is this - cut a form to the driver side wheel well . . .

sm_passqtr01.jpg

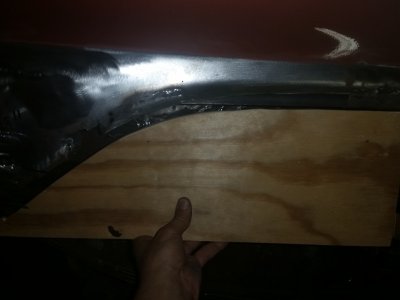
And then use that form to

sm_passqtr02.jpg
 
This will be about the end of the metalwork right? Gotta be feeling good to finally be here with the bodywork right around the corner. I think you've got the right approach to that quarter and I expect you'll knock it out in short order, good luck.
 
Glad I have no clue what I'm doing - building a wheel well from scratch . . .

No donor panel for this side, and a wheel well that is pretty much useless . . . so I've got to try and "re-create" some semblance of a 67 wheel well so I can move on with my build . . . so my plan of attack is to . . .

Uh . . .

wing it ? ! ? ! ? ! ? ( and a prayer ? ? )

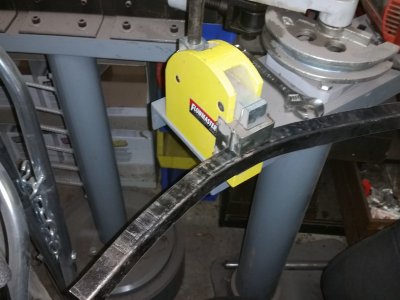
So I need a lip that matches the wooden shape of the driver side . . . how can we do that . . . match it on another piece of metal . . . use the stretcher to match the curve . . .

sm_passqtr03.jpg

Then after the shaping of the metal - compare it to the template curve . . .

sm_passqtr04.jpg

Then attempt to use this "new lip" and get it tacked into place . . .

sm_passqtr05.jpg

And then check to see how the form fits the template after the install . . .

sm_passqtr06.jpg

Got about 2 hours of head scratching, metal bending, form fitting, and tacking and grinding done tonight . . .

and the results . . . well . . . I think it "might" actually work ? ? ?
 
Auto Transport Service
Back
Top