Magnes
Well-Known Member
- Local time
- 7:09 PM
- Joined
- Nov 14, 2013
- Messages
- 286
- Reaction score
- 443
- Location
- in the Houston Texas area
I posted some of this in the 71-74 forum but this is probably a more appropriate place to do updates on my work so forgive me if any of you have already seen some of this before... Anyway, on to the story.
Last year I bought a 72 Satellite Sebring Plus and built that car to keep so I turned it into a Road Runner "clone" to suit my taste. Once I finished it, I went ahead and listed it for sale just to see what kind of offers I would get. A dude from Switzerland made a real good offer so I went ahead and sold it.
Before (taken around July 2013) and After (January 2014)


After I sold that one, I was kicking myself in the butt a bit and decided to just build another.
I really wanted to build one of these cars to keep for myself so as soon as that car sold I began searching again. I found my current project on craigslist in Texarkana, TX in April 2014. We shot out there, showed up early for the appointment, and scooped it up quick before the other people who were coming to look at it had a chance to buy it. Another guy showed up there before we even had a chance to load it and I was offered more than I paid for it but I had to pass. We drug it back home and I was a happy man...
This is how I found it. Had been sitting here since '97. A 1972 Satellite Sebring Plus. 80K miles. 318/904 car. All complete and mostly untouched. A few rusty spots but NOTHING like what you typically find with these cars. Sitting inside had really helped preserve it. White and black deluxe bucket interior with console. The dash wasn't even cracked on it. Was sitting on 3 flats but still had all the original road wheels and trim rings (including the spare).


We towed it home to Mississippi.

We got it home and with the help of my neighbors, I was able to get it off the trailer and into the garage. I started off by cleaning it up.


The majority of the paint came back to life. The thing is, it was thin. The vinyl roof was trashed and there was rust damage under that. Had a few dents. A lot of very small dings. There was some rust damage in front of the rear wheels. And there were a few areas where the paint had been blended in during repairs and that paint just wasn't holding up as well as the original paint.


The interior was really in good shape with the exception of the carpet (which was just old) and the driver's seat (which was REALLY tired, torn, and worn).
After I had the car cleaned up I got to work on the mechanics to get it to run. I went through all the regular stuff that you have to do after a car sits for 20 years. Afterwards, all it took was a shot of starting fluid and the car smoked to life. It ran good but smoked for a while and that smoothed out for the most part.
After getting it to run, I went to work on the brakes (which were froze up). I had to rebuild the whole brake system and then I bought it some new tires in the stock size. At this point, a month after buying it, I drove the car out of the garage...
The wife had been bugging me for a convertible so about this time I bought her a 77 Ramcharger and spent about 6 weeks building that for her. As soon as I was done with the Ramcharger we had to relocate to Texas.

It took another month to get settled in and get the garage set back up. As soon as that was done, I got back to work on this 72.
I stripped out the interior and glass and then I cut out all the rust. Cut out replacement panels from my green 72 Sat Sebring parts car and welded all that in place on the red car. At this point I was fired up and started busting *** on the bodywork...


I went through a lot of 2k Buildable primer. Lots of time on the sanding blocks. After a great many hours, I felt it was ready for paint. I went with a urethane basecoat / clearcoat. I shot the door jambs, inside the trunk lid, and some of the engine compartment areas (underside of hood, tops of the fenders, cowl) on one day and then painted the car the next day, all in my garage using my Devilbiss HVLP guns and a 2 stage 60 gallon tank. I shoot all the cars I fix myself at home during the weekdays to minimize any possibility of complaints.
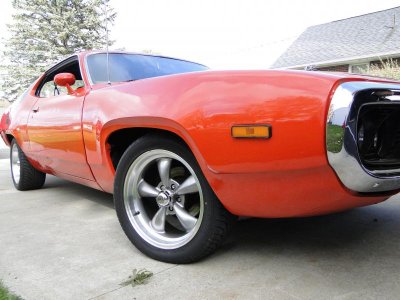
I shot it 2013 Dodge Header Orange, the same color available for the Challengers and other 2012-13 Dodges.


It laid out pretty flat but I did get a little dust in it as is to be expected when you paint in an open environment.

Several days later.


Then I colorsanded and buffed it out. Like glass.

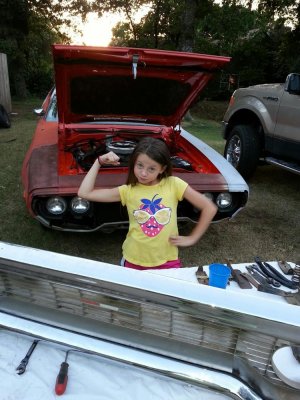
Time to start putting it back together (this was around the middle of October 2014)

That is the newly released AMD front bumper.

I did so much stuff during this time... So many new parts. All the chrome with the exception of the rear bumper. All new weatherstripping everywhere. All the emblems and decals. Adjusted everything. Installed a reflective white strobe stripe. Repaired and repainted the grill. Repaired and repainted the tail light lenses. Repaired electrical issues. Replaced every bulb in the car and cleaned all those connections and more.
Anyway, this is more of a "Cliff's Notes" version of what I've done so far so I won't bore you with tedious details...
Today the wheels and tires showed up.

American Racing Torque Thrust 2's. 17x7 fronts with 0 offset and 17x8 rears with -11 offset. BFG tires, 245/40/17 fronts 275/40/17 rears.


And that's it as of today, Oct. 28, 2014.
I've got a 440 being built for the car right now and a 727 trans. That should be going in it in a few weeks at the most. While my buddy's shop is installing the engine, I will be restoring the interior parts.
Anyway, there are more details but this has to be the longest post ever. I just wanted to post what I am working on right now. I appreciate this site and the helpful people here. I will add more details later and keep this updated.
Last year I bought a 72 Satellite Sebring Plus and built that car to keep so I turned it into a Road Runner "clone" to suit my taste. Once I finished it, I went ahead and listed it for sale just to see what kind of offers I would get. A dude from Switzerland made a real good offer so I went ahead and sold it.
Before (taken around July 2013) and After (January 2014)
After I sold that one, I was kicking myself in the butt a bit and decided to just build another.
I really wanted to build one of these cars to keep for myself so as soon as that car sold I began searching again. I found my current project on craigslist in Texarkana, TX in April 2014. We shot out there, showed up early for the appointment, and scooped it up quick before the other people who were coming to look at it had a chance to buy it. Another guy showed up there before we even had a chance to load it and I was offered more than I paid for it but I had to pass. We drug it back home and I was a happy man...
This is how I found it. Had been sitting here since '97. A 1972 Satellite Sebring Plus. 80K miles. 318/904 car. All complete and mostly untouched. A few rusty spots but NOTHING like what you typically find with these cars. Sitting inside had really helped preserve it. White and black deluxe bucket interior with console. The dash wasn't even cracked on it. Was sitting on 3 flats but still had all the original road wheels and trim rings (including the spare).
We towed it home to Mississippi.
We got it home and with the help of my neighbors, I was able to get it off the trailer and into the garage. I started off by cleaning it up.
The majority of the paint came back to life. The thing is, it was thin. The vinyl roof was trashed and there was rust damage under that. Had a few dents. A lot of very small dings. There was some rust damage in front of the rear wheels. And there were a few areas where the paint had been blended in during repairs and that paint just wasn't holding up as well as the original paint.
The interior was really in good shape with the exception of the carpet (which was just old) and the driver's seat (which was REALLY tired, torn, and worn).
After I had the car cleaned up I got to work on the mechanics to get it to run. I went through all the regular stuff that you have to do after a car sits for 20 years. Afterwards, all it took was a shot of starting fluid and the car smoked to life. It ran good but smoked for a while and that smoothed out for the most part.
After getting it to run, I went to work on the brakes (which were froze up). I had to rebuild the whole brake system and then I bought it some new tires in the stock size. At this point, a month after buying it, I drove the car out of the garage...
The wife had been bugging me for a convertible so about this time I bought her a 77 Ramcharger and spent about 6 weeks building that for her. As soon as I was done with the Ramcharger we had to relocate to Texas.
It took another month to get settled in and get the garage set back up. As soon as that was done, I got back to work on this 72.
I stripped out the interior and glass and then I cut out all the rust. Cut out replacement panels from my green 72 Sat Sebring parts car and welded all that in place on the red car. At this point I was fired up and started busting *** on the bodywork...
I went through a lot of 2k Buildable primer. Lots of time on the sanding blocks. After a great many hours, I felt it was ready for paint. I went with a urethane basecoat / clearcoat. I shot the door jambs, inside the trunk lid, and some of the engine compartment areas (underside of hood, tops of the fenders, cowl) on one day and then painted the car the next day, all in my garage using my Devilbiss HVLP guns and a 2 stage 60 gallon tank. I shoot all the cars I fix myself at home during the weekdays to minimize any possibility of complaints.
I shot it 2013 Dodge Header Orange, the same color available for the Challengers and other 2012-13 Dodges.
It laid out pretty flat but I did get a little dust in it as is to be expected when you paint in an open environment.
Several days later.
Then I colorsanded and buffed it out. Like glass.
Time to start putting it back together (this was around the middle of October 2014)
That is the newly released AMD front bumper.
I did so much stuff during this time... So many new parts. All the chrome with the exception of the rear bumper. All new weatherstripping everywhere. All the emblems and decals. Adjusted everything. Installed a reflective white strobe stripe. Repaired and repainted the grill. Repaired and repainted the tail light lenses. Repaired electrical issues. Replaced every bulb in the car and cleaned all those connections and more.
Anyway, this is more of a "Cliff's Notes" version of what I've done so far so I won't bore you with tedious details...
Today the wheels and tires showed up.
American Racing Torque Thrust 2's. 17x7 fronts with 0 offset and 17x8 rears with -11 offset. BFG tires, 245/40/17 fronts 275/40/17 rears.
And that's it as of today, Oct. 28, 2014.
I've got a 440 being built for the car right now and a 727 trans. That should be going in it in a few weeks at the most. While my buddy's shop is installing the engine, I will be restoring the interior parts.
Anyway, there are more details but this has to be the longest post ever. I just wanted to post what I am working on right now. I appreciate this site and the helpful people here. I will add more details later and keep this updated.
Last edited:
")