• When you click on links to various merchants on this site and make a purchase, this can result in this site earning a commission. Affiliate programs and affiliations include, but are not limited to, the eBay Partner Network.

The return of MAXIMVS...

Updates:
  • Got the MW intake off to fix my screwup. New MW gasket set coming in tomorrow so I can go forward.
  • Trans line install and connection tomorrow - parts got in OK
  • Alternator bolt & spacer kit came in today, finish off the engine front end tomorrow. 440 Source came through with no issues after I got the engine front end kit in sans the alternator bolt kit (PN# 109-1511). No biggie, they made it right.
  • Got the other 1/4" thick carb to intake baseplate gasket in. A&A sent one on a pair order but once again, no biggie they immediately made it right. BTW, the A&A stuff is top notch.
Chuck (snook)
 
Updates:
  • Mixed blessing on the MW xram install screwup. I discovered that the rear block oil gauge pipe plugs were finger tight, D'OH. With the xram off, access is easy, so I installed and sealed the smaller pipe plug and installed the oil pressure gauge and larger SS hose fitting and sealed it. Would have been a huge PITA if I didn't catch it before fire up.
  • Connected the radiator trans cooler to the hard lines, so the trans is all sealed up.
  • Got the MW xram intake gaskets in today, I ordered a few extra sets for future use if needed. The Felpro number is PN# 1218
  • Finally got the upper radiator hose sorted. NAPA PN# 7196 (1.5" both ends) is correct a perfect fit for a 383-440 with a 22" radiator with a passenger side upper radiator connection, see attached pic. Napa PN# 7370 (1.75" both ends) when using a later water pump housing with a 1.75" neck (original is 1.5" on housing end and 1.75" on rad end) is for the lower rad hose (drivers side) but you will have to trim to fit.
Chuck (snook)

20220527_194407.jpg
 
Last edited:
Updates:
  • Well, got the xram off and reversed. It was NOT fun. For those that don't know (and I didn't till I got this one), there are specific length (cast into the top of the xram by their respective intake bolt plugs) socket head bolts. Each bolt assembly has a bolt of a specific length (2.5", 2.25", 2.0" and short bolts , 1 for either side, for a total of 8 bolt assemblies. These assemblies consist of a bolt, thick lock washer and small OD flat washer. Installation is fraught with apprehension, as dropping a lock washer or flat washer while installing is a distinct possibility. I've found that a liberal application of Permatex #2 keeps everything together. BUT... the flat washer can become cocked in the recess and keep the bolt from getting a thread or two to get it started. Thankfully, if you use carbon steel bolts, locks and flats, you can correct a fubar in progress with a magnet. This happened to me on the drivers side 2.5" bolt assembly. Anyway after an hour long fight, I got it done. Do yourself a favor and chase the head to intake threads - I did and it paid off greatly. You need to coat the intake bolt threads with a sealer - I used Permatex #2 - as these bolts are in the intake plenum and are through threaded into the lifter valley through the MW heads. You probably won't have this concern with the modern aluminum heads - they are usually blind holes but I don't know; just keep an eye out if it is an issue for you.
  • The electrical system was shot. I just got the 1/0 flex and 6AWG cables in. The 1/0 is from the trunk mounted battery and the 6AWG is for the 100A single wire alternator that is going on. I'll do the install later, maybe in the next few days.
  • Pleasant surprise time. I ordered 2 sets of Felpro #1218 (max wedge intake manifold gasket set) from Autozone online Thursday morning and they were delivered overnight the next day. No extra charge, was not expecting that. You may want to give them a try.
  • Ordered a new aluminum master cylinder kit from Dr. Diff today. The 1976-1982 master cylinder kit I installed 20 years gave up the ghost and this time around I'll use a MC with a brake pedal rod that has a provision to keep it in the bore (retaining ring). Since the car will be street driven, I want it to be as safe as possible - I don't want to lose brakes if the rod pulls out from the bore... too many opportunities for jokes with that last sentence.
Chuck (snook)
 
Last edited:
Updates:
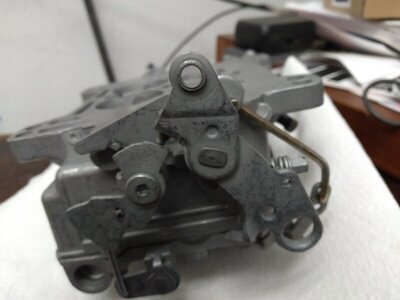
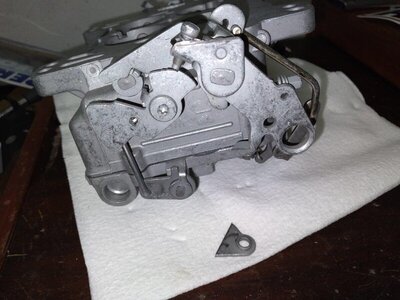
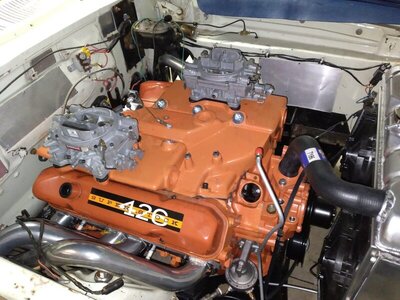
  • Modified the Eddy 1405's (600 cfm, will move up to 750's or 800's if it needs it later). See pics, the kick down arm hangs down too low and contacts the xram top - so I whacked it off since I use a RMVB and a kickdown mechanism is not needed. Plenty of clearance now.
  • Carb linkages in progress. Looking like an engine now.
Chuck (snook)

20220529_104512.jpg 20220529_105746.jpg 20220529_114655.jpg
 
Updates (where the hell is the bullets choice anyway?):
Mounted the alternator.
Tried to route the XRAM fuel lines - going to need some guidance for this - the kit doesn't line up.

Chuck (snook)
 
Updates:
- Ordered the correct MW throttle cable from A&A.
- Started sorting out the original dash wiring - than God Richard saved the old harness. Will take some reconditioning but doable. There is NO replacement available. Lots of sins to rectify here. See pic
- Need to replace the turn signal switch, as it was cut off from the column. Appears to be the early 62-63 type with the flat plug in connectors. Talking to a vendor who is supposed to make this TS harness with the correct flat inserts.
- Appears that I got the wrong fuel line setup - the supposed correct kit is on order from Fine Lines and should be here in a few. I'll update if this is the correct kit for using Eddy 1400 Series AFB's with the OE MW xram intake.
- Still sorting out the carb linkage fittings - what a PITA.
- Installed the MW xram air cleaners to check fit and get them out of harms way while I work out here. See pic

Chuck (snook)

20220531_164823.jpg


20220531_164835.jpg
 
Great watching the rebuild of your car.
I seem to recall following the original build on a different website.
 
Great watching the rebuild of your car.
I seem to recall following the original build on a different website.

Yeah, that would be Moparstyle back in 2002. That was when my Dad passed in 2002. I had made a decision to make 2002 the year that I would dedicate NSS races in memorium of the old man. In 2001 Dad would sit in that cold PA garage while I did work on the car to make sure I was safe in case of the car fell on me. I miss him, he was and is the model of a great Dad. I miss him daily. I was doing a 69 roadrunner Dana 60 change and he would not leave that cold *** garage until I was finished, I still miss him so. I was truly blessed and I know and acknowledge that.

Chuck (snook)
 
I have been blessed with good parents and great dogs. I am forever grateful for that. I know that many out there have not had that experience.

Chuck (snook)
 
Updates:
- Finally got the fuel system sorted out. The correct Fine Lines Kit ($74.07 + shipping) is: Part Number RPC6203OM (62-63 Mopar B-Body 413/426CID Wedge, w/ Edelbrock Dual 4BBL Carbs, X-Ram, Pump to Carbs Fuel Line Set; Steel). This is the correct set to use when you are running Edelbrock 1400 series, in my case I'm using 600 cfm 1405's for now but if I go with 750's or 800's it'll be plug and play. No directions come with the sets from Fine Lines, so I took pics to assist anyone else going this route. The factory 3447's & 3705's are too expensive for me; if my car was an original MW car, it would be worth it.

- the carb linkage bushings, correct MW throttle cable will be in this week.

- next up is installing wiper motor and linkage and sorting out the wiring and installing a new aluminum master cylinder and bleeding the system.

- shooting for engine start up in the next few weeks. If everything goes OK, it's off to the gear shop for the spool and 4.56 change out to a D60 Powr-Lok and 4.10's; while it's there the exhaust system with 3" cutouts will be fabbed up. When that's done, it's off to the body shop for hood/decklid paint match and fixing some spots where the Dzus brackets I installed 20 years ago and removed a few months ago.

- Once all that is done, it's off to the alignment shop.

Chuck (snook)

DSC_8905.jpg


DSC_8906.jpg


DSC_8907.jpg


DSC_8908.jpg


DSC_8909.jpg


DSC_8910.jpg


DSC_8911.jpg


DSC_8912.jpg


DSC_8913.jpg


DSC_8914.jpg
 
Things have been busy with the job, so not a lot of free time available to do MAXIMVS work.

Updates:
- Decided to change out the old fuel cell out for a new one, see pics
- Routed and secured the old original 1/2" Teflon lined braided stainless steel lines to the new fuel cell - what a PITA. I did it right back then but still a PITA - stuff is still in great shape.

Chuck (snook)

20220615_181715.jpg
 
My old lady is a Gladiator fan of the movie of the same name. The lead character was a general named MAXIMVS (Russel Crowe). The sword he used is known as a Gladius, a common gladiator sword. In Roman script, the U is denoted as a V. Super stock days mopars used an arrow pointing forward on some cars. I thought that a Gladius used in the same manner would honor that tradition. I added a pentastar to the Gladius pommel as an added enhancement.

That's it.

Chuck (snook)
 
Updates:
- Got the new 1.031" bore master cylinder and adaptor from Cass (DR. Diff) mounted today, see pic. This replaces the 76-82 corvette four wheel disc brake master cylinder that was the hot ticket 20 years ago from SSBC. Had to press in the adaptor studs but with that HF press, was a piece of cake.
- Ran the 1/0 & 6AWG cables run today from the trunk, just need to terminate. The 1/0 is the feed from the battery in the trunk all the way forward from the trunk shut off switch and the 6AWG is for the 100A single wire alternator. I'm going to post a tutorial on how to lug a 1/0 flex cable, should be of help to some.
- Got the wiper motor and transmission mounted with all new seals - what a PITA but it came out well.

Chuck (snook)

20220617_203649.jpg


20220617_203700.jpg
 
Updates:
- Went to install the new MW throttle cable and discovered that a Lokar generic cable was in place. Removed that and round filed it. Went to install the correct A&A (crossram connection) cable and soon realized that it would be way easier to unbolt the accelerator bracket, install the cable outside the car and then re-install it. That's a tip to save you aggravation if you ever have to do it.
- Here's another tip for dummies like me. Make sure you remove the xram carb linkage alignment pin before you try to operate the throttle. If you have it in place it will seem like it's jammed and won't operate. At this point it is your mind that is jammed and not the linkage. Duh.
- Fluids added tomorrow and then a trial starter turnover and priming.

Chuck (snook)
 
You know, I sat in the garage a bit ago and looked at the car. I am so sore from all the gymnastics a 65 year old fat guy has to deal with when contorting into small spaces when working on a car like this. I remarked to myself "Max you're going to kill me one of these days." After a while I realized that Max is really keeping me alive and somewhat limber when I exercise while bringing him back to life - I guess he's bringing me back to life as well. So much for the philosophy, I guess I'm trying to say that I still love it after all these years.

Chuck (snook)
 
Auto Transport Service
Back
Top