• When you click on links to various merchants on this site and make a purchase, this can result in this site earning a commission. Affiliate programs and affiliations include, but are not limited to, the eBay Partner Network.

1970 Plymouth Sport Satellite from Junk to......

I use PPG black epoxy JP377 in the shopline series. I think they also have white and gray. Inexpensive and works very well.
 
As a habit I usually put PPG high build primer down over the epoxy (withing the 72 hour window) just to make life easier as the epoxy is hard to sand and I don't have to mess with any sanding if still in the window. But you don't have to as my current project is in mostly epoxy as I needed to coat the bare metal before it started to rust. Just have to sand it again before the high build primer PPG JP202 goes down.
 
As a habit I usually put PPG high build primer down over the epoxy (withing the 72 hour window) just to make life easier as the epoxy is hard to sand and I don't have to mess with any sanding if still in the window. But you don't have to as my current project is in mostly epoxy as I needed to coat the bare metal before it started to rust. Just have to sand it again before the high build primer PPG JP202 goes down.
I was going to ask you that exact question but ya beat me to it. So is there no window with the primer? Its always difficult to plan the windows because bare metal rusts and you want to get the epoxy on right after blasting or what ever prep you use. So you prime it in the window for a chemical bond (within 72 hrs). So the primer is a mechanical bond?
 
I'm glad to see you dig in and get stuff done. Good for you, man!
 
Yes. High build will have a chemical bond within the window to the epoxy, after that window you have to sand the epoxy for the high build to have a mechanical bond to the epoxy. I have done it both ways and either works fine just use the grit that the high build asks for if sanding. If sanding the epoxy make sure it is fully cured or it will cause you problems.
 
Yes. High build will have a chemical bond within the window to the epoxy, after that window you have to sand the epoxy for the high build to have a mechanical bond to the epoxy. I have done it both ways and either works fine just use the grit that the high build asks for if sanding. If sanding the epoxy make sure it is fully cured or it will cause you problems.
Thanks BG what about after primer for say base coat. Is the base to primer a mechanical bond?
 
I can tell you what I do: Usually I sand my high build to get the finish to where I want it. Then it gets a little more complicated. I do a final sand with 400 grit, then I spray PPG JP331 (white or they have darker colors if needed) sealer on that surface. I usually wait about 30 minutes before I start applying my two or three base coats. You could skip the sealer but it is cheap insurance to prevent any ghosting or bleeding or whatever you want to call it when the color below your base is not all the same and it shows thru. I know people that just use the high build (thinned out) as a seal coat. I have not tried that so I have no idea on that. To answer your question, if you choose not to use a seal coat then the base would have a mechanical bond to the scratches in the high build. Using a sealer, then there is a chemical bond between the base and the sealer. Just a note, if you don't use a sealer you might want to use 600 grit as the sealer will fill in the 400 grit scratches and since your not using it you would be asking your base to do that. But as always, check your data sheet and use the grit they want for their base to bite.
 
Simply wow Leo’s work is meticulous! The hinge work he did is fantastic! Anyone needing this work done should think about having Leo do it. Fast turnaround like two weeks. I really appreciate quality work and that is what this is!

2CB0AD55-586B-4061-A37A-1C8D7C790010.jpeg
 
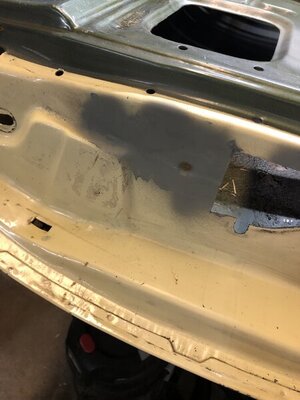
So I am not sure the best way to proceed on the floor. I would love to get it sand blasted and then epoxy it but the motor and trans are in and I am not sure if thats a good idea. Any thoughts or suggestions on what I should do to prep the floor here?

View attachment 976349
Unless you are going for a concours car or have money, energy and time to burn. I'd wire brush a little as needed, a little sanding here and there, clean it good, apply good sealer, then hit it with $3 walmart spray cans. Heck, it's never going to be seen and will never rust from the inside again, within the next 50 years anyway. Then put the extra money, energy, and time saved into other higher priority things.
 
Is that the amp meter? Do you know about the amp meter bypass mod? A lot of guys do it. It is a lot safer for your car..
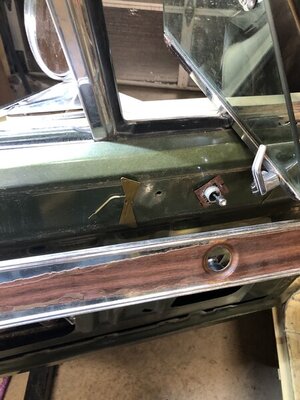
Yes I plan to do the bypass for safety even though the terminals look perfect.
 
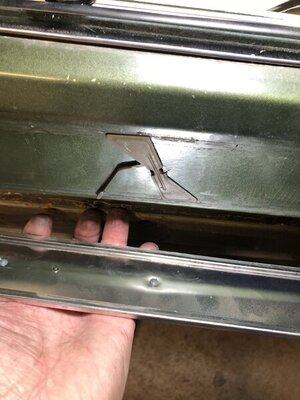
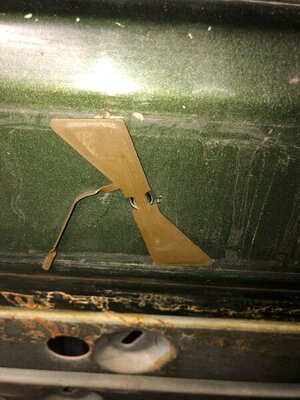
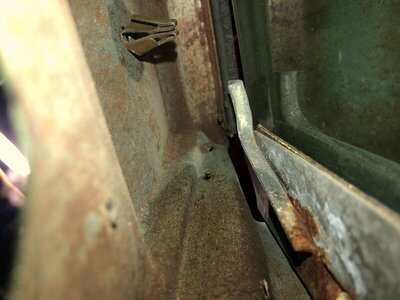
Had to pull the chrome door valance unique to Sport Satellite and GTX. This is a delicate assembly and needs to be handled correctly. I have not found any good pictures or explanations regarding this part. For others that follow down this path this is my Arne Saknussemm moment. These are what I will call K clips made of spring steel. The trick for releasing them is to pop the small finger by very carefully prying an opening. Once the small finger is popped out of the channel use a flat blade screw driver and rotate the clip. Bingo. Not sure how to get the clip out of the door itself yet. Last picture shows how it’s anchored.

2606E36D-8D05-41D6-9C1A-3516C413CB0C.jpeg A7C2E3D0-84E8-4156-B8DE-D7391C31BA00.jpeg 65C23801-DFDF-4962-800E-A0929301CB15.jpeg 1B882CC2-B523-4362-A86E-2B8077E2F01E.jpeg
 
What can I say? Mopar mess? Buggars? What I plan to do with this I am contemplating. Keep it all stock and fix all this stuff or modify it.
All I want are decent gauges controls and a functional AC system AND easy access to all that after I an done if possible.

Got some time to chew on it and learn what a Vintage Auto Air needs from this set up. A lot of work either way.....

View attachment 975829 View attachment 975830 View attachment 975833
Guess it depends on what you want. Nothing of mine worked - gauges, AC, heat and all AC components were long removed. So I had vintage air installed. I think the fans are too loud - but I do not know what the original sounded like. :) But they do make a kit that clones the original controls, so you could make it work. (I think you can get one that use the original heater core?)
 
Remembering why I laid down the cash for this car. I knew the metal on this car was incredible. Look at the bottom of the door here. This one spot tells it all......AZ car. The interior skin is like new. Crazy......

28F5B6C9-3319-46DE-8AFE-13703D778329.jpeg 8D9F27B2-531D-478E-9577-EE2C5FCC941C.jpeg
 
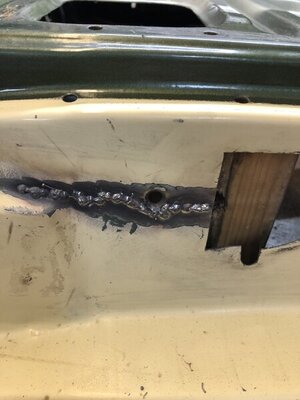
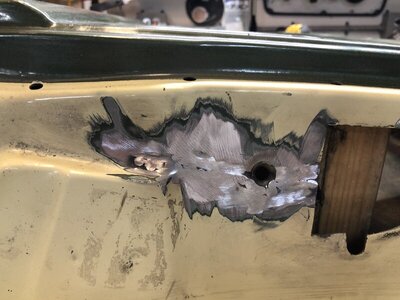
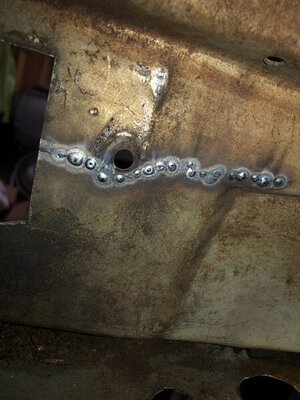
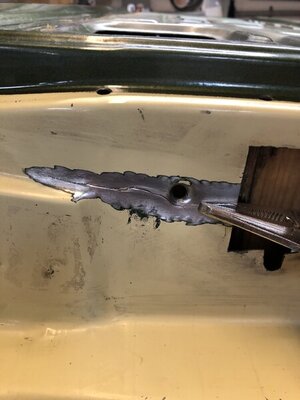
So in this (driver) door there “was” a stress fracture at one of the screw holes in the latch. Well I wanted to TIG it but I ain’t got no TIG (a blues song?). So the trusty old MIG turned out fine. 50% penetration (my second pass every other spot) is not worth going after as the metal is thin here.

Is this common in B-Bodies?

1E262977-FC68-496D-82EC-3FFFDFC92F9C.jpeg 4717DB4D-C04F-460B-8C3E-78CD4BC84248.jpeg 1BA942DB-FECE-4FD4-A4B7-34270E719460.jpeg 5412609D-F7E4-4C5F-960C-448FF62001D3.jpeg ABEB5F97-41E5-407F-9FAD-6DE0055A00C2.jpeg
 
Last edited:
So in this (driver) door there “was” a stress fracture at one of the screw holes in the latch. Well I wanted to TIG it but I ain’t got no TIG (a blues song?). So the trusty old MIG turned out fine. 50% penetration is not worth going after as the metal is thin here.

Is this common in B-Bodies?

View attachment 978453 View attachment 978454 View attachment 978455 View attachment 978456

I had the same thing in my 70 satellite, driver's side door. Welded it up.
 
I had the same thing in my 70 satellite, driver's side door. Welded it up.
Good to know that its not uncommon. That metal there is very thin for that application IMO.
 
Auto Transport Service
Back
Top