• When you click on links to various merchants on this site and make a purchase, this can result in this site earning a commission. Affiliate programs and affiliations include, but are not limited to, the eBay Partner Network.

Tremec 5 speed conversion in a 1970 Charger

It makes sense to address whatever problems that I come across but I have to resist the urge to make changes that are not needed. I always have to keep in mind that "The Snowball Effect" is a real phenomenon that turns a 3 week project into three years.

The bellhousing bolts are accessible with long extensions and a wobbly socket. The lower 2 "backwards bolts" are not hard to reach unless the car has headers....
SST 164.JPG


It was 2014 the last time I had the transmission out of the car. I forgot that to get to the RH bolt, the RH header has to be unbolted from the block and wedged away a little to get a wrench in there.

SST 166.JPG
SST 167.JPG
SST 168.JPG
 
Transmission is out. The jack is a godsend!

SST 169.JPG
SST 170.JPG
SST 171.JPG
SST 172.JPG


The Bouchillon kickdown cable and neutral safety switch wiring are still hanging. The engine was propped up using a tall jackstand.
 
I took a spray bottle with gasoline in it to clean off the oil.
I have 15 gallons of skunky gas pumped from the tank of a 66 Dart that a buddy is storing out back. It still works for knocking the oil loose from the underbody.
Looking at the last picture above, it is clear that the leak is not coming from the oil gallery plugs or the rear main oil seal retainer.

SST 174.JPG


Here we go. Bell housing, 3/8" bolts and the dial indicator to check pilot hole runout.

SST 175.JPG
SST 176.JPG


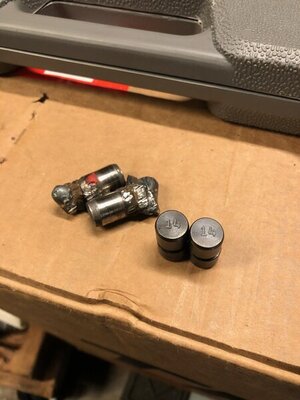
I also bought .007 offset dowels just in case.


SST 177.JPG
 
Now that you have that much access get more light in there & pinpoint your leak.... A mirror might be helpful too... Look at the rear of the intake, check the galley plugs, get a good look at the valve covers...

I'd consider bolting the flywheel, bell housing & starter up & run it without a trans in place...

So you clean it & then look for leaks?????? How can you decide if somethings leaking when you just cleaned it up....

I will agree it's a great time to run the engine & pinpoint a leak...
 
The Tremec transmissions are built with more precision than the 833s of old. Silver Sport is very clear about how the centerline of the transmission input shaft needs to be in relation to the engine's crankshaft. They have a .006 tolerance, .0012 total runout. They warn that installing the transmission without checking the runout voids the warranty. Their assertion is that the tapered bearings they use cannot tolerate much of a misalignment and if one exists beyond spec, the bearing will wear faster, it will be noisy, hard shifting, pop out of gear, maybe resulting in clutch damage and hair loss as well.
This is a new thing to me. This was the first effort at measuring pilot hole runout.
In April 2019, Mopar Action magazine had a brief segment on doing this.

SST 186.JPG
SST 187.JPG


Now read the last sentence.

SST 188.JPG


20 minutes?
20 minutes my ***! Holy crap, what a pain in the ***. The dial indicator I bought has a large dial gauge and barely clears the edge of the pilot hole.

SST 180.JPG

SST 181.JPG
 
The base of the dial indicator is magnetic with an on/off switch. I had to mess with the damn thing for quite awhile to get the rods and knobs to clear as well as the gauge itself. Some suggest to get someone to rotate the crank from the front while another person reads the gauge and records the numbers. I did it myself using a breaker bar and socket, moving the crank about 1/8 a turn at a time. It is also suggested to remove the spark plugs to allow the engine to spin easier. I had the right side plugs out to get the header loose but the LH plugs were still in.

SST 178.JPG


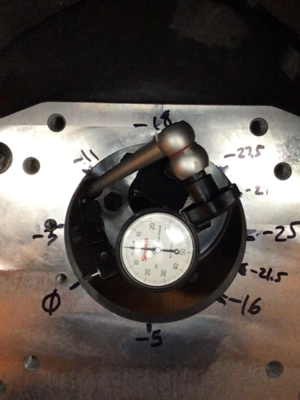
The first thing I did is to set up the gauge and pick a starting point. I started at the 10:00 position and set the gauge face to ZERO. I had some contact to the pilot hole with the knobs which affected the numbers so I wiped the numbers off and started over.
The goal is to start somewhere, set the gauge to ZERO, make a full revolution and have the gauge return to zero.
When the gauge dial was not in view, I used a mirror to see.

SST 184.JPG


The above picture was my 3rd attempt. The 9:00 position was my ZERO point, from there the numbers grew. This means that The bellhousing is half of the .027 off center to the right horizontally. To be perfectly centered, it needs to shift .0135 to the LEFT. The offset dowels that I bought are the ones with the smallest offset, .007. I need to call Summit and order the next size up.

SST 177.JPG
 
Last edited:
Now that you have that much access get more light in there & pinpoint your leak.... A mirror might be helpful too... Look at the rear of the intake, check the galley plugs, get a good look at the valve covers...
I'd consider bolting the flywheel, bell housing & starter up & run it without a trans in place...
So you clean it & then look for leaks?????? How can you decide if somethings leaking when you just cleaned it up....
I will agree it's a great time to run the engine & pinpoint a leak...

It does not leak when idling in the shop. It only leaks after driving it awhile. I have not noticed any oil smoke as I drive though the streaks on the headers are dark enough, I should have seen something.
I've had some oil weep through the pan at the timing cover but the pan rails are dry at both sides. The #8 header tube is crusty near the valve cover. It is entirely possible that while driving, the high oil pressure and slower drainback causes oil to pool near the rear of the heads. IF the RH valve cover gasket isn't aligned just right and is leaking, the oil may collect and burn on the headers down near the transmission.
 
You have one to many zeros to the right of your decimal point.... .0007 is 7/10 of one thousandth of an inch....
 
Also either your readings are off or your hole in the bell housing isn't round...

27 + 0 = 27
20 + 2 = 22
13 + 10 = 23
20 + 8 = 28
26 + 4 = 30

If the hole is round (I'm betting it is) they should all be equal...
 
I rounded up on the numbers. There were a few that were at 1/2 a number.
I'm going to order the .014 offset dowels. That is the next size up. This will put the bellhousing to almost zero runout.
 
The measuring points don't all oppose perfectly either. I might see about doing this another time with the Wife watching the dial. I could put marks at equal distances to get the math right.
 
Honestly I use four marks 90 degrees apart... It'll tell you all you need to know, more marks just complicates things...
 
The way you have your indicator set up isn't going to make your job any easier, you want that thing close to centerline and as close to a 90 degree angle to the bore as possible. Weird angles can make them chatter or pull. I agree with 1 Wild R/T, check in 4 locations to simplify. I'm sure you already get this but always end where you started and make sure it still reads what it did previously, those magnetic bases move pretty easily.
 
Last edited:
those magnetic bases move pretty easily.

Yup... For that job weld a rod to a tab that can be bolted through a flywheel bolt... A solid mount is critical to repeatability...

Even a genuine Noga base can move, but it's allot less likely that a Chinese mag base...
 
The way you have your indicator set up isn't going to make your job any easier, you want that thing close to centerline and as close to a 90 degree angle to the bore as possible.

I agree. It can't be done with this dial indicator. The rods are too long, the brackets and clamps are too big and clumsy. A smaller and more compact unit would have made setup much easier.
 
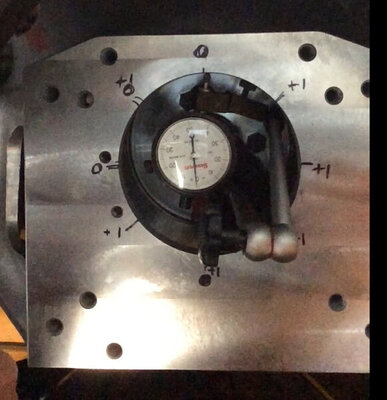
i did my alignment with flywheel on and the following mag base from amazon - looks like it will work with your gauge - Clockwise Tools MGBR-01 Magnetic Base Stand for Digital Dial Indicator Gauge 176lbs Max Pull
by Clockwise Tools:

https://www.amazon.com/dp/B07KPY6ZC3/ref=cm_sw_em_r_mt_dp_jGYbGb13AKH4G?_encoding=UTF8&psc=1


also i used the Summit 14’s dowels in my 440 block no issues. hardest part was getting out the originals....i heard a big whoosh of 1966 when each got pulled out.

and i found it easier to video the alignment and check every few pulls of the crank....tedious but got it within a thou


now youre having fun right Kern?....youre going to like 2000rpms soon enough


watermelon

06EC9B62-0EA1-4EB7-91EE-7451D58E7E97.png A9ACC56F-ABA3-4F3B-8CA2-22EFB8762A2A.jpeg A205102B-D095-4F60-9278-1650F52FAE50.jpeg
 
This is the part that still confuses me to this day - and I'm betting some serious Benjamins
my own bellhousing is nowhere near centered in Fred.
I get the gist of what the goal is - it's the machinations of reading whatever device that's throwing
me off.
For example, the welded rod onto the tab thingy @1 Wild R/T speaks of - what would you do with that?
Bend the end of the rod at a 90* to be the "pointer", then measure the gap between the end of it and
the edge of the bell hole at (4) places (like reading a spark plug gap)?
 
Auto Transport Service
Back
Top