• When you click on links to various merchants on this site and make a purchase, this can result in this site earning a commission. Affiliate programs and affiliations include, but are not limited to, the eBay Partner Network.

just a little off the back and sides please

From my perspective, what I am learning is that all metal must be super clean and bare metal when welding, so that is your "prep". If it is somewhere where you can't reach it later to paint it, then some weld-thru primer is likely appropriate.

For the pinholes: I'd grind them out until you get good metal. Then they might not be pinholes any more! The other way is to put rust converter on them, and then later fill them with JB weld or another epoxy.

Just my thoughts - I'm sure the experts will chime in...

Hawk
 
Well, I've been cutting and grinding metal over the last couple of weeks and now I have another question. I've been creating patch pieces in anticipating of getting to my welding (I've been studying videos and purchased my gas). Question #1: Are there tips for creating the patch piece? I understand that I'm to bevel the edge to allow the weld to penetrate. Question #2: How tightly/loosely should the patch piece fit? Question #3: Is it preferable to weld this piece in from the inside (I have access) or from the outside? (The piece isn't finished and needs to be shaped and cleaned up.)

IMG_1633.JPG IMG_1634.JPG
 
My tips:

#1: Keep as much original steel as possible, but if you can oversize the patch and then cut through both a the same time it will fit tight. This will allow a "butt" weld which will be very strong and not trap water/debris. In general make sure the patch is flat or slightly recessed. If it sticks out it will be a bodywork nightmare.
#2: For butt weld, tight as you can. A big gap will be more challenging to weld/bridge.
#3: Butt weld outside. That way you can grind smooth and check your work. I usually clean up the inside if I can get to it after weld to make it look better. The key on welding this is patience. Small weld stiches far apart and lots of cooling time.

RGAZ
 
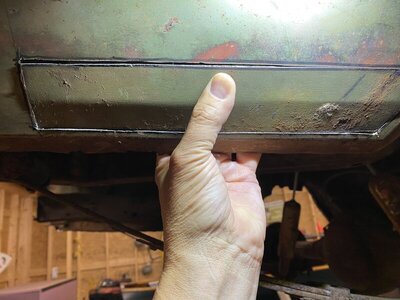
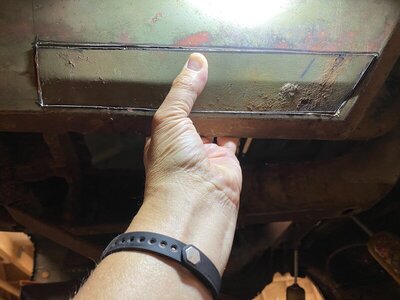
And information is what I'm here for! As I'm chopping up the trunk and discovering more rust, I noticed that the brace that holds the driver side trunk hinge to the wheel well is rusted. I'd rather NOT replace this piece if I don't have to. So I used some of the metal from my aforementioned chopping and fabricated a replacement piece (picture #1 and #2). Questions:
  1. What do I need to prep the metal for welding?
  2. I left the metal tabs from the rusted original and ground them down thinking they would allow for a great anchor for my replacement. Thoughts?
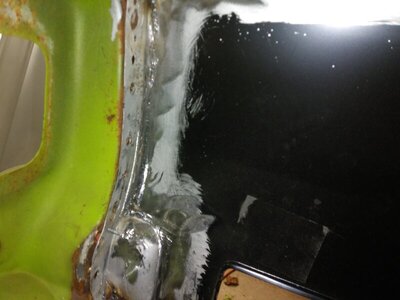
  3. There are pinholes in the wheel well. Can I just use POR or something to fill these in? I'm not going for a concourse restoration....
Thanks!

View attachment 1165967 View attachment 1165968 View attachment 1165969

go back and read all the posts..... i covered most or all of this in some way.....sandblast, epoxy prime and weld thru are your friends
 
My tips:

#1: Keep as much original steel as possible, but if you can oversize the patch and then cut through both a the same time it will fit tight. This will allow a "butt" weld which will be very strong and not trap water/debris. In general make sure the patch is flat or slightly recessed. If it sticks out it will be a bodywork nightmare.
#2: For butt weld, tight as you can. A big gap will be more challenging to weld/bridge.
#3: Butt weld outside. That way you can grind smooth and check your work. I usually clean up the inside if I can get to it after weld to make it look better. The key on welding this is patience. Small weld stiches far apart and lots of cooling time.

RGAZ
Thanks, RGAZ. Exactly what I was looking for on the patch cut.
 
go back and read all the posts..... i covered most or all of this in some way.....sandblast, epoxy prime and weld thru are your friends
I actually have your postings printed out, eldubb440! You recommended a weld-thru but didn't recommend a epoxy primer. Do you have a favorite?
 
I actually have your postings printed out, eldubb440! You recommended a weld-thru but didn't recommend a epoxy primer. Do you have a favorite?

every paint company makes one, some are harder to sand than others (for later in the job over bodywork).....I prefer Southern Polyurethanes (SPI) it's the only primer I use start to finish, other than the weld thru ........ it's also fairly priced

Epoxy Primer | SPI (southernpolyurethanes.com)
 
the quarters will dictate things from this point on....... get the quarters tacked firmly into place, attach the drop off to the bottom of the quarter with a couple screws, you may need to adjust this a bit....... now jack the entire trunk and rails into place and screw or tack the pan to the drops and inner wheel house

Tip: where the drops meet the trunk pan....drill the plug weld holes in the trunk pan, not on the drops: it leaves more room for the welder and grinder..... where the trunk pan meets the inner wheelhouse, drill the holes in the wheel house for the same reason. If the inner wheelhouse is rusty swiss cheese, just replace the bottom inch or so with new metal

....... use enough screws or tacks to hold it firmly in place until welded........ I leave the tail panel off until all the work inside the trunk is complete...... last, attach the tail panel, test fit quarter extensions, your deck lid is where you set it earlier and will help......... this stuff ain't rocket science, but patience and cleanliness is key.......good luck

Thanks for all the great info eldub440.

Glad I stumbled on this post today, I've been pondering what would be the best order to tackle mine in.

Pulled the tail panel yesterday (used several sheet metal screws from tail panel to quarter for alignment when I put it back).

PXL_20211009_211804319_2.jpg


Based on reading this thread, sounds like from here I should:
  1. Cut out trunk floor and extensions
  2. Blast rails (which are thankfully in great shape) then epoxy / weld thru
  3. Weld the trunk pan in place (don't tack to wheel wells yet)
  4. Cut and tack my lower quarter patches in place both sides
  5. Screw the trunk pan extensions to the quarter patches
  6. Jack as needed for alignment (6x6 across the rails, under the pan to jack with)
  7. Temp screw my tail panel back in place using my alignment screws
  8. Tack pan to wheel well and pan extensions
My biggest debate had been when to cut and tack my quarter patches in place to make sure my body lines are still good.

Good luck TT, I'm right there with you and applaud your courage to tackle a project like this. Has taken me a while to muster the cojones myself.
 
I saved the original bumper recess areas, the taiwan stampings are too much hit and miss..... I butted up just behind the door jamb, this car has like no rust in any of the seams so I'm not going to disturb original spot welds if I don't need to. the leaded area where quarter meets the rocker is also cherry, so I will work around that also....ran out of argon, will fill it in later

backandsides7.jpg

backandsides6.jpg

backandsides8.jpg

backandsides9.jpg

backandsides4.jpg

backandsides10.jpg

backandsides11.jpg

backandsides12.jpg

recess.jpg
backandsides5.jpg
 
Last edited:
I saved the original bumper recess areas, the taiwan stampings are too much hit and miss..... I butted up just behind the door jamb, this car has like no rust in any of the seams so I'm not going to disturb original spot welds if I don't need to. the leaded area where quarter meets the rocker is also cherry, so I will work around that also....ran out of argon, will fill it in later

View attachment 1189573
View attachment 1189572
View attachment 1189623
View attachment 1189575
View attachment 1189570
View attachment 1189576
View attachment 1189587
View attachment 1189588
View attachment 1189599 View attachment 1189571

My bumper recess areas are toast unfortunately, but most of the quarter is ok. Any suggestions on where to cut this patch panel in to best hide the horizontal weld?

Those crappy a$$ trunk extensions in the second picture are so bad (came with the car) that I'm going to buy a set from AMD.
The 90 degree bends are more like a 1/4" radius.

PXL_20211107_141901050.jpg


PXL_20211107_142803067.jpg
 
My bumper recess areas are toast unfortunately, but most of the quarter is ok. Any suggestions on where to cut this patch panel in to best hide the horizontal weld?

Those crappy a$$ trunk extensions in the second picture are so bad (came with the car) that I'm going to buy a set from AMD.
The 90 degree bends are more like a 1/4" radius.

View attachment 1190176

View attachment 1190177

i'd stay close, like within 3/8 of an inch under that lower body line...... or just over top if the rust is up too high

patch.jpg
 
i'd stay close, like within 3/8 of an inch under that lower body line...... or just over top if the rust is up too high

View attachment 1190268

You made me realize I really didn't know what I was working with so cleaned it up some. Unfortunately there is a fair amount of rust right around that lower body line (marked with red line).

rust_1.jpg


From the inside you can see that some crap must have gotten down there and rotted it from the back, based on my
past (but limited) experience it would be so thin after I cleaned it up I'd blow through it. A 1/2" or so above
the line might be OK.

rust_2.jpg


Near the bumper recess, I don't think even going up 1/2" above the body line will get me to something I can weld to. :(

rust_3.jpg


From other threads I've read, it sounds like its easier to disguise a butt weld near a body line than out in the middle of a flat panel?

Base on the metal condition, I think my two options might be red or green. Red would be harder to cut a good fitting patch (for me anyway),
but it seems like it might be less noticeable.

The other side, while it isn't as bad rust wise, looks like someone was hauling bowling balls in the trunk. I don't think it will be possible
to smooth that panel out between the top and bottom body line, so on that side the green line may be my only option.

Thanks so much for all your help. And OP, didn't mean to hijack your thread.

rust_4.jpg
 
I have an AMD full trunk pan and figure I will pull the tail light frames to get it in.
Full skins are planned too from Year One.
How do you handle this patch?
The patches are lined up top side with the frame to original height, but do I pull them down to the level of the new Dutchman?
(Circled)
And in what fashion were these little fillers attached to the original quarter if at all.?
Pictured from inside the trunk.
I got them lined up and welded in place.
But not to the quarter patch.
Will clean up welds when I can access via removed quarter panel sections.
I can't find any good info but the rear glass seems to be just glued in.
Need to fit test it.
I've got the original glass and set the patches indexed on the new panel as pictured.
Thanks for any ideas.
"The world is plagued by inexperience".

20220314_145926 (Large).jpg
20220307_080520 (Large).jpg
20220314_142156 (Large).jpg
20220314_142036 (Large).jpg
 
I have an AMD full trunk pan and figure I will pull the tail light frames to get it in.
Full skins are planned too from Year One.
How do you handle this patch?
The patches are lined up top side with the frame to original height, but do I pull them down to the level of the new Dutchman?
(Circled)
And in what fashion were these little fillers attached to the original quarter if at all.?
Pictured from inside the trunk.
I got them lined up and welded in place.
But not to the quarter patch.
Will clean up welds when I can access via removed quarter panel sections.
I can't find any good info but the rear glass seems to be just glued in.
Need to fit test it.
I've got the original glass and set the patches indexed on the new panel as pictured.
Thanks for any ideas.
"The world is plagued by inexperience".

View attachment 1256407 View attachment 1256408 View attachment 1256409 View attachment 1256410

Turns out that's next on my list as well, except instead of replacing the entire deck filler panel I opted just to fix the corners at the trunk (worked "OK" but not great).

If I understand your problem, you cant get the patch to pull down flush and also line up at the top with the dutchman?

I measured my deck filler and my patch, and they are both pretty close to 3/4" from top to bottom, off by maybe 1/16". On my patch, its not a great right angle from horizontal to vertical, guessing if I bring it closer to 90 degrees it will be 3/4".

What does your replacement dutchman measure at?

PXL_20220317_174432865.jpg


PXL_20220317_174446066.jpg
 
Everything looks good on the patches.
I figured if they line up with the Dutchman it should be good assuming the AMD patch is accurate.
The head scratcher is the fillers that go under the corners.
Mine were rusted gone except for what remained trapped by the frame.
Are they supposed to actually attached to the patch above them?
Or do just float under it?
IDK.
I can make the inner edge of the patches pull down even with the Dutchman' but the upper part is level with and fixed by the original frame (roof / quarter panel which is what they replace)
I just need to check fit the glass but I can't find info on how to install it.
Think it rest on rubber blocks and sealant?

So looking at mine, I think those guys were spot welded to the package tray, and then the deck filler was spot welded to those. Interesting to see what others have to say. You might get more responses starting a new thread.
 
Auto Transport Service
Back
Top