• When you click on links to various merchants on this site and make a purchase, this can result in this site earning a commission. Affiliate programs and affiliations include, but are not limited to, the eBay Partner Network.

It is Time to Finish That Which I have Begun: '68 Charger by a mechanical idiot

Welcome from Michigan Aron! Thats gonna be one sweet looking car....:thumbsup:

One question though.....who the hell has a garage floor that clean....:D

Hahaaha! Dude, we bought this house about a year ago, I thought "wow, I really like the way this garage floor looks on www.spartanexpoxy.com - white looks so slick!" Huge mistake - it shows everything!! When I finish the Charger (and the floor is beat to hell) I'm going to rough it up again and change it out to something more liveable. I've done about 6 of these floors now (helped out a bunch of buddies do theirs) - would never recommend white. But, the spartan epoxy is good stuff.
 
Welcome from Arizona! We love our mopars too. Another question is how did you get your car so high to use those stands. thanks

Hey Ray,
That was an ADVENTURE! First, those are Sunex Jackstands, they sell new for about $100 each I think, I got them used off of Craigslist. No one else I could find makes a similar product.

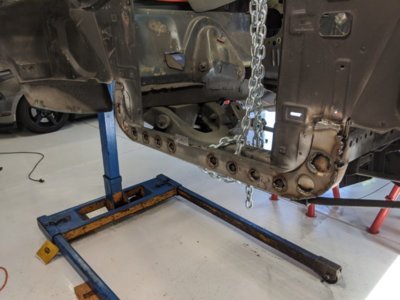
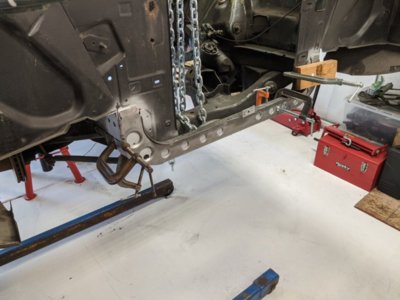
The way I got her up there was this : 1) I built 2x4 scaffolding for two floorjacks, I built them so they would be 9" high (b/c the jackstands are 28" high and my floor jacks can achieve 20" lift). 2) Get three floorjacks 3) Use one floor jack under the rear diff and push it up high enough so you can then put your other two floor jacks on top of your scaffolding, then slide those two floor jacks which are now on top of your scaffolding underneath the leaf spring plates (the plates under the bottom of the U-Bolt) 4) SIMULTANEOUSLY with steps two and three: Set up your shop crane and attach your chain to the K member. 5) As you are jacking up your rear end, pull up your front end to achieve "balance" (in a redneck engineering manner of speaking). Once you get the rear end high enough slide in the jackstands. Then put in the fronts.
***Pro-Tip: Remember to position your car about 8"-10" forward of where you actually want it to end up on the stands in your garage, the floorjacks "pull" your car backwards as they lift because they are not rolling on their wheels, they are stationary on the scaffolding.

This required trial and error. Some of the errors were a little scary. Now I get how to do it...but damn, it was a pain in the ***. The alternative was to alter the hip trusses in my garage and buy a lift. I researched that extensively, it would have been $6K minimum...putting aside how dicey it is to field alter hip trusses (so the internet says), I can't spend $6K to do all that - every dollar counts. This was $250 for the used jackstands and $185 for the floorjack (the 3rd, I already had two). I'm calling that a surplus of $5,500, at least -- I work for the government ;)
 
I didn't cut mine off. Not sure but I think usct recommends leaving the stock one on and overlap/weld it with their's. That's what I did.... Looks like you have later model door handles, kinda cool! Nice shop also!!

Thanks Daytona, those door handles were on the car when I got it - I think they're out of a later model A-Body. Not sure how I feel about keeping them on, but in the scheme of things I may live with them. I'm going to look deeper into the radiator support, I'd like to avoid cutting that bracket off, I can see myself having a hell of a time relocating it just right.
 
welcome from Pa. like those stands, where did you find them???

They are SUNEX jackstands - you can buy them new, I think, for about $100. I got them used off of Craigslist. Gotta build scaffolding out of 2x4's to get a car on top of them - I posed a detailed run down on this thread.
 
Aron - (this is Mike), glad to see you here and the pictures of your car, looks awesome. You have a solid plan, just take it one step at a time, focus on one aspect (but do not lose sight of the others). I always try to think about what I am doing an how it affects other issues/components, nothing worse than having to rip or cut up something you spent a lot of time doing previously. There is a lot of talent here and an abundance of advice, just think through everything and make decisions based on your desired end state.

Thanks Mike!! Got the FirmFeel stuff on its a way in a few weeks. I definitely agree with your approach - even talking a little with you really helped bring some things into focus about this project. Hope you are well!
 
This is solid advice and comports with the directions US Car Tools sent. here is my plan - since I don't have access to a four post lift nor will I be putting wheels back on to put in the connectors, I'm going to jack up the rear diff and the front control arms to replicate the suspension "being under load." It's not ideal but it's the best plan I can think off without towing it somewhere to get this completed (not really an option). Thoughts?
That should work, but be very careful trying to take the load off the front end by jacking on the control arms. Sounds kind of dangerous to me.
 
That will work. I did the same on my super bee. Rear axle on jack stands and front end, where A arms would be, supported by saw horses.
 
Some people say to install the frame connectors with load on the front and rear suspension, and others do it on a rotisserie without issue. With all the weight out of the car I don't see why you couldn't install them as it is.

If torque boxes and frame connectors were installed at the factory they would have done it when the car was an empty shell, so I think we could too.

Just my $0.02
 
That should work, but be very careful trying to take the load off the front end by jacking on the control arms. Sounds kind of dangerous to me.

My plan is not to interfere or take load off the jackstands in any way - rather, my thought is to push the rear diff and the front control arms up (using floor jacks and scaffolding), but not all the way by any means. This will partially replicate load on the suspension no? That's my goal - although, thinking about it - I also think what funknut says makes sense - if professionals do it on rotisseries without any load on the frame at all, does this really matter? Hmmmm...any final thoughts are appreciated. Now, it's time to go finish grinding off that last portion of undercoating. That phase of this job is no Bueno. I've had undercoating dust in my ears for three days now! It's like three cue tips every night to clean it out.
 
Aron,

Since your car is already on jackstands I woudn't suggest trying to put it back on the suspension. The key to all this is that you don't want the frame twisted when you install the US Car Tool stuff, or it will tend to hold the car twisted. But consider this: If your torsion bars are unequally adjusted you could have the same problem with the car sitting on the suspension.

I suggest merely ensuring your car is perfectly level. Shim as needed to make it level front to back and side to side, and then have at it and install the parts. It seems to me this would be much less work, safer and still would give good results.

The above is just my 2 cents worth, but if other disagree with me you'll for sure hear about it!

Hawk
 
I have installed SBCs and torque boxes both ways, on a rotisserie and on a 2 post lift and I cannot tell you the difference in either. I personally do not think it matters all that much unless the body is twisted pretty significantly.
 
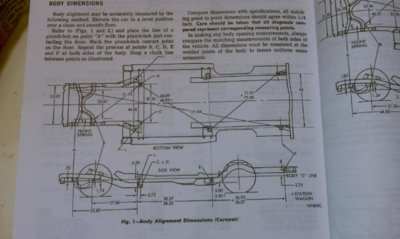
US Car Tool's instruction pics show the connectors being put on both ways, loaded with motor and all weight on suspension and unloaded shell on rotisserie. I'm no expert but imo if the car is good and straight to begin with and as it sits when you do the welding you could weld it up in outer space and it wouldn't make a difference. As most of us have seen these cars do twist and bow, as can be noticed by doors not wanting to shut when jacked up to change a flat on the side of the road, etc.. I used the factory frame measurement spec sheet/pic below to insure good numbers before and after welding lots of stuff on my car, partial rear rails, etc. I tied the connectors to the rockers with my roll bar mount plates and lots of other stiffening mods so after all that my car feels like a solid block of steel., ha. And as Hunt said BE CAREFUL about the car flipping backwards when you lighten the front, and your rear stands are near the front leaf mount area, the stripped body shells are very tail heavy.

IMAG1051_zpsfc3c56dc.jpg
 
Thanks Daytona, those door handles were on the car when I got it - I think they're out of a later model A-Body. Not sure how I feel about keeping them on, but in the scheme of things I may live with them. I'm going to look deeper into the radiator support, I'd like to avoid cutting that bracket off, I can see myself having a hell of a time relocating it just right.
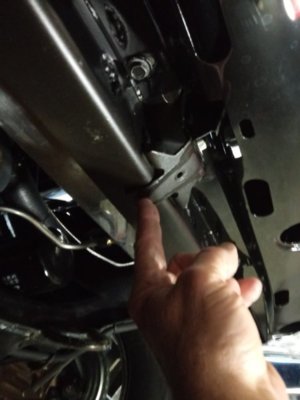
That bracket relocating is a breeze. Just drill a hole all the way thru right here (pic), then copy/drill the hole thru the the new stiffener piece after you weld it on over the old one, weld every where you can. Then line up the bracket with the hole and fill with weld. zip zap zing your done!

20200406_213529.jpg
 
That bracket relocating is a breeze. Just drill a hole all the way thru right here (pic), then copy/drill the hole thru the the new stiffener piece after you weld it on over the old one, weld every where you can. Then line up the bracket with the hole and fill with weld. zip zap zing your done!

View attachment 932772

Holy crap!! Mind blown - that's brilliant!! Geez, that makes perfect sense, such a great save! I'm ordering that Radiator support piece ASAP. I was looking at mine again tonight and it's almost looks a touch bowed in the middle - it could definitely use the support.

Thanks again for the help!! I truly appreciate it! Once again, this site is frickin awesome!!

-Aron
 
Shoot, forgot to ask - how did you take the bracket off without destroying it? Or did you leave it on?
Thanks again!
-Aron

That bracket relocating is a breeze. Just drill a hole all the way thru right here (pic), then copy/drill the hole thru the the new stiffener piece after you weld it on over the old one, weld every where you can. Then line up the bracket with the hole and fill with weld. zip zap zing your done!

View attachment 932772
 
Grinding these subframe connectors to fit is time consuming - going slow and doing it bit by bit. At least the undercoating is pretty much all off in the necessary spaces! And the Five Speed arrived from SST! Won't be cracking that open for a while, but still exciting.
IMG_20200406_171230.jpg
IMG_20200406_171244.jpg
 
Shoot, forgot to ask - how did you take the bracket off without destroying it? Or did you leave it on?
Thanks again!
-Aron
The bracket has to come off. It's in the way for the stiffener. Almost everything on these cars is spot welded. If your going to do much more spot weld cutting you should invest in a rotary broach cutter. Makes for way easier work. And lube it before every cut and sometimes during..
 
Last edited:
Well, I finished the Subframe connectors and the torque boxes. I learned A LOT about welding in difficult positions...and the miracle of the grinder to smooth out my ugliness. Plus, a coat or two of Rustoleum black undercarriage paint makes me feel better about the whole thing. Thanks to Daytona Kid's solid advice, the Radiator support is on it's way and that will finish off the frame stiffening efforts which seem well worth it. Suspension replacement is next.
Strategy question: I have the SST manual swap kit in my garage. Once (or before) the suspension is done, would you all send it out for paint and body or put the trans in now? In my hopes and dreams, no panels need to come off, the car will be media blasted, blocked, primed and painted. Interior blasted and painted too - I've stripped that out as well. I'd like the firewall smoothed - got a lot of unnecessary holes. So, should I put the trans in now or put it in when it comes back?
thumbnail_IMG_20200410_192242.jpg
thumbnail_IMG_20200416_184955.jpg
thumbnail_IMG_20200416_192617.jpg
thumbnail_IMG_20200416_192638.jpg
thumbnail_IMG_20200416_192649.jpg
 
Been too long since I did an update - I've been working on my '68 every day and the progress is slow but I'm learning a lot and reading this site gives me so many new ideas and the patience and determination to keep pressing through even when it seems like tasks are taking too long or not going the way I want.
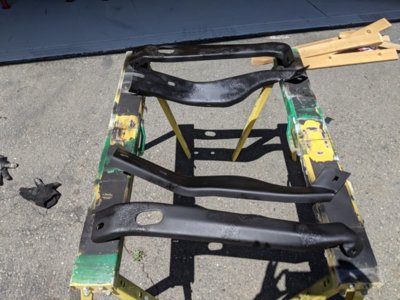
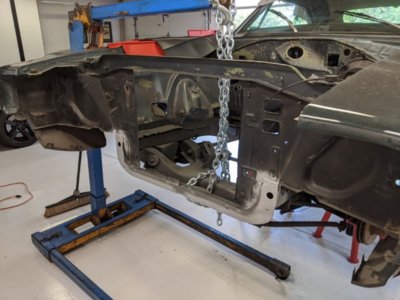
Finished the radiator support primary install. Let me start by saying my original / existing radiator support was TWISTED and out of shape like you wouldn't believe. I didn't know it, but when I started to take a hard look at it, that thing was crooked and bent. So, first I applied a mini sledge to see if I could tap it back into line...no dice. Then, I fastened on some C Clamps and just muscled it...bingo. After a lot of adjustments and patience, it came into line. It was literally half an inch or more off line, but elbow grease got me into good shape. I started to have a miniature freak out wondering if my frame was bent. Then I realized two things: 1) I listened to other posters earlier on my thread and took measurements before installing the subframe connectors diagonally under the car- my frame is square. 2) Even if it's a little off - my budget and car project parameters ain't taking me to the frame shop. So, fire up the welder.
And, while I have the bumper mounts out, might as well clean them and flat black em with the Rust-O-Leum. I promise, the finish came out better than it looks in the photos ;)
Next up is taking out the rear end, unbolting the 8 3/4 742 carrier, cleaning up the assembly, and getting my local rear end shop to press in a set of .737's for me - it will mate well with the Tremec Five Speed Swap I got from SST - the Overdrive / 5th gear is .64...that should be a very smooth freeway gear I think, while the .737's will be a fun rear end around town. I MAY back off to .355's...still thinking on it.

bumper brackets.jpg rad 1.jpg rad 2.jpg rad 2a.jpg View attachment 941916 View attachment 941917 View attachment 941918 View attachment 941919
 
Auto Transport Service
Back
Top