• When you click on links to various merchants on this site and make a purchase, this can result in this site earning a commission. Affiliate programs and affiliations include, but are not limited to, the eBay Partner Network.

1964 Rusty Bucket transformation

Crumley

Well-Known Member
Local time
8:02 AM
Joined
May 16, 2015
Messages
203
Reaction score
330
Location
Cedartown GA
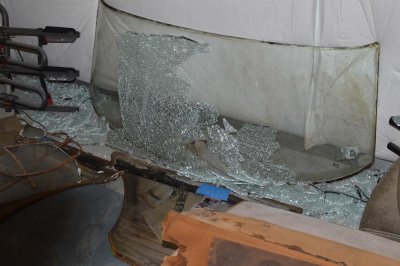
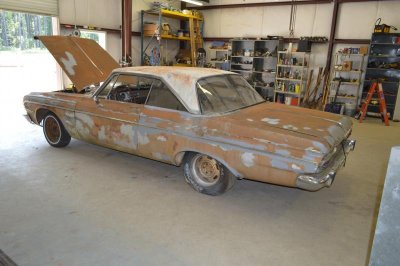
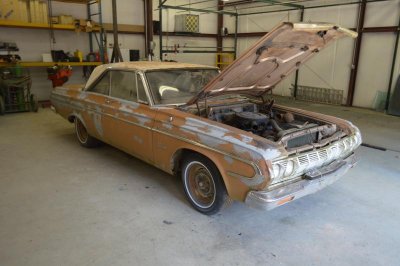
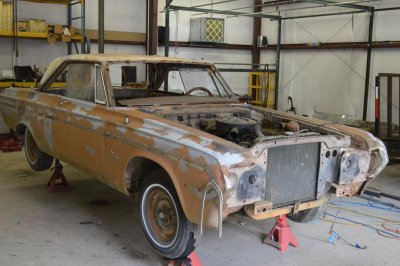
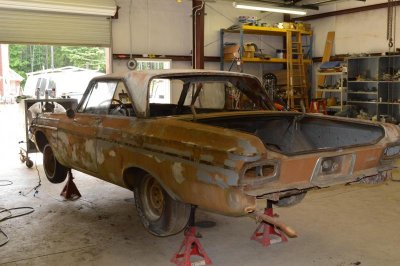
Hello everyone, I am new to the FBBO. This is my 1st Mopar and 1st attempt at restoring one. Between installing new flooring in the house and other honey do lists items, I found time to begin the de-construction of the 64 Belvedere. I also learned that I stored my perfectly good back window incorrectly and will now need to add a new one to the ever growing list of needed items. So the picture taking and bagging and tagging begins. See attached pictures on the progress:
 

Attachments

  • DSC_0032.jpg
    DSC_0032.jpg
    57.9 KB · Views: 1,801
  • DSC_0086.jpg
    DSC_0086.jpg
    57.5 KB · Views: 1,668
  • DSC_0080.jpg
    DSC_0080.jpg
    54.8 KB · Views: 1,697
  • DSC_0052.jpg
    DSC_0052.jpg
    65.8 KB · Views: 1,667
  • DSC_0054.jpg
    DSC_0054.jpg
    66.3 KB · Views: 1,560
welcome to fbbo Crumley. seems to be a good starting point. sorry to see your rear windshield got broke. what plans do you have for the engine? stock or ?
 
Good luck on your project car. Looks like you're going to have your hands full for awhile. Great car, will be fun working on it and following your resto thread.
 
Looks like a good project. Looks like it was gold with white top, is that the original color? My 65 Coronet starting life the same with the pearl white interior. What are your plans?
 
My current plans, pull the 318, auto combo and install a 440, auto combo. Move the springs under the frame and mini tub it. Install frame connectors. Minimal interior with light weight bucket seats. May install a roll cage.....install old style American racing wheels 15x10 on the rear and 15x7 on front. Install duel master cylinder and disc brakes. Kinda make it look like a mid to late 60's SS drag car. Currently, my color choice is black.

The car came from the factory light brown with white top and brown interior.
 
Welcome aboard the fun bud! Very nice looking model and your plans really sound good! I think the factory colors that were on it was great looking but you can not loose with the looks of a black one, especially pushing the RPM's and cool looking racing wheels.... ENJOY and have fun!!! :)
 
I wish mine was that clean when I started. The end result is what counts though. Took me 5 years.
Doug

DSC_3977.JPG
 
I wish mine was that clean when I started. The end result is what counts though. Took me 5 years.
Doug

That is one beautiful MOPAR there buddy!!! Very nice...
 
X2 on the beautiful MOPAR, Doug. I hope mine comes out that good. I can only imagine what you guys get for cars to restore in the rust belt....my hats off to you guys.

Not much to add on this post, all I did was remove the back LH and RH windows' I did wire brush the rusty spots around the back window to see how much sheet metal work will be needed. There will be work needed, I also wire brushed where the 1/4 panel are spot welded to the inner structure.

Other wise I was installing flooring in the house and doing honey do items, oh the fun......lol.

I did manage to get over to Joe Suchy's, he lives about 20 minutes from me. Great guy and he is a wealth of information when it comes to 65 and older MOPARS. And yes he has AMD 64 Plymouth 1/4 panels in stock, thanks guy for the input on the 1/4 panels. I will heading back over with a pocket full of cash so I can get replacement panels......
 
Just a little dissembling up date: The gas tanks, gas line, drive shaft, engine compartment wiring and radiator removed. I also turned the 64 around so the engine compartment (to remove engine and transmission) could be easier accessed with the gantry crane.

I have a question can the engine and transmission be removed as one unit?

DSC_0139.jpgDSC_0155.jpgDSC_0152.jpgDSC_0156.jpgDSC_0157.jpgI also picked up a few body replacement panels from Joe Suschy. See attached pictures
 
A little update: still removing parts, bagging, tagging and taking lots of pictures. I am some of you guys have already run into this, while removing the front fenders there where 2 spot welds holding the front fenders to the body, I had to break out the spot weld cutter to remove the fenders. Items still to be done, remove instrument panel, front suspension, rear end, engine and trans. Then it will be time to cut out a zillion tack welds and begin the instillation of new panels. See attached picture of the spot weld at the bottom of the fenders.
DSC_0013.jpgDSC_0014.jpg
 
Welcome. Good luck on your project. Your on your way.
 
Will I had a little time to work on the 64. I had to make a torsion bar removal tool. It make removal quite easy.DSC_0241.jpg See pictures for update. The rear end, dash, heater and brake lines is all that is left. It will then be stripped down to a hull. Then the real work begins replacing the floor boards. Superfreak, thank you for the suggesting for dropping the engine, tranny, steering and K member out the bottom of the car.DSC_0242.jpgDSC_0243.jpgDSC_0246.jpg It worked like a champ.
 
A job well done.
When you are ready to re-install, it will go back in the same way.
 
Looks like you're getting some good work done. This is the hard part. The fun will come when you start putting things back together. Appreciate the pics. It's going to be a fun thread to follow. By the way - I know about the honey do list. My honey asks and I do it! Good luck
 
Look forward to seeing progress. Nice area you have there to work on it. :)
 
A little additional update on the 64. See pictures:DSC_0265.jpgDSC_0261.jpgDSC_0262.jpgThe heater and windshield wiper system is all that is left to remove. Hopefully that will be next weekends project. once removed, my plan is to 1st. remove and replace the floor pans. While the floor pans are out, the cross members will be checked for excessive rust and replaced if needed. 2nd. remove right side quarter panel, trunk pan and pan extension they will be replaced with new panels. 3rd. remove the left side 1/4 panel and trunk extension and replace with a new ones. 4th. then it will be on to the cowl are for rust repair. 5th. repair rust spots around the windshield and back window. It will depend on how the body work turns out, then I will decide which direction the build will go.....more stock or drag race car look.

DSC_0265.jpg DSC_0261.jpg DSC_0262.jpg
 
Auto Transport Service
Back
Top