I'm happy for you.
You are using an out of date browser. It may not display this or other websites correctly.
You should upgrade or use an alternative browser.
You should upgrade or use an alternative browser.
1968 Charger, Ray Barton 528 Hemi, Pro-touring.
- Thread starter Jarven1977
- Start date
Jarven1977
Well-Known Member
Well, haven't updated here in a while but I've been busy.. mostly with scratching my head and searching the internet for answers but also troubleshooting the Hemi oil system...
This is a long story but I'm writing it down for myself as well to have something to look back at when times get rough..
As I said, I had my 5 seconds in heaven but in that short time I spent staring at the gauges I could not see any oil pressure!
We made a tool for running the oil pump to prime the engine to be able to check oil pressure without starting it again. Just a tube with a hexagon bit welded at the bottom. I was scared that I'd fucked this Hemi up.
Anyway, ran the pump ccw with a drill, zero pressure.. googled it and found out that I needed to run it longer. Ran it for minutes, zero pressure.
Ok, maybe I have a problem with sensor or gauge. Measured at the sensor and I had 5V. Grounded the wire and the gauge moved! Measured the resistance from sensor to ground, infinite! The spanking new sensor is faulty...
Well I decided I needed to see pressure before I did a new startup. Found some fittings, rubber hose and a pressure gauge in the "nice to have" bins. Connected it to the second outlet on the rear end of the Hemi. This one is 1/4" npt and the electrical sensor outlet is 1/8" npt. Ran the drill again for minutes, zero pressure.. now I was starting to sweat and I called it a day. Went home and read up on possibly every darn thread on the internet with guys having the similar issue.
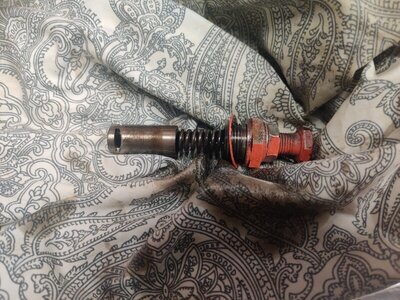
Cavitation in the oil pump or a sticking relief valve could be the culprit since the engine has been sitting for 4 years.
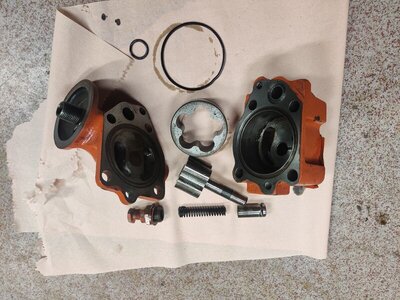
Managed to dismantle the pump in it's location(it's tight around a hemi with headers!!) and twist it out and inspect the internals. Everything looked good unfortunately. Sourced new o-rings locally that seemed to fit, everything was really worn and I doubted it would seal properly again.
There are many opinions out there but I decided to grease everything up with lithium grease that will desolve after warm up. This is for helping the pump to get proper suction.
Fit everything again, mounted the drill, ran it ccw and laugh and behold, I could feel the pump grabbing after a turn or two, almost yanked the drill out of my hand!!
I was so confident that I would see pressure but I was totally devastated when I yet again saw zero pressure at the mechanical gauge.. what could be wrong? Could the right oil gallery be clogged, oil filter clogged?
Removed the filter, ran the drill slightly and oil flushed out! So the pump is priming and flowing but I'm not getting pressure.. could it be a open galley plug or broken rocker making it an internal leak? Hope not because it's a pain removing the valve covers to inspect.
I was running out of ideas but I tried filling the right galley through the hose I connected but I couldn't? So I removed the fitting and it looked fine.. screw it in again and fitted the hose. Adjusted the relief valve to increase pressure and ran the drill again. BAM!!! Oil everywhere...
The hose had popped lose. What the hell was this...
Took everything apart again and inspected it, tried blowing through the rubber hose.... Completely sealed... Used compressed air on it and bang! Out shoots a screw!!? The hose was sealed with a damn screw!? I was both happy and sad at the same time.. imagine your wife telling you that, out of your friends, you have the biggest dick of them all. That's how I felt.
Put everything together again, ran the drill ccw, felt it grab oil and heureka, we have oil pressure!
But it was darn high(I had increased it). Adjusted it down to 75-80 psi(is this ok?).
Did a new startup, nice idle, pressure is good and I"m heaven again.
Ran it for about half an hour to check stuff, a lot of smoke from the wrapped headers but it calmed down in the end.
It's popping sometimes in the exhaust. Noted that fuel pressure was at 7psi so decided to adjust it to 5.5 in case it's excessive fuel. Also tried adjusting timing. We'll see, from now on it's tuning. I will sleep well tonight.


70chall440
Well-Known Member
- Local time
- 11:25 AM
- Joined
- Feb 11, 2018
- Messages
- 5,168
- Reaction score
- 7,428
- Location
- Yelm, Washington
My 440 runs about that same amount of oil pressure when cold, comes down to maybe 55 or so when hot so I think you are good.
Jarven1977
Well-Known Member
Oh yes we are! Tackar..Are we gonna see it out on the street this year? Awesome work on the car! kör hårt!

Jarven1977
Well-Known Member
Tried to figure out why it pops in the exhaust.
Pulled the plugs and they were black from soot and some where also wet. Cleaned them up and put them back again.
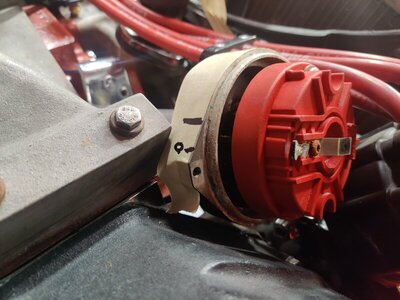
Checked that rotor was pointing at no1 cylinder at tdc in case I got something wrong when removing and replacing the timing gear and oilpump drive but it seemed correct. When turning the engine by hand I measured and found that rotor was pointing at no1 plug wire at approximately 15deg before tdc on cylinder 1. Seems correct?
Started it again, checked with strobe and I"m att 15deg on idle, 950rpm. Still intermittent pops. Checked the lambda and AFR seems on the highside even though I had black plugs?
I've Always thought that excessive fuel can ignite in the headers to make them pop?
Could I have a leaking header perhaps?
Good throttle response though.

INTMD8
Well-Known Member
Congrats on getting it fired up 
I don't recall the history of this engine and hard to hear really what's going on but have you checked valve lash? Almost sounds like the valves are tight.
Have you connected a vacuum gauge?
I don't recall the history of this engine and hard to hear really what's going on but have you checked valve lash? Almost sounds like the valves are tight.
Have you connected a vacuum gauge?
INTMD8
Well-Known Member
Actually I see you cleaned the plugs.
I would start with replacing those.
I would start with replacing those.
Jarven1977
Well-Known Member
It came out of a Pro Street -68 Charger that my dad owned for some years. Worked flawless there. Sitting for 4 years until now.Congrats on getting it fired up
I don't recall the history of this engine and hard to hear really what's going on but have you checked valve lash? Almost sounds like the valves are tight.
Have you connected a vacuum gauge?
What has changed is new ignition box and coil, wrapped the headers and new return style fuel system.
Wrapping the headers could be a factor since it keeps the headers warmer thus making it easier to ignite unburnt fuel? Maybe far fetched... Haven't checked valve lash.
Yeah, I'll replace the plugs. The easy stuff first.
Last edited:
INTMD8
Well-Known Member
I don't think header wrap would have anything to do with it. Backfiring can be from an exhaust leak but it sounds like it's still misfiring to me.
Never had any luck myself with cleaning fouled spark plugs (and certainly easy to swap on a Hemi) so that's where I would start
Never had any luck myself with cleaning fouled spark plugs (and certainly easy to swap on a Hemi) so that's where I would start
- Local time
- 2:25 PM
- Joined
- Mar 10, 2010
- Messages
- 32,912
- Reaction score
- 61,453
- Location
- Hanover, Pennslyvania
Looking at the last picture of your distributor there's a lot of corrosion and rust on the rotor. That's a sign of moisture. Does the inside of the cap have corrosion? What's the pickup look like? This could be your popping.
The last time I had a popping like in your videos my new plug wires were slipping away from the plug. It was just a small gap but that's all it took.
The last time I had a popping like in your videos my new plug wires were slipping away from the plug. It was just a small gap but that's all it took.
Jarven1977
Well-Known Member
Yes, you are correct, there is a lot of corrosion and I'll have to replace it but I was planning to do that when it's time for the efi conversion. It looked like this when it was in the previous car also and we didn't have the popping then. I'm going to check CO when I get home again. Away on a business trip to Netherlands this week..Looking at the last picture of your distributor there's a lot of corrosion and rust on the rotor. That's a sign of moisture. Does the inside of the cap have corrosion? What's the pickup look like? This could be your popping.
The last time I had a popping like in your videos my new plug wires were slipping away from the plug. It was just a small gap but that's all it took.
Jarven1977
Well-Known Member
biomedtechguy
Accelerati Rapidus Maximus
- Local time
- 1:25 PM
- Joined
- Mar 28, 2014
- Messages
- 35,875
- Reaction score
- 59,546
- Location
- South Louisiana
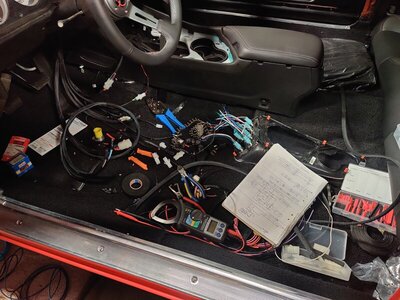
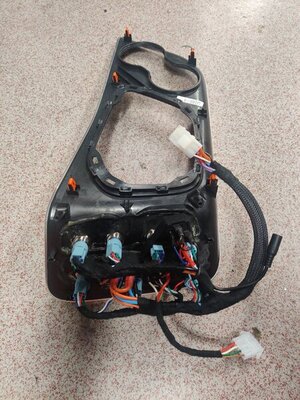
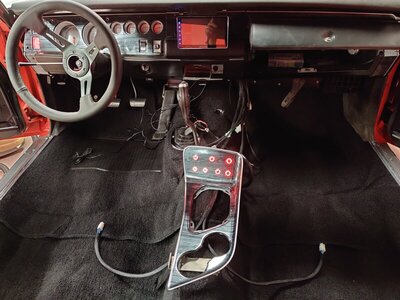
Yeah...I would have been running down the street screaming, stripping my clothes off about halfway through that, and I repair medical equipment!Chaos and Mayhem but almost completed. Looms with connectors are done, wiring diagrams completed, just need to wire up the buttons.
Everything is connected with quick connectors so it's easy to remove all panels without cutting.
View attachment 1237455

Great work, and the way it SHOULD BE DONE!
My Barton Hemi fires in the pipes when cold and then clears up as it gets warm. What carbs are on the car? Have you recently taken the valve covers off to take a look under the skirt?
Last edited:
Jarven1977
Well-Known Member
I had them off when I squeezed it in between the frame rails from underneath and it all looked fine and dandy. It's a Holley demon carb. Checked floaters and adjusted levels, looks good.My Barton Hemi fires in the pipes when cold and then clears up as it gets warm. What carbs are on the car? Have you recently taken the valve covers off to take a look under the skirt?
After I've bled the brakes I'll take it out so I can run it for a while and get it real warm and see what happens.
Jarven1977
Well-Known Member
Jarven1977
Well-Known Member
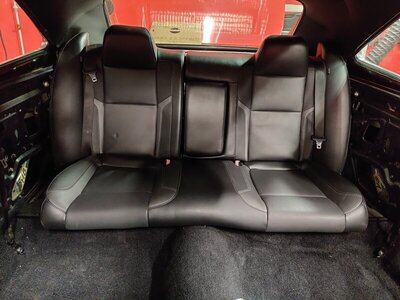
Squeezed in an hour this Friday evening before it's "fredagsmys" with the family!
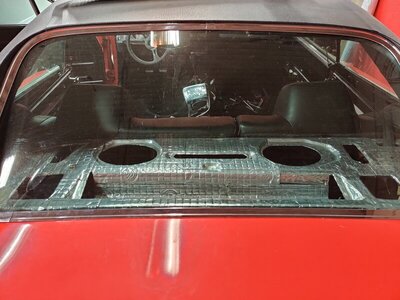
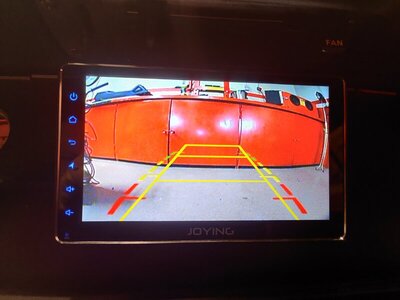
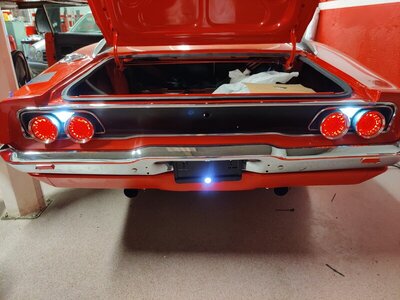
Connected and tried out the backup lights and rear view camera and it actually worked on the first try.
Fitted the rear seat also.. bits and pieces.
I have received all the stuff I need for the interior Door and rear panels so I'll start working on that now. Audio system installation can also be started, just need to figure out the layout. I'm not happy with it yet.


biomedtechguy
Accelerati Rapidus Maximus
- Local time
- 1:25 PM
- Joined
- Mar 28, 2014
- Messages
- 35,875
- Reaction score
- 59,546
- Location
- South Louisiana
Man, this is truly going to be a real


work of mechanical artistry when you are finished.
With my budget and my mixed use, mixed "genre" I can only emulate or approach the levels you have attained. I have some of the same parts as really expensive cars, and a similar "theme" as some others, but you are putting together the WHOLE PACKAGE and it is AWESOME

Jarven1977
Well-Known Member
Thank you for the kind words!Man, this is truly going to be a real
work of mechanical artistry when you are finished.
With my budget and my mixed use, mixed "genre" I can only emulate or approach the levels you have attained. I have some of the same parts as really expensive cars, and a similar "theme" as some others, but you are putting together the WHOLE PACKAGE and it is AWESOME

Similar threads
- Replies
- 29
- Views
- 4K

