• When you click on links to various merchants on this site and make a purchase, this can result in this site earning a commission. Affiliate programs and affiliations include, but are not limited to, the eBay Partner Network.

1969 Dodge Super Bee Coupe Restoration

Looking good Wayne and thanks for sharing info with us, nice to see automotive guys who don't look at our cars as if they are spaceships.
 
Thanks guys, not done yet. Still need to install the adjustment hole covers, god forbid undercoat the wheel wells, figure out how to drain the oil out of my steering box and replace it with Corn Head grease and a few other trinkets.
 
great to see you getting some seat time and so close to being complete! I really wanted to come to the shop and see this beauty in person,but the resort has my full attention with just a couple days before the 24 weekend! I so hope to get another chance to see/hear it! your attention to detail and effort are second to none!
I asked Dalt to mention how good that A pillar trim looks/LOL/guess he didn't have the nerve!
 
Stickers for both cars and insurance!

New plates are on

Pick a filter.. which one do I want to get dirty, which for show only. All the lids supposably the correct colour! I think mine on the left is the correctest!

Good filter in the trunk for shows, reproduction on the engine for sucking dirty air.

New alignment / clutch pivot hole rubber covers.

Drivers side hole before cover.

Cover in place on the outside.

Passenger side adjuster hole.

Cover in place on the inside.... someone had a screw loose at Chrysler...

AMD repro adjuster hole covers on the left, my OE's on the right. I had bought reproductions not thinking my OE's would clean up this nice, but they're going back on when I can source the correct screws.

beerestoration2019part2 850.JPG beerestoration2019part2 858.JPG beerestoration2019part2 861.JPG beerestoration2019part2 864.JPG beerestoration2019part2 866.JPG beerestoration2019part2 869.JPG beerestoration2019part2 873.JPG beerestoration2019part2 877.JPG beerestoration2019part2 880.JPG beerestoration2019part2 881.JPG
 
Stickers for both cars and insurance!

New plates are on

Pick a filter.. which one do I want to get dirty, which for show only. All the lids supposably the correct colour! I think mine on the left is the correctest!

Good filter in the trunk for shows, reproduction on the engine for sucking dirty air.

New alignment / clutch pivot hole rubber covers.

Drivers side hole before cover.

Cover in place on the outside.

Passenger side adjuster hole.

Cover in place on the inside.... someone had a screw loose at Chrysler...

AMD repro adjuster hole covers on the left, my OE's on the right. I had bought reproductions not thinking my OE's would clean up this nice, but they're going back on when I can source the correct screws.

View attachment 767417 View attachment 767419 View attachment 767420 View attachment 767421 View attachment 767422 View attachment 767424 View attachment 767425 View attachment 767426 View attachment 767427 View attachment 767428
Why not get a K&N air filter element for sucking dirty air while driving around...and then you could save all of the paper elements for later use. :thumbsup: K&N should last a lifetime - wash and dry, re-oil and off you go again....just a thought. :)
 
Same newer style OEM CA332 paper filter on there for over 30 years Roger, I think one of the cheap reproductions (that almost look correct) will do just fine for all my driving. :thumbsup:
 
Time will tell!!! I'll wait for some stone chips but I definitely need to do the rear wells as the Blue stands out too much there with 14" bias plies.

Also waiting for others to comment on the rubber adjuster hole covers. My passenger side was mounted inside, as stupid as that seems. I see Justin put his on the outside... so not sure which is actually correct, but I'm sure nobody took the time to pull the push pins out of mine and swap it to the inside.
 
Last edited:
My Charger's were on the outside. See if I can scrounge up a picture.
 
Sorry Wayne. My set up is the same as yours on the drivers side. And I have a picture of that with the shield mounted. But the picture I have of the pass side the flap is already removed. Sorry. I was looking to see if it might have been on the inside but can't really tell. So I guess I'm going to say I can't remember and call it safe. But I can't wait for the day when I'm installing those flaps.

Brake line.jpg
 
Last edited:
Original Bird restoration directions state passenger side rubber installed on inside and seeing there are no frame rail holes on the outside, like there is on the drivers side, I'm pretty certain this is correct considering my OE came off the inside.

From Winged Warriers "
Take off the access opening covers (one at each end of the upper control arm). These are just rubber flaps that are held on with little clips that you can pry off. The front cover on the passenger side of the car has two small bolts holding it on. The rear cover on the passenger side goes in from the engine side of the inner fender. The photos below show the covers on the car (arrows) and off the car. There are two covers on each side.

birdsusp004_small.jpg

"
beerestoration2019part2 872.JPG
birdsusp004_small.jpg
 
Last edited:
Car looks fantastic Wayne. ...love the effort and dedication in the project :lowdown:

For my 2 cents worth....stone chipping the front fenders is a great idea. You'll thank me when the first stone that gets wedged in a front tire let's go at 60mph. Trust me...I know that feeling all too well.
:welcome:
 
Same newer style OEM CA332 paper filter on there for over 30 years Roger, I think one of the cheap reproductions (that almost look correct) will do just fine for all my driving. :thumbsup:
Those re-popped filters ain't cheap. I saw this original one on fleabay for $115

s-l500.jpg
 
All depends how you buy them! I've paid $350+ for an OE filter and I'm down to 50 bucks for my cheapest repro yet!.. and when Kevin King finally gets their reproduction done correctly, I'm getting some free ones!! :D
 
Wayne , i was thinking about the wheel well dilemma for a show car! Could you make removable covers out of black magnetic sign material for street cruising that can be removed for shows!
I use closed cell foam inside my dually fenders to stop spider cracking in fiberglass from stones but it's glued in place which doesn't work for show quality!
 
Thanks for the idea Don, but I'm just gonna "chip it and dip it" lol... Gonna make any that have called her a trailer Queen cry as she's going out on the streets as soon as I get this carb back together!! :D
 
Kinda miss working on the "old" car, when you just climbed right in! :rolleyes:

I'd say it was a BIT rich !

Accelerator pump jammed in probably isn't helping.

Holes so close to 3/8 thread size, I tapped them partially for legs.

3/8" bolts threaded in for legs to hold for rebuild.

3310-2 (4160 model) Holley with fixed secondary jet plate. Funky screws holding it on.

Ground a screw driver to fit.

Hole in a vacuum plug cap. May have helped it run by giving it some more air! Power valve is dried out and stuck in place, just like the accelerator pump. If it's stuck open would explain the raw fuel spitting out the tail pipes.

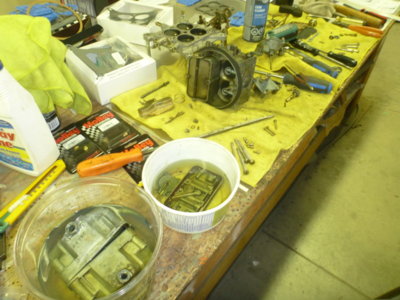
Remembering why I've always just bought a new one when they go for a ****. Took almost 30 minutes to get the metering block off, almost had to use a sledge!

Brown scum on the bottom of both bowls, that turned to dust when it dried up.

beerestoration2019carbrebuild 004.JPG beerestoration2019carbrebuild 010.JPG beerestoration2019carbrebuild 014.JPG beerestoration2019carbrebuild 019.JPG beerestoration2019carbrebuild 021.JPG beerestoration2019carbrebuild 026.JPG beerestoration2019carbrebuild 029.JPG beerestoration2019carbrebuild 038.JPG beerestoration2019carbrebuild 044.JPG beerestoration2019carbrebuild 045.JPG
 
Last edited:
Accelerator valve dried out and stuck in this position.

Gaskets are stuck GOOD, after 30+ years. You'd swear they were glued on.

New accelerator pump diaphram going into place.

Only solution I could muster for final gasket removal.

Carb body ready for assembly. All ports checked and cleaned out.

So close to back together. Have metering block (and 3 UCA alignment cover screws I found) soaking in BBQ lighter fluid now hoping it will lift the final gasket by morning. It's been soaking all day in gas, which did little if anything and the lighter fluid seems to be softening it up. Want to go for a drive tomorrow...

beerestoration2019carbrebuild 046.JPG beerestoration2019carbrebuild 048.JPG beerestoration2019carbrebuild 049.JPG beerestoration2019carbrebuild 052.JPG beerestoration2019carbrebuild 054.JPG beerestoration2019carbrebuild 059.JPG
 
Auto Transport Service
Back
Top