• When you click on links to various merchants on this site and make a purchase, this can result in this site earning a commission. Affiliate programs and affiliations include, but are not limited to, the eBay Partner Network.

'64 330 Street Hemi build

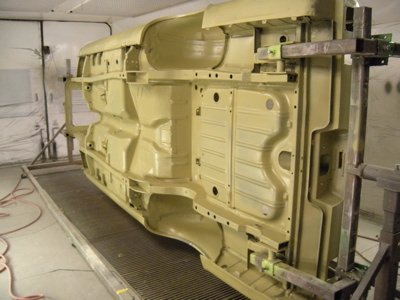
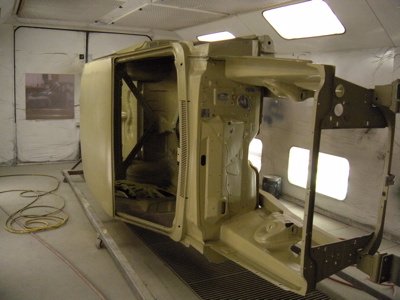
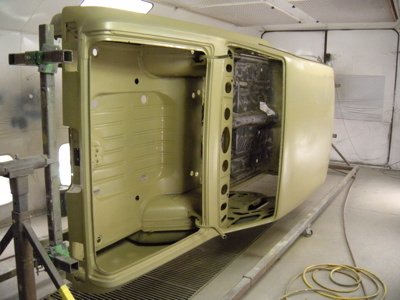
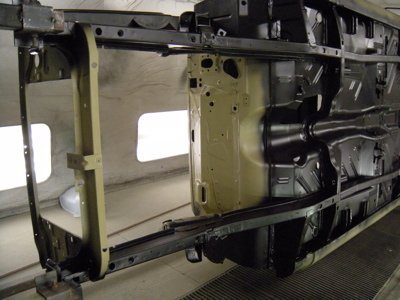
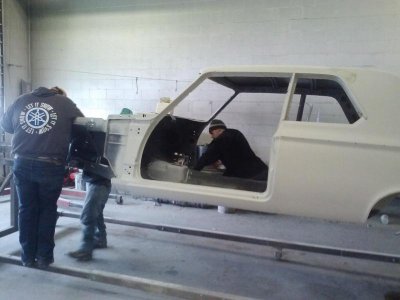
as promised; couple shots primed in the booth. "pee green" etch prime (technical term) and then first base prime on bottom which will also be used on the interior. after this, several more coats of base prime and blocking.
 

Attachments

  • primebody287.jpg
    primebody287.jpg
    52.9 KB · Views: 908
  • primebody289.jpg
    primebody289.jpg
    48.4 KB · Views: 900
  • primebody290.jpg
    primebody290.jpg
    50.7 KB · Views: 889
  • primebody293.jpg
    primebody293.jpg
    52.3 KB · Views: 864
steering column reassembled w/new parts.
 

Attachments

  • steering column295.jpg
    steering column295.jpg
    52.9 KB · Views: 853
  • steering column296.jpg
    steering column296.jpg
    59.9 KB · Views: 824
UPS showed up today with the re-chromed dash parts. tach face color looks "off" more in this pict. than it really is. gonna go with it for now.
 

Attachments

  • dash finish297.jpg
    dash finish297.jpg
    58.6 KB · Views: 850
  • dash finish298.jpg
    dash finish298.jpg
    59.4 KB · Views: 847
  • dash finish299.jpg
    dash finish299.jpg
    58.1 KB · Views: 829
Bill Petrow of Special-T-Unlimited. He has a website, but the best way to get ahold of him is either call or email.

[email protected]
Phone: 847-255-5494​
Fax: 847-466-5991​


- - - Updated - - -

http://special-ts.tripod.com/
 
pretty jacked. picked up the dash/interior garnishes and the front rims from the shop today. will pick up the bright work sometime next week which includes the dash knobs/bezels/lock collars and start assy. Here's a shot of the "dry fit" for the cluster and the front rims finish color.
 

Attachments

  • paint dash328.jpg
    paint dash328.jpg
    71 KB · Views: 770
  • paint dash327.jpg
    paint dash327.jpg
    48.4 KB · Views: 788
between being "Santa's elf" this morning was able to get the dash wired. The harness is from M&H through Year one. Everything matched up very well. there are a couple runs i needed to make; power jumper from the heater switch to the vacuum switch and the ground from the light switch. no big deal. shop manual is a MUST for this stuff.

Daughter wanted a recipe box for Christmas. Brazilian Walnut with American White Oak inlay. (heaviest recipe box i've ever seen. that brazilian walnut is hard/dense stuff...) time to head into the house for a hot shower a martini and enjoy life a little.

Y'all have a Peaceful and Joyous Christmas.
 

Attachments

  • dash harness334.jpg
    dash harness334.jpg
    73.3 KB · Views: 722
  • dash harness335.jpg
    dash harness335.jpg
    71.4 KB · Views: 743
  • dash harness331.jpg
    dash harness331.jpg
    52.1 KB · Views: 737
chrome home. didn't unwrap everything just the bumpers and the dash parts. black
in-painting done and dash assembled, short the radio bezel and ash tray. should be bringing the body home in the next couple weeks.
 

Attachments

  • dash finished337.jpg
    dash finished337.jpg
    62.7 KB · Views: 719
  • dash finished338.jpg
    dash finished338.jpg
    61.4 KB · Views: 718
  • dash finished342.jpg
    dash finished342.jpg
    55.2 KB · Views: 701
  • dash finished345.jpg
    dash finished345.jpg
    37.3 KB · Views: 737
here's a fun one for ya'll. after spending about, "way-to-long" looking for front turn signal lens gaskets decided to make my own using rubberized cork. i know the orig. were closed cell adhesive foam. If I ever run across an orig. set somewhere I'll buy them.

fun fact; a spent, I repeat, spent, steel 7.62 casing works great as a hole punch for the screw holes in the gasket... (.30-.30 will also work but mine are all brass and I didn't want to ruin 6 of them.)

also worked on the re-assy of the vent windows. should have them in the frames tomorrow. will post when done...
 

Attachments

  • turn gasket362.jpg
    turn gasket362.jpg
    72.1 KB · Views: 666
  • turn gasket363.jpg
    turn gasket363.jpg
    64.5 KB · Views: 675
  • turn gasket364.jpg
    turn gasket364.jpg
    74 KB · Views: 688
  • turn gasket365.jpg
    turn gasket365.jpg
    58.5 KB · Views: 659
  • turn gasket368.jpg
    turn gasket368.jpg
    45.4 KB · Views: 702
here's the vent windows assembled and ready to go (other than the latch handle buttons, should be her in about a week). re-chromed parts, new rubber. first one took about 2 hours, second one about 40 minutes.
 

Attachments

  • turn gasket361.jpg
    turn gasket361.jpg
    63.9 KB · Views: 653
  • vent wind done370.jpg
    vent wind done370.jpg
    54.6 KB · Views: 663
  • vent wind done371.jpg
    vent wind done371.jpg
    63.3 KB · Views: 658
final pre-cleaner wipe down before the last prime coat.
 

Attachments

  • 0103131313.jpg
    0103131313.jpg
    44.8 KB · Views: 653
This is gonna be a friggin' bad *** car when your done!! I'm jonesen for more pics, lol!
 
Auto Transport Service
Back
Top