• When you click on links to various merchants on this site and make a purchase, this can result in this site earning a commission. Affiliate programs and affiliations include, but are not limited to, the eBay Partner Network.

Advice on Front Frame Rails

69Beeper

Well-Known Member
Local time
2:57 PM
Joined
Apr 12, 2012
Messages
141
Reaction score
14
Location
Elkton, Maryland
Hi,

I have a 68 RR with two front frame rails and two different issues....

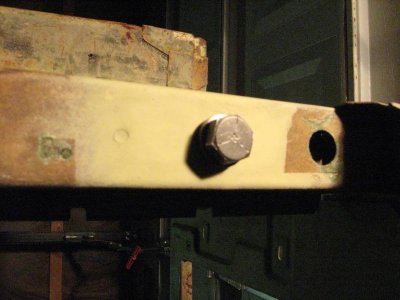
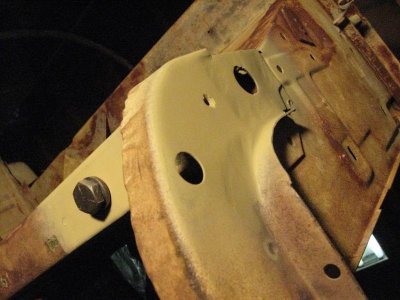
The weld nut for the RH side front k member bolt broke loose inside the frame rail. The catch is that the stud is still in the nut. Yep, some previous owner torqued it loose and sheered the bolt head off the bolt and broke the weld nut in the process. The rail is perfect otherwise. I thought of windowing out the top or the inner (side) and weld the nut back in, then welding the piece I cut out back into the rail. I also though of drilling two "large spot weld" holes on each side of the bolt hole, then mig welding the weld nut and broken stud back in place (it looks flanged), then tapping out the broken stud using a torch and prayers. Anyone have this experience before?

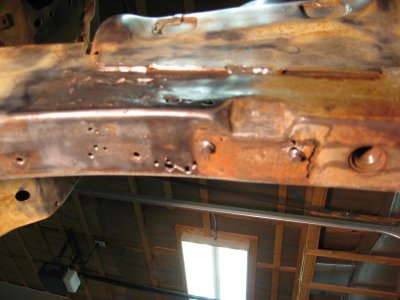
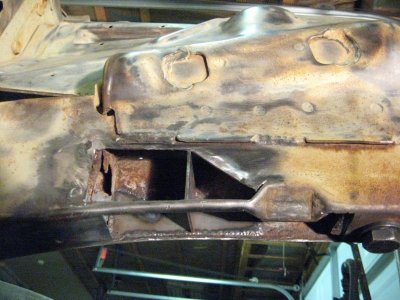
The LH side front rail has about a 4 inch section of pinhole rot on the sides and bottom of the rail just to the right of the brake line mounting bracket. The corners where the metal makes the "u" look solid. I want to cut patches and replace with new metal butt welded into place and ground smooth for a seamless repair on all three sides while leaving the bent corners intact. The rail is solid otherwise. Anyone have any advice? I've seen pics of folks doing the same with good results.

Just wanted to get any metal magician's perspective or experience who wants to share...
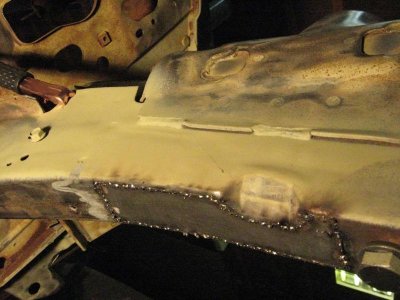
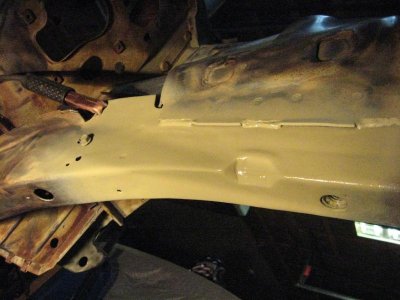
 
1. I would drill out the broken bolt.
2. Then fish plate the mounting area from the outside making a letter U that can slide over the frame area using 16 gauge steel.
3. drill 4 very small holes around the nut area in frame, take 2 washers and weld to a new nut. Then using a piece of hanger, or tig rod slide the nut with washer facing down to frame. Pull down with a bolt and Mig weld the washer to the frame.
4. Trim the fish plate on both sides of frame. Clamp in place and Mig weld to old frame using .023 wie and gas.
5. Avoid the tourch, wrp and paper thin metal burns thru real fast. If you have questions ask. I can tell you any good metal shop can bend the U on a brake in 10 mins, you will need to make a stencil and it has to be installed on all 4 locations equally.

Hope it helps Ive done this before with big Motors in b bodies like hemi's it works.
 
I don't know how he's gonna drill out the broken bolt if the nut has broken loose. All it's gonna do is spin. Blow it out with a torch or plasma cutter. Simple and effective. Then window the frame rail and come in and weld a new nut inside and close it back up. The repair you have in mind for the left side sounds good.
 
Here is a pic of the LH rail. Holes were obviously smaller until I hit them with a wire brush. Thinking about cutting out a rectangle around the cancer and replacing with new. Not sure if these holes are too large for plug welding. Might be worth a shot to see if they blow out before I start cutting on the rail. This is the worst side. The bottom of the rail directly underneath this section has a few holes in about a 2" area, and in the same location on the inside of the rail has a couple holes like the ones pictured.

Yes- the RH frame rail weld nut is detached from it's original mounting location with the broken K member bolt still in it. It's loose and running a-muck inside my frame rail! I can see it and I can touch it, but I can't get it out without enlarging the bolt hole or windowing the rail.


IMG_7826.jpg
 
Probably like Rusty says...
Easiest and most secure way to ensure it is re-welded correctly.
Bummer...
I'll take it "off your hands" for like $2,000 or so, if thats any help?
 
if you have holes like that on both sides and the bottom of the rail and
plus where the k bolts up is also screwed up..
i wouldn't monkey around with that many fixes..
i'd be replacing the whole rail myself,
it would be just as much work with better results
 
Each rail has its own single issue..

LH has the rust as pictured, but is nice everywhere else to include K member bolt locations. This rust is not near the K bolt mounting surface.

RH has broken weld nut only. No rust thru at all.

You know, there is something to be said for previous owners who force stuff together or apart on these 44 year old cars... penetrating oil and taps are invaluable and eliminate major, major headaches. I can't imagine the torque that someone must have used to punish the k bolt and weld nut enough to break them both.

- - - Updated - - -

Probably like Rusty says...
Easiest and most secure way to ensure it is re-welded correctly.
Bummer...
I'll take it "off your hands" for like $2,000 or so, if thats any help?

That would probably make the wife happy.... and me, weep like a CHILD!! That said, the wallet keeps weeping green every time I work on it. It's an epidemic going around- watch out.
 
If you are opening the frame rail why mess with the old nut put a new one in. I agree with flypaper on the pin holes, at the very least really check them over. If they rusted from the inside out there will likely be more rust hidden in there.
 
I agree as well, Plasma cutters are priceless when it comes to resto tools.

I had an identical issue with the left rail on my Roadrunner. I didn't have the issue with the nut for the k-Frame, but the rail was rotted in the same spot as yours. While initially taking all the paint/rust/grease/primer down to clean metal I ended up opening holes in the frame rail just like you did.
Fired up my hypertherm Plasma Cutter and this is what I found inside:

w1.jpg

With the geometry of the rails and the factory openings/holes up front, this area is the perfect collection point for all the road debris/dirt/gravel/moisture to collect. What was left of the rail after cleaning it all out:

w2.jpg

Right rail didn't look as bad and no thru wall wire wheeling, but never the less I still cut a hole and what do you know.....Filled with garbage, but metal was still good:

w3.jpg

As far as the fix........Again, used the plasma cutter to slice up 10 gauge (thicker than factory) repair patches to be "U" shaped around the rail. Cut out the rot till I found decent metal. Used a 6HP shop vac to insure all garbage was out of the rails, used a flexible wand with a coaxial spraying head, sprayed in rust converter, then encapsulator, then rust bullet as far as I could get it down in there. Did the same with the right rail.

w4.jpg

Morale of the story...cut it out and get it out of there. Depending on what you have to work with once it's cleaned out, I would try to save the rail if you can. Changing out a front rail is serious business and if you do not have experience doing it and a rail change is needed, take it to someone that knows what they're doing. Being off just a small bit, your car will not be road safe, won't go down the road straight, wear out tires in an odd manner, and trying to line up surrounding panels may be an issue as well.

Been there....hope it helps.
 
Propwash,

Thanks for the education on how you repaired this area. The pics are a great reference that I will come back to when I begin this phase of the project. I have a good plan of attack now and know what to expect as I open up the rails. Thanks to all for their advice. I will let you guys know how I make out. Maybe snap a couple pics to share for others in the future.

Thanks again to all who responded!

69Beeper,
Anytime you feel an individual like Propwash has helped you or the Forum please feel free to click on the "Thanks" Icon at bottom left of post.
 
That's some pretty nice patching & welding prowash. Replacing the frame rail isn't to hard IF you have some rigid steal laying around to build a jig out of to hold everything in place and locate the replacement.Hopefully it doesn't come to that, Good luck
 
69Beeper,
Anytime you feel an individual like Propwash has helped you or the Forum please feel free to click on the "Thanks" Icon at bottom left of post.

By all means there's no need to feel obligated to hit the thanks button. I find enough gratitude just being around the great guys on this site and all the help that they have given me. If I can toss in my 2 cents along the way and help someone else out, great. Thanks Ski.
 
I promised an update so here we go:

- Right hand rail broken jam nut: Since it was the front nut closest to the radiator support, I worked the stud/nut to the front of the rail against the radiator support. I drilled out the spot welds and loosened the lower support which exposed the end of the rail (which is tabbed over by the way). I gently pried open the end of the rail tabs enough to allow the nut to pass through the end of rail opening. I drilled out the two spot welds which held the large plate to the rail and passed that through the opening as well. I removed a weld nut/ plate assembly from a chunk of donor rail I had laying around. I cleaned it up, reversed the process and welded it at the spot weld holes I made while removing the old plate. View attachment 103212View attachment 103213

The LH rail rust areas were removed and replaced. After inspection, I decided that the rail was in salvageable condition. Pics are worth a thousand words, so I'll just post them:View attachment 103214View attachment 103215IMG_8011.jpgView attachment 103216View attachment 103217
View attachment 103218


... overall, not bad for my first time. I also treated the area after welding with a galvanizing primer I bought at Grainger. My Millermatic 140 worked great. Both rails are extremely solid now and I couldn't be happier. I butchered the sequence, but you get the point. IMG_8016.jpgIMG_8017.jpgIMG_8018.jpg
 

Attachments

  • IMG_8007.jpg
    IMG_8007.jpg
    55.7 KB · Views: 428
  • IMG_8008.jpg
    IMG_8008.jpg
    62.4 KB · Views: 402
  • IMG_8003.jpg
    IMG_8003.jpg
    52.3 KB · Views: 413
  • IMG_8006.jpg
    IMG_8006.jpg
    76.8 KB · Views: 431
  • IMG_8013.jpg
    IMG_8013.jpg
    66 KB · Views: 421
  • IMG_8015.jpg
    IMG_8015.jpg
    61.3 KB · Views: 410
Hello 69beeper, this is the exact frame rust I'm dealing with and this is extremely helpful.
 
Back
Top