• When you click on links to various merchants on this site and make a purchase, this can result in this site earning a commission. Affiliate programs and affiliations include, but are not limited to, the eBay Partner Network.

Bellhousing runout question

I bought 2 of these kits, one for my Roadrunner and one for the GTO. Tell them the size of your bellhousing transmission side opening. Red part mounts to the crankshaft, and the ring slides into the opening of the bellhousing. Put a light in the bellhousing and the gap should be the same all around the ring. If not, adjust accordingly. Simple, no math, no risk of a magnetic base moving or slack in the elbow joints of the alignment arms.
https://www.hotrod.com/articles/hppp-1210-how-to-align-bellhousing/
https://www.browellbellhousing.com/components.html#
View attachment 1100575
How does this tool index to the center of th
No, no need to check, JMO. I understand why you say that, but the gap is so small between the ring and the edge of the bellhousing opening, and the red part mounts flush on the crankshaft.

If you think so, you don't know how expensive it is when you get the runout wrong. Also, the way I use my car, I have had the transmission in and out several times. The cost of the TKO600 going in the GTO justifies this investment IMO, and both cars are likely to have the clutch disc(s) changed again, so I use that tool every time the bellhousing comes off.
In the case of my Roadrunner, I am going to change bellhousings when the Bill Mitchell aluminum block goes in, and I kept all 3 pair of offset dowel pins I bought from Robb Mc because I may well need them. I have 2 new zero offset dowels in my factory aluminum bellhousing, because it didn't require any offset.

I want one of these for doing it in the car alone. Do you have a pic of the backside? How does it index/center on the crank? Do they make it fit the converter ring perfectly?
 
I want one of these for doing it in the car alone. Do you have a pic of the backside? How does it index/center on the crank? Do they make it fit the converter ring perfectly?
I'll take a pic tomorrow if I can.
I'll say more then.
 
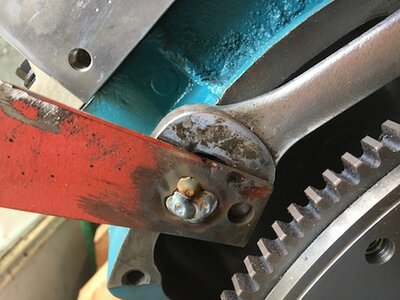
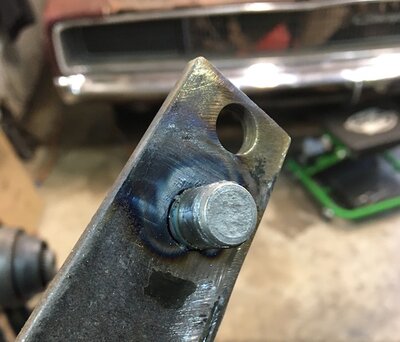
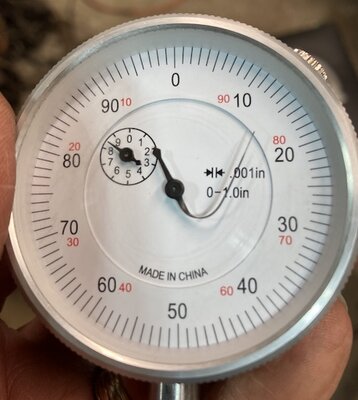
Update: I was able to get the pin out! I tried welding a nut to it, nope. Then I took a piece of flat iron, drilled a hole the same size as the pin and then did a hot bead in four corners on the face of the pin. I was able to turn the pin a little each way, so I used an end wrench behind the bar, leaned into the wrench with my hip while moving the pin back and forth and worked it out. Turns out the hole in the block was a bit corroded, so after cleaning it out the new offset pin finally went in all the way. I was working away, measuring, pulling the bellhousing, measuring again, closing in on getting the numbers as small as possible, when after almost dropping the dial gauge three times - I finally did and ruined it. So, I painted the bellhousing to match the engine and called it a night. I'm off to HF this morning to buy another dial indicator.

IMG_0714.JPG IMG_0715.JPG IMG_4686.JPG
 
I don't see anything wrong with that one :poke:
:lol:
Just calculate the difference between the "bent" needle indicator reading and what it should be. I mean while you're doing math, what's one more variable?:D
Although I haven't dropped my beautifully anodized Browell runout tool, I think it would still work afterwards:D
All kidding aside, I'm sorry to see your fine product of Chinese labor get damaged, but I hope everything turns out OK.

Thanks so much. Very helpful.
I don't ever plan to do this again, so for the cost of a couple HF dials I'll get it close enough.
 
Thanks so much. Very helpful.
I don't ever plan to do this again, so for the cost of a couple HF dials I'll get it close enough.
All good. I was just having a chuckle, having done the process with a magnetic base borrowed multi jointed dial indicator assembly. Even though it turned out that I didn't need any offset, I was on the crankshaft pulley side, turning the engine over with a long socket bar, and a friend and very talented mechanic was watching the indicator. I still didn't trust those results.
The Browell tool makes it easy, and I personally have complete confidence in it.
Best to you brother!
 
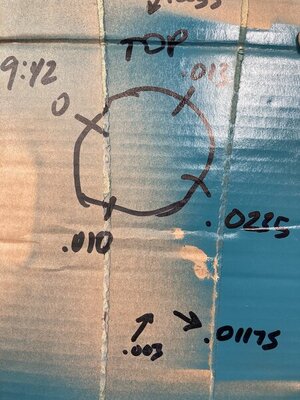
Update: maybe one of those Browell alignment tools would be worth the cost to avoid the time and frustration! After many, many tweaks, this was the best I could get. The .021 offset pins pointed at about 9:42 o'clock. I'd already tried 9:00, 9:30 and 10:00. I thought I could get it a little better, but couldn't, and am now trying to get it this close again. Do I then subtract .003 from .01175 to get .00875 total overall offset? I can live with that.

IMG_4699.JPG
 
Browell tool is a MATH-FREE zone! (Unless you are curious, then use a feeler gauge to get "the numbers" then just get the gap as concentric and uniform as possible. I believe a light source in the bellhousing, and a decent pair of eyeballs would do the job.
 
Think something else maybe the problem, that's way off. Do you have someone you trust to put a second set off eyes on it?
Kern Dog had trouble with a 1" throw dial indicator. I'd buy a cheap one of these.
dail.JPG
 
Have indicated the OD of the flywheel? Does it fit tight center hub of crank.
 
That's the problem, well, one of the problems I've had trying to use a dial indicator. NO absolutely solid way to mount it AND have the tip of the pointer able to follow the edge of the bellhousing opening.
I've seen something :lowdown:@andyf did, but I couldn't make out how it was done.
The "worries and frets" are OVER for me!
Buying those 2 Browell tool sets, 1 for my Mopar and 1 for the GTO have bought me Peace of Mind in knowing, absolutely knowing, that my bellhousings are properly installed.
ALL that depends on that, the performance, reliability, longevity, and everything that affects, not missing cherished events or opportunities, some only come once a year, some may never come again, NONE of those missed because of a bad runout check...
WORTH EVERY PENNY! :bananadance::confederateflag::usflag::moparsmiley:
 
I took another shot at it tonight, this time following some instructions I found on Tremec's site to just put the needle straight up and zero it. I had been following a YouTube video (from Silver Sport transmissions, I think) doing a revolution, finding the lowest spot, then zeroing there. I turned the pins counter clockwise a bit to try it one more time. I have no idea what was going on all those times, and I'll spin it one more time to confirm the numbers (tomorrow) but I think I finally got it right. As they say in Apollo 13 - check my math (bad example, but they survived).

IMG_4716.JPG
 
Last edited:
I took another shot at it tonight, this time following some instructions I found on Tremec's site to just put the needle straight up and zero it. I had been following a YouTube video (from Silver Sport transmissions, I think) doing a revolution, finding the lowest spot, then zeroing there. I turned the pins counter clockwise a bit to try it one more time. I have no idea what was going on all those times, and I'll spin it one more time to confirm the numbers (tomorrow) but I think I finally got it right. As they say in Apollo 13 - check my math (bad example, but they survived).

View attachment 1103455
From the instructions I read or heard or watched, the dowels, if offset, EACH must be the same offset and each dowel must be offset in the same "clock" position, opposite the positive shift direction of the bellhousing hole.
Just as an example, if the bellhousing was too far to the right, 3 o'clock, then the offsets' "hump" should face 9 o'clock and be the closest offset # to the distance you need.
Hang in there, it looks like you are almost done!
:thumbsup: :bananadance: :bananaweed: :bday: :drinks:
 
Hang in there, it looks like you are almost done!
Thanks for the tips and support! I was seriously reconsidering my decision to put a four speed in this thing. Tonight, I'll check it one more time and also check the flywheel run out, just to be sure, as suggested by Fran Blacker and others. Then I need to start reading up on how to assemble the clutch and everything! I can't wait to finally get this into the car! Oh yeah, and the bushing that goes into the crankshaft - I keep having to remind myself. Time for an updated cardboard checklist. All forged crankshafts were drilled for manual transmissions, I've heard? It's a 383 from a '64. Need to do some measuring.....
 
Yes 99.9999% were drilled, but not all were finish reamed. There is a bushing that is made for cranks that are not reamed, I got one at napa or use the one that fits the converter hub.
 
Yes 99.9999% were drilled, but not all were finish reamed. There is a bushing that is made for cranks that are not reamed, I got one at napa or use the one that fits the converter hub.

My NAPA guys are not going to know what I'm talking about. I don't suppose you have a part number for that bushing, in case I need it? I already bought the bronze one from Brewer's, but haven't measured yet.
 
It looks like it was discontinued 615-1033 was the number. It was .914 diameter vs .941 for the one you have.
 
It looks like it was discontinued 615-1033 was the number. It was .914 diameter vs .941 for the one you have.
Thanks for bringing this up - I haven't been able to locate the bushing I'd purchased from JEGS yet (found the invoice, not Brewers like I thought), but I have a feeling I'll be needing to order the undersized bushing and I found one online. I don't have anything to measure the hole in the crank, but once I find the standard bushing I'll know if it fits or not.
 
Auto Transport Service
Back
Top