• When you click on links to various merchants on this site and make a purchase, this can result in this site earning a commission. Affiliate programs and affiliations include, but are not limited to, the eBay Partner Network.

Bringing it back to factory specs

So after a few months of driving the car around and having fun with it, I started back on getting the car completed. I am looking at having it finished for the Mopars @ E-town show on Aug. 23rd. Anyway, here are pics of the rear axle with the resto. I gotta say, I can honestly say that this appears to have never been apart as the wheel cylinders still have the white closed cell gasket material on it. The markings I am finding on the car are ones that I have NEVER seen before on other original cars that I have looked at!

u bolts and rear rubber flex brake line bracket all degreased

IMG_0660.jpg


rear leaf springs.....

IMG_0664.jpg


IMG_0661.jpg


IMG_0663.jpg


IMG_0662.jpg


pinion snubber with TONS of grease on it. Once it was cleaned off, the rust seemed minimal and most likely will be pit free! (currently soaking in evapo-rust!)

IMG_0665.jpg


original rubber bushings for the shackles...

IMG_0668.jpg


hard to see but appears it was a yellow 4 on the third member a the 12 o clock area.

IMG_0669.jpg


original rubber flex rear brake line...

IMG_0666.jpg


hardware....

IMG_0667.jpg


some yellow mark on the underside of the rib where typical area for the stamped date code would have been.

IMG_0671.jpg


heart shaped yellow crayon mark to the left of the 2

IMG_0670.jpg


orange mark at the 6 o'clock rib, most likely for or part of the axle ratio

IMG_0673.jpg


yellow paint mark on the saddle of the driver side axle tube

IMG_0674.jpg


another yellow paint mark on the pass side axle yoke as well as a baby blue dot (with splatter)

IMG_0676.jpg


paint markings found on pinion yoke. red where the caps are and white closer to the nut

IMG_0677.jpg


IMG_0678.jpg


more paint markings on the driver side axle tube. markings were put on with the axle flipped 180* so the carrier was facing rear ward as shown by the paint runs from the inspection marks

IMG_0675.jpg


original wheel cylinder still has the factory white closed cell gasket material! (how often do you see this!)

IMG_0680.jpg


IMG_0679.jpg


factory installed u-joint straps (previously pictured earlier in the thread but the picture turned out blurry)

IMG_0683.jpg


IMG_0682.jpg


yellow inspection mark on top of the axle tube and went UNDER the brass t block for the rear brake lines. vent bolt put back in place to prevent dirt from entering the axle.

IMG_0681.jpg


factory gray dip tank primer where the front hangers were bolted up.

IMG_0684.jpg


IMG_0686.jpg


factory red oxide primer in the wheel wells where they missed with the undercoating.

IMG_0687.jpg


IMG_0685.jpg


IMG_0692.jpg


IMG_0691.jpg


IMG_0694.jpg


IMG_0693.jpg


bronze paint over spray in wheel well and also area where the lower black out got over sprayed

IMG_0695.jpg


IMG_0696.jpg


reference pics for when I put the brakes back together!

IMG_0690.jpg


axle u bolts all cleaned up which revealed white inspection paint marks on the top of each u bolt!

IMG_0698.jpg


IMG_0699.jpg


IMG_0700.jpg
 
You're obviously a perfectionist. And with a near perfect GTX to work with. I can only imagine what fun and finale outcome you're going to have for a beautiful car. I'm bias - besides my wife, GTX are the love of my life. Thx for all the pics and details. Now I know who to ask if I have a question about originality for mine :)
 
Thanks for the compliment GetX'd ! I wouldn't say that I am a perfectionist but probably close to it. If I were a perfectionist, all of the factory imperfections would have been corrected. :icon_eyes: We are ever so fortunate to be able to have a great example to begin with. Otherwise, a lot of the details that we are locating could have been lost. Lets face it, once someone meddles with something, 99% of the time, things get either changed or originality gets modified ever so slightly to the point where it does not reflect what or how the factory did things. A perfect example would be how the factory painted cars. The cars were on the assembly line on a cradle of some kind going down the line and into the paint booth. Just choosing a number out of the air, lets say the height of the car off the ground was 18". Lots of restorers either have the bodies completely apart or up on rotating assemblies when they paint the bodies. This typically allows the body to be higher up off the ground where paint coverage would get to places where it most likely would not have gotten with a car being lower to the ground and the line workers not bending over or spraying paint low enough to get proper coverage under the rocker panels or the bottom parts of the door frame. With the example of the vehicle we had, there was little to no paint on the underside of the door frames and the gray factory dip tank primer was still there. I am trying to recreate our vehicle back to that kind of example and with taking the before and after pics, I think I have done the car justice so far.

Feel free to ask any questions that you'd like as I like to try and help out as many others as I can with the knowledge I have learned and uncovered with this "archaeological find". ha ha ha
 
Beautiful work!!!!

A little off topic, but how about a couple pictures of white & red E-body?
 
I thought I posted pics of them earlier in this thread? Pics of Mom's 70 Chally vert I posted in reply # 26 :)
 
Some more pics I came across while cleaning up the rear axle and freshening up the undercoating.

CIMG2004.jpg


factory masked off area where the front spring hanger bolts up. factory gray dip tank primer still there!

CIMG2006.jpg


reference pic of how the rear shackles were installed.

CIMG2008.jpg


pass side shackle

CIMG2007.jpg


under coating pattern

CIMG2010.jpg


CIMG2011.jpg


notice the bolt where the stud should be. Its unknown if this stud broke off at some point in the life of the car or if this was installed by the factory since it still had the correct captive washer nut on the other side. funny thing is this was the only one like this!

CIMG2012.jpg


markings on the rear axle

CIMG2022.jpg


lookie what I found under the brass rear line brake T

CIMG2023.jpg


CIMG2021.jpg


assembly part code under blue paint markings

CIMG2025.jpg


CIMG2024.jpg


CIMG2026.jpg


pinion yoke markings

CIMG2027.jpg


CIMG2028.jpg


CIMG2029.jpg
 
Lots of progress today! Rear axle housing is painted with epoxy semi gloss paint and awaiting its stampings and paint markings, backing plates are all cleaned up, inspection marks reapplied, and coated in RPM, rear shocks painted, e-brake cables all evapo-rusted, RPM'd, and ready to be reinstalled as well as the pinion snubber that still has the original rubber bumper in pristine shape.

IMG_0734.jpg


IMG_0735.jpg


original wheel cylinder all cleaned up, rebuilt, and RPM'd on the outside.

IMG_0731.jpg


all hardware evapo-rusted and RPM'd!

IMG_0732.jpg


IMG_0761.jpg


IMG_0762.jpg


flex line support bracket.

IMG_0733.jpg


brake shoe side of backing plate

IMG_0736.jpg


and outside view of same.

IMG_0737.jpg


left backing plate side.

IMG_0738.jpg


IMG_0739.jpg


pass side e-brake cable

IMG_0740.jpg


IMG_0741.jpg


IMG_0742.jpg


IMG_0744.jpg


IMG_0743.jpg


brass T all cleaned up as well as he rear hard lines

IMG_0747.jpg


IMG_0748.jpg


IMG_0749.jpg


IMG_0750.jpg


driver side e-brake cable

IMG_0745.jpg


IMG_0746.jpg


Rear 8 3/4 axle casing all cleaned up, paint stripped, and repainted!

IMG_0752.jpg


IMG_0758.jpg


Today I also soaked the rear leaf springs in a homemade solution of de-ruster. I forgot that the original zinc interliners were in there and the solution disolved them. Thats ok as I have the new interliners in the new rebuilt kit I have. The bushing part of the leaf spring revealed some baby blue and cream brush stroke markings as well as some baby blue and white brush stroke markings on the other leaf spring eye. Under these paint markings you can still see the black paint where these springs were dipped in the black paint at the manufacturer.

IMG_0753.jpg


IMG_0754.jpg


IMG_0755.jpg


IMG_0756.jpg


still has the original rubber DCPC rubber bushing!

IMG_0757.jpg


shocking! lol

IMG_0759.jpg
 
Looking really nice resq302!
I am not familiar with evapo-rust and RPM
Can you explain the process to remove the rust?
Thanks
 
Thanks Mopar4Don!

Evapo-rust is a solution where you submerge the rusty part, tool, piece, whatever really in the solution for a period of time and it dissolves the rust off of the part without hurting paint or anything else. The only thing I have seen it remove is zinc plating on certain parts if you leave it in there for too long. The evapo-rust is completely biodegradable and an amazing product that you can use over and over till the solution pretty much wears out.

The RPM is a product developed by Dave Walden who owns ECS Automotive Concepts. http://www.ecsautomotive.com/ It is a paste that you apply with a brush over bare metal parts and prevents the metal from oxidizing or rusting. RPM stands for Rust Prevention Magic. This product has won a SEMA award for best new product of the year (I think that was the title) at the show they had a few years ago. If you want to do an OE look or style resto like I am doing, you will use this product over and over again as it can be used on not only cast iron, steel, but also aluminum too. I even apply it to the plated parts so as they do not oxidize.

- - - Updated - - -

here is also a good video of how the product is used and also goes into a little bit of Evapo-rust. http://www.ecsautomotive.com/rpm.php
 
So I got some more parts cleaned up and stripped down the other day. I attacked the rear shock mounting plates (also bolts up to the underside of the leaf springs) and let them soak in Evapo-rust for a good day and a half. After they came out from the solution, a little brushing off and hosing off, they were ready for the RPM treatment.

IMG_0790.jpg


IMG_0787.jpg


IMG_0788.jpg


IMG_0789.jpg


Next was the rear leaf springs. At some point, someone had painted the rear axle and rear suspension with some cheap black paint. Knowing that the rear leaf springs could have come either dip painted in gloss black as an assembly or natural heat treated spring steel, I took precaution in cleaning them. Since I did not have enough of the Evapo-rust to fill a black corrugated tube, I chose to use something called "The Works" which can be picked up at Home Depot or Lowes for just over a dollar a bottle. It essentially works the same as Evapo-rust however, is a little more caustic to the skin. It does, however, leave the paint on the parts and only dissolves the rust like the Evapo-rust stuff with the only draw back is that once the parts are removed and washed clean with water, the parts almost immediately flash rust. Here are some pics after I removed them from the dip and started the disassembly and rebuild process.

IMG_0763.jpg


IMG_0765.jpg


IMG_0767.jpg


When I removed them from the dip, I found some factory paint markings on the eyes of the springs where it bolted up to the hangers.

baby blue and cream colored yellow

IMG_0766.jpg


baby blue and white colors (blue appears to have been applied first, then the other color second on both springs) Both springs had black paint under these paint markings indicating that they were dipped in the black paint prior to having the paint markings applied. If there was no evidence of black paint behind these paint markings, that would have indicated they were natural and unpainted.

IMG_0793.jpg


IMG_0794.jpg


driver side springs

IMG_0792.jpg


IMG_0791.jpg


pass side leaf spring all reassembled and sprayed on heavy to duplicate dipping. (paint markings still need to be applied)

IMG_0785.jpg


IMG_0784.jpg
 
Wow. That's a lot of time you've spent on this but it looks really good!

Question: I use Evapo-rust and find that its only usually good right out of the bottle, and doesn't recycle well, meaning after I try to use it the second time it loses a lot of its effectiveness - and the stuff is $22/gallon.

Tell me what you think of any other brand of rust remover you've been using. Its gets very expensive to buy enough Evapo-rust to fill large pan, then not have it work very well on the second job.

I see all those jugs of rust remover in the photo. Unless you're buying it by the case, even that much would become very costly in a hurry.
 
springs hung!

IMG_0797.jpg


IMG_0808.jpg


IMG_0807.jpg


pass side shackle installed and natural steel color like the assembly did it (treated in RPM to prevent rust of course!)

IMG_0799.jpg


assembled pass side leaf spring with paint markings

IMG_0796.jpg


IMG_0795.jpg


IMG_0801.jpg


IMG_0802.jpg


rear housing all painted and some (not all) paint markings applied that were revealed during the clean up. Still awaiting the rubber stamp numbers to do the rest of the paint markings.

IMG_0798.jpg


IMG_0806.jpg


IMG_0805.jpg


driver side shackle...

IMG_0800.jpg


driver side hanger.....

IMG_0803.jpg


IMG_0804.jpg


Rear just temporarily in to see how it looked....... and it looks GOOD! :)

IMG_0809.jpg
 
Very impressive indeed! A super nice GTX to be sure.

I appreciate seeing all of the detail; very informative - thank you for posting all of the pictures.
 
Wow. That's a lot of time you've spent on this but it looks really good!

Question: I use Evapo-rust and find that its only usually good right out of the bottle, and doesn't recycle well, meaning after I try to use it the second time it loses a lot of its effectiveness - and the stuff is $22/gallon.

Tell me what you think of any other brand of rust remover you've been using. Its gets very expensive to buy enough Evapo-rust to fill large pan, then not have it work very well on the second job.

I see all those jugs of rust remover in the photo. Unless you're buying it by the case, even that much would become very costly in a hurry.

Thanks for the compliments Tom! In answer to your question, I reuse the Evapo-rust a lot till its almost completely black in color. It still works, just not as fast as the fresh stuff. However, it still does work.

The other stuff, which actually is a toilet bowl cleaner, is called "The Works" and can be picked up at Lowes, Home Depot, etc. That costs about $1.50 per bottle although, the stuff will flash rust immediately once you wash off the acid. The stuff also emits very bad odors and has to be used outside where as Evapo-rust really has no odor and is safe and non toxic. I primarily use "The Works" stuff for larger items although I did use Evapo-rust in a tube for the drive shaft. I will say this about the "Works" stuff, you MUST wear gloves! I didn't the first time and I got some chemical burns (very minor) on my finger tips. Also, any open cuts or cracks in your skin if you have dry skin will hurt like a mother! Again, Evapo-rust is not like this as it is environmentally friendly and biodegradable.

Again, "The Works" is good for doing large items but you get really bad flash rusting after you rinse the chemical off the parts. Evaporust doesn't have as fast as a flash rusting.
 
Very impressive indeed! A super nice GTX to be sure.

I appreciate seeing all of the detail; very informative - thank you for posting all of the pictures.

X's 2 for sure. Your car is definitely top notch and I appreciate your attention to detail.

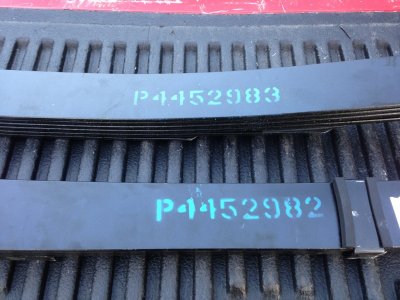
By chance did you happen to find any part numbers spray painted on top of the main leaf spring??? Chrysler is now producing reproduction springs again and they have the number stenciled on top.

Here is a photo of what I'm talking about. The color of the stencilling appears to be very close to "corporate blue" engine enamel used from '72 to '79 or so.

- - - Updated - - -

IMG_7024.jpg
 
no sprayed part numbers on the top leaf spring. That is the new Mopar Performance ones and unless they changed their metalurgy, they sag within a few years. I got a set of them on my 69 Charger about 8 years ago and they look more like a w now than the u shape they are supposed to be happening only after 3 years.
 
Update....... LOTS of progress today! The rear axle is back together and we are so very close to driving it again. The only thing holding us back right now is that we have to bleed the air out of the rear brakes.

After carefully looking at the pics we determined that the yellow word appears to have said "tape" and a long with the blue word on the driver side axle tube "ebrake" I can only assume that they needed tape down the e-brake cables since the pass side is pretty long and gets bolted up to the underside of the body. If that was left dangling during shipment, it could have gotten snagged on something or damaged, hence the need to tape them up. Again, just a theory but that is what we deduced the original pictures to say.

IMG_0810.jpg


IMG_0812.jpg


IMG_0815.jpg


IMG_0814.jpg


When I was cleaning the black paint off of the third member, I uncovered a yellow crayon marking of what looked to be a heart next to the 2 and a large hand written 4 on top of the third member. These were replicated with the paint crayon which I picked up from Quanta a few years ago.

IMG_0813.jpg


Yellow "heart" and 9-26 carrier assembly date code. (date code of 9 27 I am awaiting on the rubber stamp to come in for the axle tube final assembly date)

IMG_0816.jpg


again, you can see how long the pass side e-brake cable is as it has to be attached to the rear axle housing.

IMG_0817.jpg


shocks installed and bolted up at the top mounting location. Waiting for the suspension to be compressed a little to attach the lower mounting points.

IMG_0818.jpg


brake lines all installed. Note the new closed cell foam gasket where the wheel cylinder mounts to the backing plate.

IMG_0819.jpg


IMG_0820.jpg


IMG_0822.jpg


e-brake cables installed....

IMG_0821.jpg


wheels back on, e-brake lines connected to the main cable, shocks mounted to lower location, getting closer!

IMG_0823.jpg


IMG_0824.jpg


IMG_0825.jpg


IMG_0828.jpg


3 black stripes designate the 3.23 axle ratio with the large u joint and the orange dab denotes the use of Sure-Grip.

IMG_0827.jpg


IMG_0826.jpg


IMG_0829.jpg


IMG_0830.jpg
 
You too! I'm really looking forward to it and hoping we don't have any issues with the car like the first show of the season! lol. Either way, I'll get that thing there even if I have to push it or tow it with my charger!
 
Auto Transport Service
Back
Top