• When you click on links to various merchants on this site and make a purchase, this can result in this site earning a commission. Affiliate programs and affiliations include, but are not limited to, the eBay Partner Network.

Broke my 7UP Pop Machine today....

These PA/HF cabinets need tuning
I have spent many a hour researching ways to get the most out of these cabinets. And many hours modding and tuning mine
My buddies can’t believe how slick my cabinet works. It’s just as easy as turning on a tv
Yeah Wayne, my glass needs replacing as well. 28 bucks for a plate of glass.
I’ll get around to it sometime.
Looking good Wayne
 
Can’t remember if these headlight door bushings were for my 71 Charger or my friends bird… I’ll send a set or 2 if ya need em. :thumbsup:
BC47EF34-E4D0-40A1-8D3C-3533505A1485.jpeg

B8D10D38-B4ED-44BF-BF95-F7A45A408E4B.jpeg
 
Thanks Tom, the smaller ones are probably correct. That said, I bought a set of 10 bucket bolts and 4 bushings some 17 years ago... because I could at the time. Looks like I get to finally use them and hopefully will never need more! Thanks for the offer!
 
I know you don't need them but if you did McMaster Carr carries the bushings

 
Passenger side headlight bucket in the blasting cabinet.
superbirdfullpaint3 079.jpg

Front fender to fender extension attach bolts needing some clean up.
superbirdfullpaint3 082.jpg

Was going to Evaporust them and then figured I had the blasting cabinet going.
superbirdfullpaint3 091.jpg

Both buckets ready for some wax and grease remover, then paint.
superbirdfullpaint3 093.jpg

Buckets hung and ready for paint. 53 year old things look like brand new.
superbirdfullpaint3 096.jpg

Got the first coat on, can ran out and grabbed my last can of SEM trim paint. Of course it clogged, spit and spread like **** so they look JUST LIKE a Friday afternoon Chrysler drunken paint job. Runs yes...
superbirdfullpaint3 103.jpg

Ready to put some parts back together.
superbirdfullpaint3 105.jpg

Fender extension hardware soaked in Boeshield T9 and draining off.
superbirdfullpaint3 113.jpg
 
Just had my Hagerty insurance policy and invoice for the next years coverage emailed to me! Was damn near terrified to open it and have a look figuring one way or another I'd be paying them back for the $25K+ claim submitted to fix the side of the car. Happy to report that they didn't raise my premium from last year by even a nickle!!! Absolutely amazing, especially considering even our daily driver extortionists raised our premium 17% this year.
 
Headlight bucket bolts and pivot bushings that I bought some time ago, because I could. 19 years ago to be exact. Light surface rust from sitting in the bag all this time.
superbirdfullpaint4 002.jpg

Into Evaporust, along with the spacer washers off of the vacuum actuators.
superbirdfullpaint4 004.jpg

These were missing on my buckets, but I noted them on the assembly drawing in the manual. Found some AN901-12 grommets in my aircraft stock that'll work perfect to protect the headlight wiring and vacuum hose.
superbirdfullpaint4 006.jpg

Headlight bucket bolts rust free, wax and grease remover next and then paint.
superbirdfullpaint4 010.jpg

This way they'll blend in with the black "raccoon eye" black paint spray around the headlight doors.
superbirdfullpaint4 052.jpg

Headlight door opening springs and a few other pieces of hardware fresh out of the blaster.
superbirdfullpaint4 021.jpg

Dipped in Boeshield T9 so they don't rust.
superbirdfullpaint4 022.jpg

I'll assume that these self tapping screws, that hold the vacuum actuators into the buckets, are original. 6 of them with the larger LN and 2 with the smaler.
superbirdfullpaint4 029.jpg

Getting ready for assembly.
superbirdfullpaint4 039.jpg

Tomorrows blasting candidates..
superbirdfullpaint4 043.jpg
 
Last edited:
For sandblasting bolts I drill holes in a 5 gallon bucket lid just slightly less in diameter of the thread. Then I force the bolts into the holes and hold the lid as I sandblast. It’s easy to rotate and get all sides. Flip it upside down and get the threads. Push them more or less into the lid to get the portion that you don’t get the first go around.
 
I use one of those magnetic round parts trays
Does a really good job
Roll the bolt over with my thumb, but it gets most of the bolt without touching them
 
I'll assume that these self tapping screws, that hold the vacuum actuators into the buckets, are original. 6 of them with the larger TN and 2 with the smaller.
superbirdfullpaint4-029-jpg.jpg
Is that bolt marking a TN? I assumed (which could be dangerous) that they were upside down, and were NL or LN.
 
Nose inlet bezels screws blasted and ready for paint, as well as the hood latch and bolts.
superbirdfullpaint4 055.jpg

For the date stamp folks. Hood latch mfg 285th day of 1969.
superbirdfullpaint4 056.jpg

Latch had been painted gloss black which is incorrect. It should actually be a black oxide coating, but I'm not sending a single part out. High Heat BBQ paint fakes it fairly well.
superbirdfullpaint4 059.jpg

It'll lighten up and turn a tad grayish as it cures.
superbirdfullpaint4 065.jpg

Clean hardware and headlight springs all dipped in Boeshield T9.
superbirdfullpaint4 061.jpg

Nose air inlet screen prepped and painted Semi-gloss Black. According to David P it should be body colour, but you'll see 80% out there are Black.
superbirdfullpaint4 067.jpg

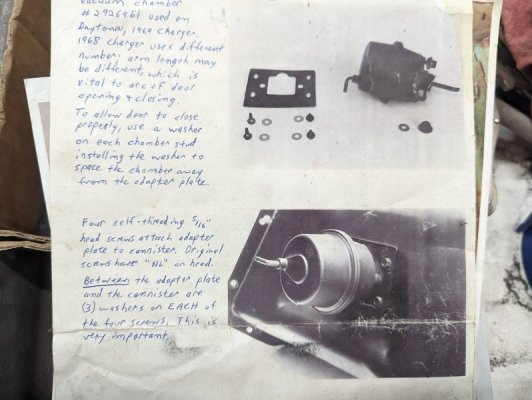
Thought it was odd as I disassembled the actuators, finding a washer on each actuator boss and then the mounting plate and nuts. Then 3 washers spacing the plate out off the bucket on each of 4 self tapping attach screws.
superbirdfullpaint4 071.jpg

While none of this is shown in the parts manual it was confirmed that this is indeed correct by a new aero friend I picked up in FBook by the name of David Gabay.
superbirdfullpaint4 074.jpg

I'm guessing it's a partial spacing to correct actuator stroke and also allows the unit to flex around so the headlight doors don't bind up.
superbirdfullpaint4 078.jpg

actuatormouting.jpg
 
Last edited:
Both actuators mounted back on their buckets with new vacuum hose. Signal light housings attached to their brackets and misc parts ready for reassembly when George and Dan have the headlight pods painted Black to match the nose decal.
superbirdfullpaint4 085.jpg

Dan's not wasting any time taking her to nice clean metal. Good thing as it'll be time for us to head for Camp in no time and I want it all done before we do.
superbirdfullpaint4 087.jpeg

So great to see that it's looking like less metal work than was originally thought!
superbirdfullpaint4 088.jpeg

Buckets ready to put the headlight pods into them and then back into the nose once painted.
superbirdfullpaint4 091.jpg

Figure I'll get the door glass tidied up next along with it's guide channels.
superbirdfullpaint4 093.jpg

Rear glass channel could use that new flocked rubber insert that I have for it.
superbirdfullpaint4 096.jpg

Overspray from the paint job some 35+ years ago, coming off easily with a razor blade.
superbirdfullpaint4 101.jpg
 
Last edited:
Lookin good.... Sucks the way the project started but at the end you'll have a nicer bird....
 
Just had my Hagerty insurance policy and invoice for the next years coverage emailed to me! Was damn near terrified to open it and have a look figuring one way or another I'd be paying them back for the $25K+ claim submitted to fix the side of the car. Happy to report that they didn't raise my premium from last year by even a nickle!!! Absolutely amazing, especially considering even our daily driver extortionists raised our premium 17% this year.
They never raised my rate after my claim a few years back either. I've never had anything but the best experiences
with that company.
 
You guys talking about the rates made me go look at my bill that came in the mail a couple of weeks ago. Up by three dollars. I guess I can take the hit this year. lol Why no calendar?? You think that would be a given??
 
Auto Transport Service
Back
Top