• When you click on links to various merchants on this site and make a purchase, this can result in this site earning a commission. Affiliate programs and affiliations include, but are not limited to, the eBay Partner Network.

Dakota Digital gauge swap in a 1970 Charger

Kern Dog

Life is full of turns. Build your car to handle.
FBBO Gold Member
Local time
10:15 AM
Joined
Apr 13, 2012
Messages
35,069
Reaction score
123,307
Location
Granite Bay CA
In 2015, I swapped in a Dakota Digital instrument cluster in my 1970 Charger. At the time, I didn't think of posting about it.
I have a little free time while I'm waiting to resume some changes to the car so I thought I'd revisit this upgrade.
I bought the car in March of 2000. It had a non working clock in the instrument cluster along with the rest of the standard Rallye gauges.

Dak 3.JPG


Dak 4.JPG


The car is actually a "500" model so I'm lucky that the left pod wasn't the cheap "blank" that the lower line XP model Chargers were equipped with.


Dash 1 F.jpg


Within a couple of years, I swapped in a 440 and wanted to have a tachometer. A company known as "Restorations by Julius" offered a drop in tachometer that looked sort of like a factory one....

Dak 5.JPG


Dak 6.JPG


Time marched forward. By 2013, the temperature gauge was working part time. The oil pressure gauge had already conked out awhile back so I put in a hydraulic gauge in place of the ash tray. I made a dual gauge pod to also include an Air/Fuel gauge.

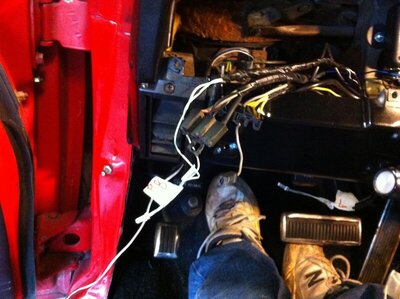
Dak 9.JPG
 
By Summer 2015, I figured that I should do something about the gauges. I had a few choices. I could buy new OER gauges from Classic Industries or another vendor, I could have my stock cluster restored or I could change it up and go with something a bit more modern.
All were going to cost about the same.

At that time, Dakota Digital only offered this style.

Dak 54.JPG

Dak 53.JPG


The advantages of this setup is that it eliminates the ammeter via the use of a voltmeter, the speedometer can be calibrated to any speedo pinion since the kit includes an electronic speed sensor and....It has a low fuel warning, 0-60 timer, stop timer, clock and a few other features.
I like the style, but in the years since, they have added this design to their product line:

Dak 01.jpg


I like that it looks more like a factory setup but I'm not as fond of the light bar for the tach.

Digging in, there were a few changes that I needed to do to make this work. The DD cluster uses a "Brain Box" where all inputs are received.....Water temp, fuel level, oil pressure, voltage, vehicle speed and engine rpm. Each used their own wiring so all the factory wires for each of those was pulled and taped up except the ammeter. I did something a bit different there.

Who here has heard of the MAD electrical reroute?

This is the factory arrangement for the charging circuit. Note how there is a LONG path from the alternator back to the battery and that full charging current is routed into the car!

Mopar elect.jpg


This is the reroute as outlined by the MAD electrical website. In this setup, charging current runs to the starter relay, then to the starter. Also, a jumper wire now passes through the bulkhead connector to power up the interior.
Note how the red and black wires form a loop on the interior side. I thought that idea was redundant so I just eliminated the red wire.


MAD 3.jpg


I pulled the stock cluster out along with the plastic dash cladding. It was originally green but sprayed black in place many years ago.... and it needed a repaint. I also painted the dash frame.
Dak 11.JPG


Dak 12.JPG


Dak 13.JPG


Dak 14.JPG
 
All the wiring was identified and marked for quick reference.

Dak 27.JPG


All those masking tape tags are still in place. It is faster than having toi look at the wiring diagram every time.

Dak 28.JPG


The headlight switch plug was melted from when I had a switch fail some years ago. I replaced the plug with a good used one.

Dak 29.JPG


I replaced the water temp sending unit and the oil pressure sending unit with the replacements from Dakota Digital. They also included an electronic speed sensor that fit the 727 trans that I had in the car then. For the fuel sender, a ground wire had to be attached to the sender and routed back to the "VHX" Brain Box that I mounted to the dash frame right behind where the gauges will sit. Normally, the speedometer cable would run right though this area.


Dak 35.JPG


Everything that you see in the stock gauges now runs through the new setup. Flasher, turn signals and the High beam indicator. The DD setup installs like stock using factory switches for the headlights, flasher and windshield wipers.

I replaced the plastic trim panels that fit on the dash face.


Dak 51.JPG


Dak 52.JPG


There were a few areas that required some connections to the factory wiring. Some choose to use butt connectors but I soldered everything and used heat shrink wrap.

Dak 37.JPG


Dak 38.JPG
Dak 36.JPG
 
Did you know on the Dakota Digital RTX gauges that you can have the tach light bar removed and have a tach added it removes the clock.
 
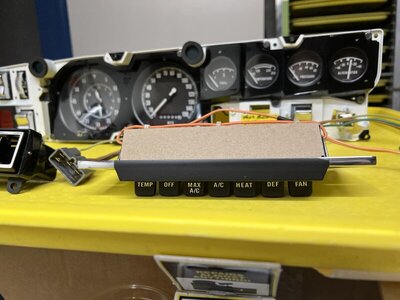
While I had it all apart, I decided to get the HVAC system working. The buttons were pretty worn out.

Dak 17.JPG


Nobody made replacement buttons and the stickers that I saw offered were out of stock.
I had another control panel so I used the buttons from it.

Dak 18 B.JPG


The heater control switch in the car was AFU. I had a replacement that I bought from a NAPA store back in 2001!

Dak 19.JPG


Dak 20.JPG


For the dash vents, I painted them a semi gloss black and tried to paint the silver outline with a paint pen. I failed miserably.

Dak 24.JPG


Dak 25.JPG


I ended up wiping off the silver and painting the whole thing black.
Funny thing is...for all of this work, I didn't get the heater, defroster or A/C to work. I couldn't even get the fan to come on without jumping the wire directly to a POS source. The complexity of the electrical and vacuum system led me to pulling the whole thing out in 2019 and installing a Classic Auto Air setup.

Check this out if that upgrade interests you:

https://www.forbbodiesonly.com/mopa...ling-classic-auto-air-in-a-70-charger.178445/
 
The plastic dash cladding was cleaned and sprayed with this stuff:

Dak 43.JPG


Dak 44.JPG

Dak 45.JPG

Dak 46.JPG


I noticed that while the dash pieces were textured, the ash tray was not. To aim for a match, I spreckled some rattle can undercoating onto the face of the ash tray from about 24" away to get a fine texture. After drying, it was sprayed with the same paint as the other parts.

Note the Brain Box. Plenty of wires to attach.

Dak 48.JPG
 
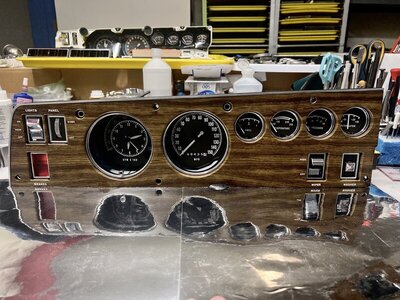
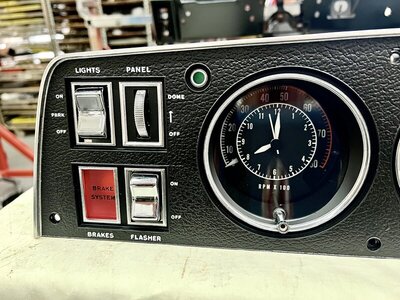
With the instrument panel in and powered up....

IMG_4215.JPG


Somehow I got lucky and it matched the lights on the stereo!

Gingwr 107.JPG


Looking at some of these pictures, I saw this......

Dak GV.jpg


That is the switch for the Gear Vendors unit I had in the car some time ago.

Dak 62.JPG


Since this installation was completed before Christmas 2015, only one problem has occurred.
Water from a leaky windshield dripped into the panel and cased the gauges to wig out. Once the car dried out, everything was fine. It was because of this that I later pulled the windshield (That was installed by a professional) and resealed it with 3M 8609 urethane.
Unfortunately, it still leaks a little but mostly on the right side.

Dak 64.jpg


A couple of comments:
The panel is lighted up whenever the ignition is on. I'd prefer that it were more like a stock setup where the panel only lit up when the headlight switch was on. The LOW FUEL warning comes on when there is about 3 gallons of gas left. The kit requires recalibration to the fuel sender and while it isn't perfect, the gauge reads closer to accurate than a stock gauge with these aftermarket sending units. I really like the speedometer calibration feature. I changed to a Tremec 5 speed and the speed sensor in that transmission was compatible. Calibration is simple: Mark out a known mile. Start at the beginning, press the "teaching switch" button. Drive the mile. Press the button again and you're done. No more replacing the speedo pinion. A check with my iphone gps speedometer app showed me to be accurate.

I did make a mistake with the odometer. I didn't notice that it is a 6 digit layout and programmed it to 430,000 miles instead of 43,000. You have a limited amount of time to reprogram it and I missed it. I sent the Brain Box back to Dakota Digital and they reset it to the number that I requested.

Dak 63.jpg
 
I had my cluster and tachometer restored. Knowing what I know now I would of went with a Dakota set up. They just plain look good and are more modern with added features.
 
Nice Greg. You do good work. They are cool units. I've done one in a 57 Chevy, 78 F250 High Boy and now a 72 Challenger non-Rallye. Had to wait around 8 months for them to make the E body non-Rallye as I guess this is the first one. Please excuse my crappy pictures.
upload_2022-5-21_7-29-56.jpeg

upload_2022-5-21_7-30-58.jpeg

upload_2022-5-21_7-31-45.jpeg
 
Good work. If you want to return to the beautiful factory look with excellent function of factory restored parts, please look up my services. I specialize in restoration of Original/factory installed gauges, switches with upgrades of quartz clock, solid state tach board and voltage limiter. When restored correctly, they not only look absolutely stunning, but they function as intended. I also specialize in ac vents and controller.

A51687B1-D22C-4D2C-BD10-A3260B1BA500.jpeg 5388FBD8-586E-4D3B-BF35-0E03DD2832D1.jpeg C48653A8-15A3-41AE-B0D5-98DC2B32E559.jpeg
 
Auto Transport Service
Back
Top