• When you click on links to various merchants on this site and make a purchase, this can result in this site earning a commission. Affiliate programs and affiliations include, but are not limited to, the eBay Partner Network.

Headlight upgrades

great info / suggestions 451 Mopar.

thanks 493Mike and Don Frelier as well ! those Hella lights look like a good upgrade as well.

i appreciate everyone's input
 
Use 12GA wire for the circuits. Unless you have a decent sized feed into the compartment, not through the bulkhead, DO NOT pull power for the lights from the fusebox. Use the alternator output stud.

I do things a bit different. My kits have independent power runs for high and low beam. No single breaker or fuse. Low beam goes out, at least you have a chance to pop to highs and get stopped. Breakers just turn back on to burn up more stuff... :)

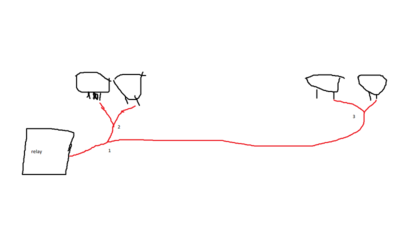
An artist I am not... this is what you have to do with 3 bridges if using a general use relay that has 87/87a configuration. It has one output so you need to split to head to each side, then split again at the bulb.

relay bridging.png
 
Last edited:
Uhhh, you forget that some are not as adept at understanding electrical jargon as a seasoned guru....

Anything electrical is all Greek to me. I have to install a new ceiling light in my kitchen. If I fark it up you can have my '69...
 
sometimes I read post and is funny all contradictions around. I can understand ppl saying closer the relay to the headlights less lost on the wire distance, I can understand everything like that but, look, If is mandatory to put the relays close to the headlights to prevent loosing, then never put your battery on the trunk, because the worst device to suck load is the starter motor ( 100-120 amps to crank, maybe more if a high compression engine ). You can put a 0 gauge wire to feed it from 15 feet, but still will be loosing on the wire distance. This becomes worst to feed back 20, 30 or 50 amps to charge back the battery, specially when the wire coming out from alt it uses to be no more than 8 gauge, maybe 6 ? some ppl still keep the stock 12 gauge wire!

I will only share my own experience. I have run my relays at a side of the batt in the past, with forward lighting harness cut and getting relays spliced in the line and at this moment I'm running my relays hidden down the kick panel, with no cut wires, just relocating floor dimmer switch terminals into the 87 terminal relay, and adding a piece of wire, same color, to trigger it at 86 terminal coming from floor switch. Guess what ? NO DIFFERENCE on intensity, no dimming lights no nothing againts put the relays closer to the headlights. We are talking about maybe 10 maybe 12 amps tops ( depending on voltage ) when 4 high beams are on ? the stock 14 gauge wire on 9-10 or maybe 15 feet wire talking about the far right side headlight and the regular packard 56 terminals are PLENTY for these 10-12 amps. Anyway, I barelly use high beams because the low beams using the halogen sealed beams is PLENTY.

Of course I'm running a parallel wiring path from my 78 amps alternator up to ammeter, and the terminal 30 relays are being feeded straight from it. Once again, NO DIFERENCE on light intensity and no dimming lights. Sure every upgrade must be accomplished to source it, and all the electrical system must be mantenienced. The dimming light deal will be worst if the alt is not able to feed the upgrade, no matter where you put the relays.

I won't say it must be made like this, I'm just sharing my experience. I wanted to keep a stock look on my engine bay with no visible relays and I rebuit my lighting harness. The ground for the headlights is being taken from the radiator core support like originally is ( the harness is MADE in that way ), and the ground for the relays to 85 terminal on back of kick panel is being taken from the floor dimmer switch screws. My relays are safe from dust, rust, oil, heat... and no visible.

Oh and as mentioned, I'm running regular halogen sealed beams. My only concern about them is the heat to the headlight fillers, just that.

Sure there is less load sucker headlights, but well I wished a full stock look everywhere, even into the headlight glass, being still sealed beams
 
Last edited:
just like this:

( and I know I have the pic of the actuall setup, not just diagram, when I find it will post )
relay upgrade on kick panel area CORRECTEDa.jpg


with this, you can see all the setup like untouched, even wires arriving to dimmer floor switch with correct wires, untill you remove the kick panel and will see the relays.

the wires arriving to 87 were the ones originally arriving to floor dimmer switch which are the ones running straight to headlights through the bulkhead. I removed them from the floor switch plug and inserted into the relay plug, didn't cut. Then replaced the floor switch wires to trigger to relay at 86 with a same color same gauge wire. Just the jumper wires and 4 female packard terminals.

It can't be made cleaner than this, if you want a clean job of course.
 
Nacho-I was thinking of mounting mine in the kick panel but went the route of putting mine under the battery tray. They're tucked away, neat all by themselves. My interior was already installed and had some wiring to do under the hood is my reason (among others).
 
It's at each own, I just posted about my experience on this. The natural place is allways on driver side inner fender area, which I also did initially, but hated to have that exposed, hence the reason I changed and really, didn't notice any diff about headlight performing. Sure my harnesses and terminals are clean and tight, I rebuilt my harness and the new setup was made without cut any wire so is fully reversible without any tooling, more than new harness tape. On a dirty and bad conditions harness and terminals the difference would be noticeable, but then the problem is not really the relays location but the harness and terminals conditions.

And as I also mentioned on my first reply here, having the ammeter in order, the relays must be sourced from alt side not the batt side ( just for those are not afraid to still keep it, but must be made on the right way ).
 
Last edited:
Here is a link to the info on the Eaton / Bussman fuse/relay block(s):
http://www1.cooperbussmann.com/pdf/36090f1a-b434-4910-98ec-1870f1f2519d.pdf

They are fairly expensive once you price in the cost of the tangless merti-pack 280 terminals, and mounting brackets.

I made a mistake in my earlier post (I went back and edited it) on the part number. The MiniRelay/fuse block that is bussed is the 15303-2-2-4.
Because the block is bussed and feed by 8-AWG wire, is the reason it is mounted in the engine bay near the headlights.
In my application, I did split the relay (low current side) buss because I needed the headlight relays to activate on the high side signal, and the cooling fans to activate on the low side signal.
The wiring harness I made is custom, not a plug and play, or spliced in. The wires are terminated on each end with the correct terminals.
Packard 56 at bulkhead connector, metri-pack 280 tangless at the fuse/relay block, and Packard 59 at the headlight sockets.

I modified the pinout of my bulkhead connector so that the lower connector only goes to the forward lights and relay block.
Basically, just moved reassigned cavity "T", "W", and "Z" and used those to trigger the 3 relays that trigger on the low side.
 
Has anyone even considered using HID (High Intensity Discharge) lighting systems? Switching the headlamps with relay controlled circuits is a great idea. Using the dimmer switch to turn on the high beams via a relay relieves the existing wiring and OEM dash mounted switch of that task. However, if more light is wanted/needed condider XENON HID systems. The HID systems produce more intense (brighter) forward projected light than LED (Light Emitting Diodes) or Quartz Halogen luminaries. Quartz Halogen lamps are nothing more than regular tungsten filament lamps surrounded by a quartz crystal glass envelope, filled with a halogen gas, which allows the filament to operate at a higher temperature which results in more light output. The bulb is still subjected to vibration and voltage spikes.
In a XENON HID system all the voltage and current the lamp needs is regulated and is NOT subject to vibration or supply transients. But the big benefit is the light output, measured in LUMENS, is roughly 3x - 4x brighter than any H4 halogen lamp even the 100 watt H1 or H2 or H3 halogen lamp, frequently used in separately mounted driving lights.....and they consume LESS current (read amps), are instant on and generally cost the same for replacement lamps (bulbs) as a dual filament 55w/60w H4 bulb. You owe it to yourself to at least investigate the offerings specific to your vehicle. See link below for a potential supplier.
www.xenonhids.com
This supplier also offers all the pieces and parts meeded: lamps, wiring harness including the relay, wiring diagram, the ballast and lamp ignitor devices and the necessary weather pac connectors. There are additional suppliers on the web if competitive pricing is wanted. XENON HID systems are used in most new vehicles because they're brighter and safer than the old halogen/ LED systems.
Just my opinion of course.
BOB RENTON
 
Ok really confused in the day and age of Low power draw Led headlights what is the advantages of using HID that need relays? Honestly an LED is plug and play that will draw a percentage of the original halogen bulbs. Most if not all new car manufacturers are going away from HID systems for brighter more efficient LEDs. This seems like an over complication that is just not needed IMHO. They make direct plug in LED for h4 bulb housings. Just some food for thought.
 
:usflag:update report.

I added my two 30amp relays in line by the battery (no ammeter). it did make a nice upgrade for afternoon of beer drinking and wiring in the garage for a minimal cost.
Thanks crackback & Nacho (and everyone) for the wiring diagram and dets. :thumbsup: i used the red & violet wires as the switch and ran new power wire going to the lights.

-full 12 + volts to headlights
-no flickering at idle , nice and bright at idle actually
-inside lights are constant (no flickering)
-noticeable brightness while driving. bright enough to realize my headlights where in need of an alignment (LOL)
-wife said she like the results (+2 pts)

looking into some LED headlight replacements next....
 
Last edited:
Most LED light are not good. Bright doesn't mean much if it's sprayed all over the place.

I have customers that have a relay kit and GE nighthawks, some say they are better than a current vehicle headlight set up. Fancy or newer, doesn't guarantee better results. It's surprising how much better the halogen style light works when they are supplied with adequate voltage levels.

As long as you have a decent sized feed from alternator to the power pick up point, you should be good to go.

:thumbsup:


:steering:

I was to click on AGREE or LIKE on the post... but better quote it and add a better stance to this reply LOL

:popcorn2:
 
Last edited:
So ! just to clarify i could swap out all 4 of the housings to something like this > https://www.summitracing.com/parts/HLA-002850001 which lets you use the GE nighthawk h4 bulbs ?

you do all 4 head lights for both high and low beams ?
anyone got part numbers for the GE Nighthawk bulbs by chance ?
my google machine is failing me …
 
Auto Transport Service
Back
Top