Now those are some A-Arms, holy crap they look like they come off of a Hummer or something! Anything special about the spindles, lowering spindles or does the coil overs do that for you? Looks great Kahn
You are using an out of date browser. It may not display this or other websites correctly.
You should upgrade or use an alternative browser.
You should upgrade or use an alternative browser.
My 1967 Belvedere Convertible Plans and Restoration (aka - Mad Scientist Build)
- Thread starter conv67bdere
- Start date
Now those are some A-Arms, holy crap they look like they come off of a Hummer or something! Anything special about the spindles, lowering spindles or does the coil overs do that for you? Looks great Kahn
Can't believe that I forgot . . . argh . . . the spindles are 2" drop spindles . . . ( smile ) . . . I'm in sensory OVERLOAD ! ! !
kb67mopar
Well-Known Member
All looks awesome! Congrats on the fawesomeness
"I'm in sensory OVERLOAD"
Is that catchy? Ive been scared here before but man.... He he... I think your doing a over load of quality work myself, its fun watching all this! Keep it up and a video will be inevitable..
Is that catchy?
kb67mopar
Well-Known Member
As Ron states the video is inevitable...and I know you are itching to get this thing to paint...but a word of caution. Don't even dream of painting that car and engine compartment until you have had the entire drivetrain sitting where it belongs and sorted out your transmission, clutch plumbing etc. Doesn't need to function just make sure it all fits and massaging isn't needed. I really wish I would have taken the time to build headers before I painted the engine bay....and I still haven't built them! So i know you knew this already but I had to remind you to avert the excitement a touch just in case.
:happy1: ixie:
ixie:
:happy1:
And the Wilwood brakes . . . WHOA ! ! ! These are cool too ! ! 1
Got the Wilwood brakes pulled out of the box . . . and they are incredible . . .
13" of pure beauty - 6 piston - drilled and slotted - powder coated RED . . . SWEET ! ! !
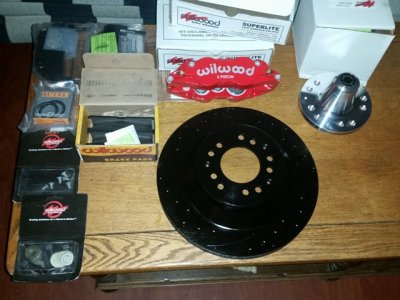
What I found out is that the "typical" race car application has a 2-piece rotor and cost a lot more and is much lighter.
But in talking to Clint at MagnumForce, he said that Wilwood makes a single cast rotor ( similar to what you'd see on a daily driver ) and it's save you several hundred $$$$'s - and they still look incredible ! !
Got the Wilwood brakes pulled out of the box . . . and they are incredible . . .
13" of pure beauty - 6 piston - drilled and slotted - powder coated RED . . . SWEET ! ! !

What I found out is that the "typical" race car application has a 2-piece rotor and cost a lot more and is much lighter.
But in talking to Clint at MagnumForce, he said that Wilwood makes a single cast rotor ( similar to what you'd see on a daily driver ) and it's save you several hundred $$$$'s - and they still look incredible ! !
Last edited:
kb67mopar
Well-Known Member
Ooooooooooooooooooh Ahhhhhhhhhhhhhhhhhhhhhhhh, those sure are purdy Kahn! My brakes all of a sudden look ugly............ thanks allot.
X2....my A body brakes just shed a tear of major inadequacy
hammond472
Well-Known Member
Sweet custom build!
I've been watching your mad scientist build and it's franken awesome. Can't wait to see it done. I'm a big fan of the 66-67s. My youngest son built a model of a 67 GTX. It was his second model. The first was the Tom Daniels cherry pie wagon. Soon after that we got our 67 Coronet 66 Charger and 68 Dart. My boys started off with Hotwheels, slotcars and models and now they are building real cars for themselves. I hope to have a 67 Belvedere some day as they are one of my favorite bodies. Also glad you're happy with the MFR suspension setup. I liked mine so much I got out of construction and got a job there. It made my morning to see how happy you are to get it. It is nice to see where they go after they are built. Keep up the awesome work. It's one sweet Mopar!
I've been watching your mad scientist build and it's franken awesome. Can't wait to see it done. I'm a big fan of the 66-67s. My youngest son built a model of a 67 GTX. It was his second model. The first was the Tom Daniels cherry pie wagon. Soon after that we got our 67 Coronet 66 Charger and 68 Dart. My boys started off with Hotwheels, slotcars and models and now they are building real cars for themselves. I hope to have a 67 Belvedere some day as they are one of my favorite bodies. Also glad you're happy with the MFR suspension setup. I liked mine so much I got out of construction and got a job there. It made my morning to see how happy you are to get it. It is nice to see where they go after they are built. Keep up the awesome work. It's one sweet Mopar!
HYRDGOON
Well-Known Member
- Local time
- 3:04 AM
- Joined
- Apr 20, 2013
- Messages
- 3,372
- Reaction score
- 2,745
- Location
- Breslau, Ontario, Canada
Seriously getting exciting now that pieces have arrived to see some assembly soon!! Kahn I'm thinking when we meet at 747's you could maybe bring all this stuff with you and look the other way for a few minutes!! HAHAHA
I'm happy to see you getting everything and it being SO top shelf and I'm suitably Jealous in a good way at the same time!!
FER RACIN' parts right thurrrrrr!! Goon Approved!
I'm happy to see you getting everything and it being SO top shelf and I'm suitably Jealous in a good way at the same time!!
FER RACIN' parts right thurrrrrr!! Goon Approved!
No turning back now . . . the seat frame has been welded into place . . .
Now that I got the epoxy primer down on the metal, there was nothing holding me back from my next step - welding the metal donor seat frame into location . . . and I bit the bullet and it's now welded into place.
Turned out pretty good, so far, but I've got a bit more touch-up to do . . . to get it finished off . . .
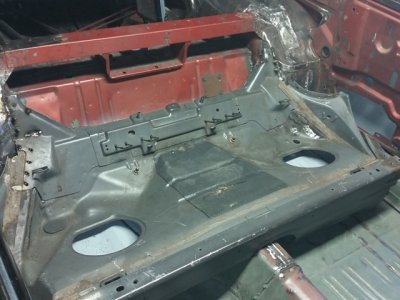
And I've got to figure out how to attach the top latches - probably will have to be a roll bar included in this . . .
- - - Updated - - -
OH Man 747 Mopar . . . I can't do anything to make YOUR car look bad . . . ( hangs his head in shame )
- - - Updated - - -
Oh no . . . not you too KB67 . . . Errrrrrrrrr . . . ( hangs his head in shame again ) . . .
- - - Updated - - -
Thanks Hammond . . . What a cool job to work for MFR ! !
And I'm NOT "Happy" to get this stuff . . . Try . . . Elated, or Ecstatic, or better yet . . . Over the top ! ! This stuff looks incredible ! !
The "bad" part is that I'll mount and set the engine, figure out my tunnel hump mods, then these gorgeous parts will sit while I finish up the rest of my metal work ! !
At least I got some new "Home Art Pieces" that I'll be able to admire in my living room ! ! ( smile )
BTW - absolutely loved your "Mad Scientist Build" comment . . . Thanks ! ! ! LMAO
- - - Updated - - -
LMAO - - - remind me to keep my eyes on you GOON ! ! ! And YES, it's FER RACIN' ! ! !
Now that I got the epoxy primer down on the metal, there was nothing holding me back from my next step - welding the metal donor seat frame into location . . . and I bit the bullet and it's now welded into place.
Turned out pretty good, so far, but I've got a bit more touch-up to do . . . to get it finished off . . .

And I've got to figure out how to attach the top latches - probably will have to be a roll bar included in this . . .
- - - Updated - - -
Ooooooooooooooooooh Ahhhhhhhhhhhhhhhhhhhhhhhh, those sure are purdy Kahn! My brakes all of a sudden look ugly............ thanks allot.
OH Man 747 Mopar . . . I can't do anything to make YOUR car look bad . . . ( hangs his head in shame )
- - - Updated - - -
X2....my A body brakes just shed a tear of major inadequacy
Oh no . . . not you too KB67 . . . Errrrrrrrrr . . . ( hangs his head in shame again ) . . .
- - - Updated - - -
I've been watching your mad scientist build and it's franken awesome. Can't wait to see it done. I'm a big fan of the 66-67s. My youngest son built a model of a 67 GTX. It was his second model. The first was the Tom Daniels cherry pie wagon. Soon after that we got our 67 Coronet 66 Charger and 68 Dart. My boys started off with Hotwheels, slotcars and models and now they are building real cars for themselves. I hope to have a 67 Belvedere some day as they are one of my favorite bodies. Also glad you're happy with the MFR suspension setup. I liked mine so much I got out of construction and got a job there. It made my morning to see how happy you are to get it. It is nice to see where they go after they are built. Keep up the awesome work. It's one sweet Mopar!
Thanks Hammond . . . What a cool job to work for MFR ! !
And I'm NOT "Happy" to get this stuff . . . Try . . . Elated, or Ecstatic, or better yet . . . Over the top ! ! This stuff looks incredible ! !
The "bad" part is that I'll mount and set the engine, figure out my tunnel hump mods, then these gorgeous parts will sit while I finish up the rest of my metal work ! !
At least I got some new "Home Art Pieces" that I'll be able to admire in my living room ! ! ( smile )
BTW - absolutely loved your "Mad Scientist Build" comment . . . Thanks ! ! ! LMAO
- - - Updated - - -
Seriously getting exciting now that pieces have arrived to see some assembly soon!! Kahn I'm thinking when we meet at 747's you could maybe bring all this stuff with you and look the other way for a few minutes!! HAHAHA
I'm happy to see you getting everything and it being SO top shelf and I'm suitably Jealous in a good way at the same time!!
FER RACIN' parts right thurrrrrr!! Goon Approved!
LMAO - - - remind me to keep my eyes on you GOON ! ! ! And YES, it's FER RACIN' ! ! !
Last edited:
roadrunnerman
Well-Known Member
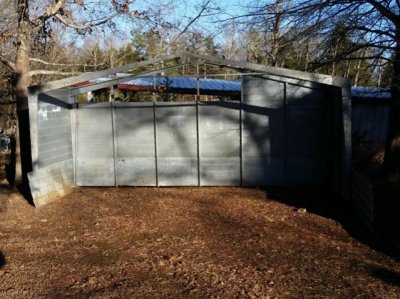
Those look like some serious parts going on your car. Can't wait to see you get them on. Sounds like a good deal having that extra building to keep the garage open for more tools, parts, etc...
Amazing is the word, I sure am looking forward to seeing the finished deal bud, sweet!!! You sure are doing a great job with all the welding now-ah-days... I hope i get there one day  Thats going to be a ride to remember for you, and us watching all this!
Now to figure out the forward struts . . .
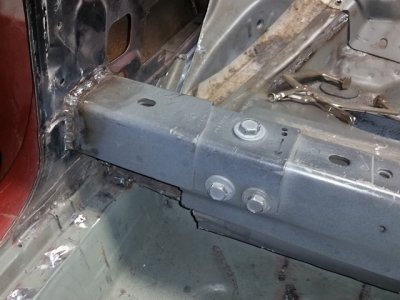
Grabbed the forward strut parts, and headed to the shop to see what I had ( besides a whole lot of coolness ) and see if I could figure out what needs to be done to get these fitted properly into their resting place . . .
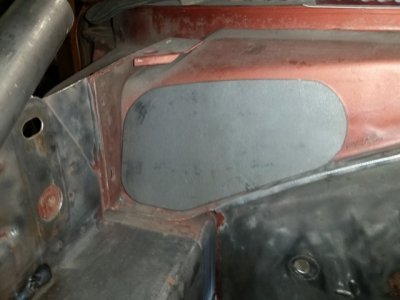
I've got a plate for the firewall ( with the tube off to the side ) . . .
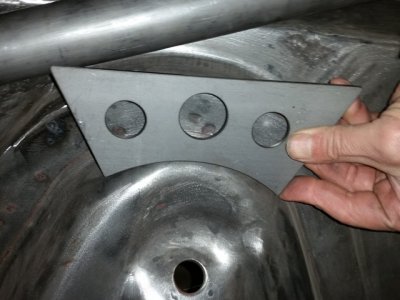
And a plate that attaches to the shock tower ( with the tube just above ) . . .
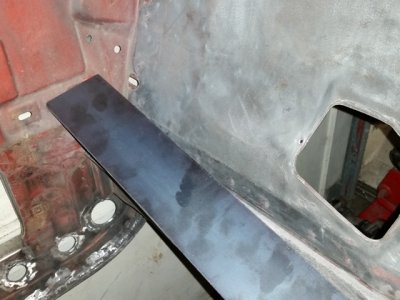
And another plate that attaches to the top of the frame rail . . .
The tube was sent long to allow for fitting . . . and I'm trying to make sure I understand How it all fits in before I start cutting . . .
It should look like this:
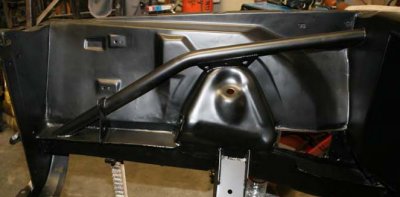
trying to figure out "how" they are suppose to fit in there . . .
Grabbed the forward strut parts, and headed to the shop to see what I had ( besides a whole lot of coolness ) and see if I could figure out what needs to be done to get these fitted properly into their resting place . . .
I've got a plate for the firewall ( with the tube off to the side ) . . .

And a plate that attaches to the shock tower ( with the tube just above ) . . .

And another plate that attaches to the top of the frame rail . . .

The tube was sent long to allow for fitting . . . and I'm trying to make sure I understand How it all fits in before I start cutting . . .
It should look like this:

trying to figure out "how" they are suppose to fit in there . . .
Alright . . . how do I make this fit ? ! ? ! ?
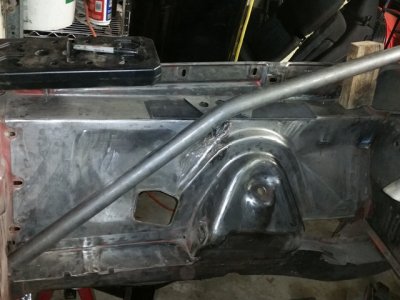
So I spent some time reading through the directions . . . and looking at the pictures of the forward struts on their website to try and get a good idea in my head for "how" these things need to look when they get installed . . . So I'll work it down a little at a time . . .
First I got the tube set in place as needed . . .
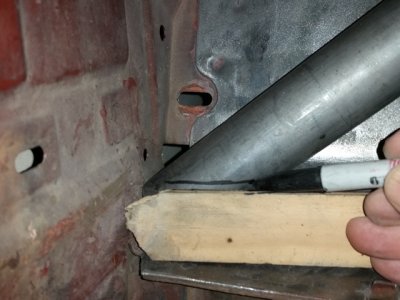
Then I used a scrap of wood as a marking gauge . . .
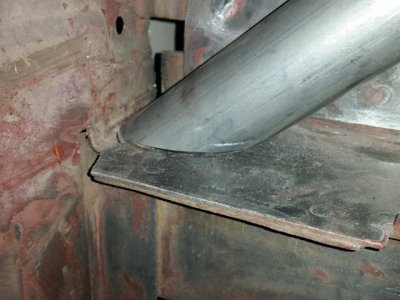
Then cut the end of the tube off as indicated by the sharpie marks . . . pretty good fit so far . . .
Then double checked that the tube-to-shock tower bracket would still fit in . . .
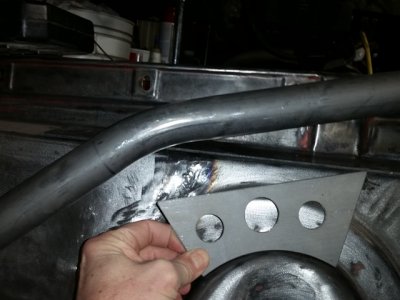
Seeing that the top of the bracket and the tube are parallel, I can now cut more off the bottom of the tube ( where I just cut ) and walk the height of the tube down, then mark the angles on the top of the tube for attachment to the firewall . . .
Wish I could measure 25 times - and cut once . . . but this will be a small step by step process . . . fun, fun fun ! ! !
So I spent some time reading through the directions . . . and looking at the pictures of the forward struts on their website to try and get a good idea in my head for "how" these things need to look when they get installed . . . So I'll work it down a little at a time . . .
First I got the tube set in place as needed . . .

Then I used a scrap of wood as a marking gauge . . .

Then cut the end of the tube off as indicated by the sharpie marks . . . pretty good fit so far . . .

Then double checked that the tube-to-shock tower bracket would still fit in . . .

Seeing that the top of the bracket and the tube are parallel, I can now cut more off the bottom of the tube ( where I just cut ) and walk the height of the tube down, then mark the angles on the top of the tube for attachment to the firewall . . .
Wish I could measure 25 times - and cut once . . . but this will be a small step by step process . . . fun, fun fun ! ! !
"but this will be a small step by step process . . ."
And this is why it will be good and right and then.... the... " fun, fun fun ! ! !"
Great work, time is best used being steady and ill bet it will be as good as everything else Khan!!! Im ah- watching!
And this is why it will be good and right and then.... the... " fun, fun fun ! ! !"
Great work, time is best used being steady and ill bet it will be as good as everything else Khan!!! Im ah- watching!
HYRDGOON
Well-Known Member
- Local time
- 3:04 AM
- Joined
- Apr 20, 2013
- Messages
- 3,372
- Reaction score
- 2,745
- Location
- Breslau, Ontario, Canada
Similar threads
- Replies
- 5
- Views
- 336
- Locked
- Replies
- 13
- Views
- 1K
- Replies
- 2
- Views
- 348
- Replies
- 8
- Views
- 1K

