• When you click on links to various merchants on this site and make a purchase, this can result in this site earning a commission. Affiliate programs and affiliations include, but are not limited to, the eBay Partner Network.

New dash and engine harness hooked up, nothing happens when key is turned

rikubot

Well-Known Member
Local time
12:09 AM
Joined
Jan 31, 2013
Messages
112
Reaction score
13
Location
CO
I have a '69 Charger w/440 that had the most miserable wires make shifted under a poorly made cluster, so I bought new engine and new dash harness and got a hold of the correct gauge cluster to fix it. I pulled out all the old scrap wiring and hooked up my engine and dash harness. I turn the key, and I get nothing. I have little to no knowledge of electrical systems.

My question is:

What all needs to be hooked up for my car to start? I only have the two upper harness clips plugged in as I figured it didn't need front lights to start.

Stuff I have hooked up:

Coil, alternator, resistor, alternator regulator, neutral safety switch, battery, starter.

I'm sure I've missed something but here's the basics. Any help is much appreciated. Any questions just ask.

-Mike
 
Firstly, I'd try the headlights, horn and brake lights - they don't require an ignition switch to work. Second, I'd probe the feed to the ignition switch where there is supposed to be 12 volts all the time. Third, I'd try the different ignition switch positions to make sure there's 12 volts when required. If none or some result in failure or success it's time to check the obvious -battery charge and cable connections, grounds where required including the battery, power at the fuse panel and fuses, and the ignition switch and outputs. You can work your way forward or backwards through the system using a probe with a built in light ( they resemble a screw driver with lights in the cap and are easier to use than a VOM meter as there is a ground clip on a wire extension and only requires one hand to use). Start at the battery and work your way to the fuse panel and then at the panel to the rest of the components especially the ignition switch. You will need the battery connected to perform most of these probes. If you are uncomfortable doig it this way use a VOM meter with long leads and aligator clips. If there is one feed that is not getting power you'll have to correct that and move on to the next. Download a schematic at:

http://www.mymopar.com/index.php?pid=25

If you don't find your schematic there, other sites have them so you'll have to Google it.
Follow the color codes for each system ( heater, lighting, dash etc) and check for continuity or power. Do not forget junction points as this is where many connections are made for different accessories. If you study the diagram and color codes you'll be a wiring genius in no time. You may well have multiple issues as opposed to just one so you'll have to verify each circuit in turn. And, if the car has a bulk head connector at the firewall be sure to unplug it and clean it thoroughly with the battery disconnected. Good luck and don't forget to fix any questionable connections properly.
 
@ Yatzee,

I will get to probing around to see if everything has the current its supposed to. I don't have the connector for the front light assembly built yet. Do I need that to start it? One thing I did notice when I turn the key: the alternator gauge slowly moves to the right about 1/16 of an inch??

@ Car Nut,

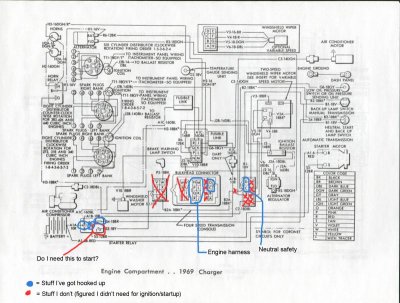
I have everything on the starter relay hooked up except the yellow one next to the neutral safety nubby, do I need that as well? Here is a terribly illustrated picture of what I've got hooked up in respect to a diagram. I am mainly referring to the bulkhead portion.

This site compressed the .jpg i uploaded so let me know if I need to email a more legible pic.

dggfds.jpg
 
@ Snakeoil24,

Yes sir. But sadly, the more I've learned about this old car, the more I feel I DON'T know! haha
 
electronics are easy, my old instructor used to say "follow the bouncing ball", power has to start somewhere so that is where you start, at the battery, put your test light/meter on the pos and ground it to the chassis, if she lights 12v you go the first bounce, then follow the wire to the next bounce, follow it until you are missing power, the problem is betwwen the last bounce and the first miss...

Any way Ill bet your issues are caused by not hooking everything up, I wouldn't even try to start it until everything is plugged in and grounding, I heard of a guy wiring a chopped merc, he just wanted to gt the power windows up, and it went up all right, up in flames, burnt his garage and 2 other cars...

My advice, hook it all up 100% then go play..
 
There is one wire (yellow) in the headlight harness that goes to the starter relay (labeled T on your schematic). You can just make a jumper wire if you don't want to plug the headlight harness in. I would try that first.
 
There is one wire (yellow) in the headlight harness that goes to the starter relay (labeled T on your schematic). You can just make a jumper wire if you don't want to plug the headlight harness in. I would try that first.

I did that and got it started, then I killed the motor to try it again, and now I get a really strange kinda loud noise coming from my starter and it wont turn over? Did I just destroy something?? X(
 
Is it a clinking or wering sound?
 
Is it a clinking or wering sound?

It's not the usual "clicking" you would expect, but more of a clicking than anything else. Almost sounds like a stun-gun zapping.

- - - Updated - - -

My advice, hook it all up 100% then go play..

Would I need the wiper motor harness hooked up as well? Right now on that harness all I have made is a make-shift neutral safely bypass.

- - - Updated - - -

Starter relay??

I forgot to mention that I have that all wired up according to the diagram. It does look pretty old and in poor shape. Should I just replace it now?
 
Your Bendix for the starter sounds as though it's not engaging. When this drive gear flies towards the flywheel a set of contacts are closed within the starter that energizes the motor. You may not have enough juice to energize the starter at this point due to low battery voltage/amperage. If the clicking is coming from the starter relay what you are hearing are the points closing within it. If it started fine before and voltage and amperage are sufficient it should start again providing the contacts in the start relay and inside the starter are not burned (dirty), the battery is good, and the grounds are sufficient. You need only wire the start and ignition circuits to start the engine providing there is no electric fuel pump present. Focus on those wires in the diagram and then do the charge system directly after. Without the alternator charging you will be running soley on the battery which will deplete quickly.
 
@ Yatzee,

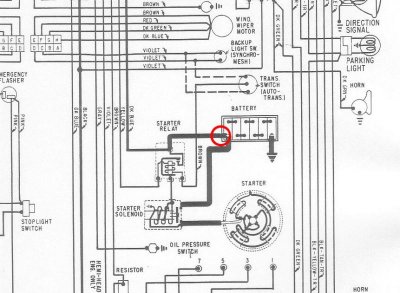
Thank you for all the information. I haven't had the chance to get back into it tonight but one thing I did notice and want to mention: The red heavy gauge wire going from the starter relay to the positive battery cable probably has less than half its copper wires still attached. Not sure when they severed but a friend I talked to tonight thinks this might be the culprit. He explained that it was a critical area for power since it was starter related. I have the weak point circled in red on the picture of this diagram.

69ChargerB.jpg
 
A little food for thought...(or short story)

Thought I'd play electrician on my first car, lol, many years ago, doing a trunk mounted battery. Bottom line is I didn't do things right enough, and 'something' went wrong. All good for awhile, until one day doing 65 mph on the freeway, car filled with white smoke. Bad enough that I had to stick my head out the window, to see to get on the side of the road, much less breath!
I really lucked out, since no 'fire', just smoke. Popped open the hood...and had the pleasure of watching EVERY wire under my hood, burn just like a fuse! All happened fairly quick. All those burning wires continued, and burned all wires in the car. Just lucked out no actual fire, or my 63 could have sat there, and burned to the ground!

Like some of the guys are saying, go completely through the start/ignition wiring, and make sure it's complete, in good shape, and grounded right. Or, wait until all the wiring is done.
 
Rikubot, glad to see you're getting it back together! But as stated be very careful with your wiring! Also as stated, be systematic with tracking down. Hook everything up!

Also, You've got new wire harnesses with old wiring in the car. Even if it isn't part of starting system, power travels through the new wires easily. But the old wires and previous owners and their wiring skills or not and corrosion etc, will cause a large possibility of potentially vehicle burning situations with the mix and match of old and new. Not a good thought I know. I have a complete wiring kit for my 69 and it will be going in once the stroker is done and in. I don't want to mix old and new. Good luck!
 
Thanks for the heads up guys. That's easily my worst nightmare. What I ended up doing was building new harnesses (except headlight) and rebuilding new bulk heads for them. I plugged everything in and fixed the connection between the starter relay and the positive batt cable and she came alive! My next goal is to make sure the wiring is as sound as possible by laying it out next to my buddy's old harness. I afraid though as I used only old connecting pins on two harness'. I did of course clean them with steel wool and put dielectric grease on them. I cannot afford new wiring at the moment and new harnesses are on back order so I'm told anyway. What do you guys think? I will post a picture later of my bulkhead so you can get the idea.
 
One thing that a lot of people fail to realize is that the contact between the single strands of copper in wire is integral with the load capacity that they can handle. Over time and under load copper wires that heat up become a bit brittle and the intimacy between the individual strands is lost, lessening their capacity. Good part is that copper wires years ago were purposely over sized and better quality copper was used hence the reason for oxidation and hardening. Strip back some of the insulation on an old wire you have and see how far you can go before you reach clean copper. If you temporarily replace only high load wires for now you'll be OK until a new harness is installed. Wires tend to corrode just where the crimped connectors are or where they are joined. That's because they weren't soldered just crimped and did not really make total contact with the terminal. A rule of thumb today is that every connection ( with a few exceptions) should be crimped and soldered at the time they are replaced or worked on and never trust just crimping on heavy load circuits. Many a time I've see a terminal pull off easily after being crimped - I always check with a hard tug after application. This seems to be true regardless of the gauge of wire and distributors are selling some pretty cheap stuff these days. I currently only use Pico brand and haven't had a bad connection since.
 
One thing that a lot of people fail to realize is that the contact between the single strands of copper in wire is integral with the load capacity that they can handle. Over time and under load copper wires that heat up become a bit brittle and the intimacy between the individual strands is lost, lessening their capacity. Good part is that copper wires years ago were purposely over sized and better quality copper was used hence the reason for oxidation and hardening. Strip back some of the insulation on an old wire you have and see how far you can go before you reach clean copper. If you temporarily replace only high load wires for now you'll be OK until a new harness is installed. Wires tend to corrode just where the crimped connectors are or where they are joined. That's because they weren't soldered just crimped and did not really make total contact with the terminal. A rule of thumb today is that every connection ( with a few exceptions) should be crimped and soldered at the time they are replaced or worked on and never trust just crimping on heavy load circuits. Many a time I've see a terminal pull off easily after being crimped - I always check with a hard tug after application. This seems to be true regardless of the gauge of wire and distributors are selling some pretty cheap stuff these days. I currently only use Pico brand and haven't had a bad connection since.

I have noticed that in order for a strong physical connection at my crimps I had to put a lot of care into them. I did NOT solder them as I am not quit sure how to get solder into the connectors. Any tips? I am using tube crimp style connectors. Another question I would have: what is considered "high load" wiring? starter stuff? I know what I've been doing is far from perfect but I have been as careful as I can so far. Now learning about the loss of load capacity through strands I have to give it all a once-over. My engine and dash harness are brand new but I worry about the Franken-harnesses I've built. I would have to disappear forever if my wiring melted my Charger. If you would have seen what I pulled out of there you'd lose your minds. Its a lot better than it was, but I'd love all new wiring. Again thanks for the advice, help, and learnin' you're sending my way.

Edit: I should make known that my wiper/neutral safety harness is Frankensteined as is the connector half of my headlight harness.
 
PM me I can help walk you through each item with the wiring diagram, it's easier than you thing and with a little guidance we can you have your awesome 69 charger running and safe in no time. But it will cost you some pics of the car in this thread! :)
 
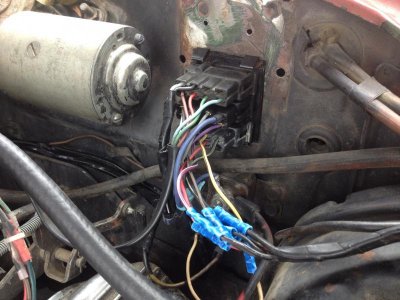
Here is a photo of my bulkhead:

IMG_2232.jpg

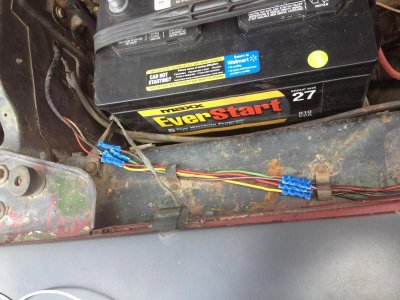
Here is the headlight harness where the factory connector sat right near the battery (was missing originally):

IMG_2233.jpg

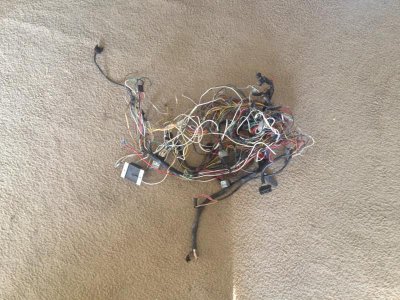
Here's my old "harness":

IMG_2019.jpg

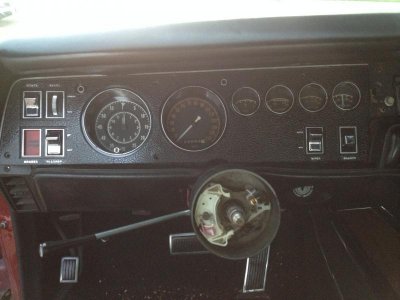
And here is my new (to me) cluster in the dash:

IMG_2241.jpg

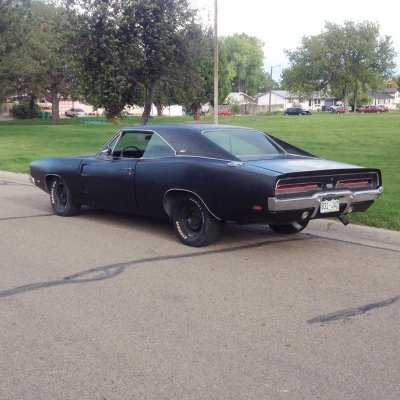
Here's Christine:

IMG_9224.jpg
 
Auto Transport Service
Back
Top