• When you click on links to various merchants on this site and make a purchase, this can result in this site earning a commission. Affiliate programs and affiliations include, but are not limited to, the eBay Partner Network.

New garage "toy" . . . but not as big as 747Mopar's . . . and rebuilding

My friend has a Bridgeport and it's DRO - and programmable ( sorta a CNC - 2 axis - with a manual 3rd axis - machine ).
He's teaching me how to use it and it's amazing !

Our plan is for me to build a bigger shop, and merge both of our shops together into one shop - he's amazing on the work that he does
( and I'm blessed to be able to learn from him )
And I'm also looking forward to the learning . . .

With the lathe, I found the funniest thing was that I was using the lathe to make adjustments to the parts for attaching the chuck so that I could get it adjusted - which finally resulted in me getting the total run out on the chuck to 6/10 . . . ( I so wanted to push it further and get it less - but that is really incredible as it sits )

Your lathe, when set up, is much more than a cutting tool. It is a measuring device. And feel free to think outside the box with it.
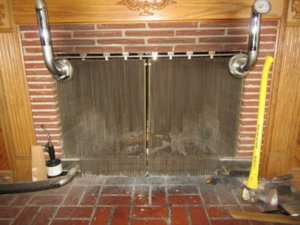
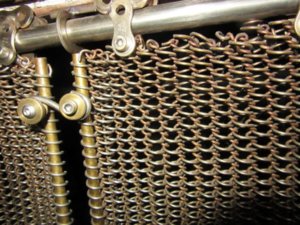
Example--I made a fireplace screen by winding stainless and copper wire on my lathe using the table threading feed.
IMG_0433 (Large).JPG IMG_0434 (Large).JPG
 
Last edited:
Your lathe, when set up, is much more than a cutting tool. It is a measuring device. And feel free to think outside the box with it.
Example--I made a fireplace screen by winding stainless and copper wire on my lathe using the table threading feed.

View attachment 574963 View attachment 574964

Wow - very nice !

I've got a lot to learn about this lathe . . . but I'm off to the right start and I've got a great mentor to lead me in the tight direction !

Heck, I've already used the lathe to make adjustments to the bolts and got the chuck dialed in ( that still amazes me ) . . . I'm stoked !
 
Your lathe, when set up, is much more than a cutting tool. It is a measuring device. And feel free to think outside the box with it.
Example--I made a fireplace screen by winding stainless and copper wire on my lathe using the table threading feed.

View attachment 574963 View attachment 574964


LOL . . . If you've seen my build thread . . . Then you already know that I "do" think outside the box already ! ! ! LMAO

That's why I've called it the Mad Scientist Build . . .
 
Next step on the rebuild . . . work and paint on the saddle and reassembly . . .

After getting the saddle painted I set it up on the lathe for good keeping . . . I like the new look . . .

sm_lathecleanup10.jpg


Next I got the lower "gearbox assembly painted, as well as the attachments under the saddle that hold it to the base . . .
Bolted and pinned back together and functioning in place - the paint is not the best - but it'll have to do as is . . .

sm_lathecleanup11.jpg


Then after I got it all buttoned up I remembered that I wanted to fill the gearbox partially with oil for better gear oiling . . .
Looks like it'll be coming apart again to get the level set to the proper level . . .
 
Well . . . that was pretty quick . . . got the tooling delivered to the house today . . . and BOY is it NICE ! !

Here's the entire 14 pieces - All Dorian name brand stuff ( and my engineer friend says it great tooling )
Cutting and facing / boring bar / inside & outside threads / parting or cutoff tool . . . NICE stuff ! !

sm_lathetools01.jpg


Now - believe it or not - had to pull out the lawnmower this past weekend and run it over the yard to knock down the tall stuff . . .

If you don't believe me . . . take a look at the Bradford Pear Trees down here that already in bloom ( so are my peach trees )
( ready for the frost to come in a couple weeks and kill them and any fruit from the trees )

sm_treesinbloom.jpg


things are turning green already here . . . that may NOT be a good thing . . . a frost makes a mess out of things . . .
 
Spent some time yesterday and today working on dialing in the lathe . . . and my engineer friend is really happy with the results . . . so we're off to making my first "part" on the lathe, and he's working with me to put some shavings on the ground . . .

Here's what is happening . . . first I've got to face this piece of steel . . . ( we have shavings . . . )

sm_makingpart01.jpg


And the turning down of the outside diameter left these really cool ( ok they were pretty hot ) blue shavings . . . I'm told that "good" as the heat was removed from the part and transferred to the shavings . . .

So I got a chance to spend part of my birthday making a part . . . until . . .

sm_makingpart02.jpg


Needed to drill a hole in the part and the tail stock has not bee aligned yet . . . and the original tail post chuck has an adapter on it - and my engineer friend say that the original chuck is "junk" . . . so he's got me looking at Albrecht chucks . . .

Buy quality and build quality parts . . .
 
Blue chips are a good sign. In my experience, they generally indicate time is not being wasted on needless light cuts when getting close to size.
Light cuts are for finishing.

BTW my experience is self-taught (crash bang):) learning when I did portable machining in the field. I did this for years and learned how hard a cutting tool could be pushed before it self-destructs. Blue chips are a general tell that one is getting close to the limit.
A rigid machine and horsepower are great for getting rid of metal fast but the cutting tools have limits that you will find. It becomes a feel.
Cheers for your progress and may your finish cut not put you back at the beginning.:thumbsup:

My engineer friend says to me . . . as you progress in the machining each additional process become more "costly" as it'll take longer to get back to that point if "you have to start at the beginning again" . . . as you so stated ( so I'm starting to understand the whole process )

Working on a part today and did machining, drilling, boring, cutting 45 degree chamfers . . . used every one of my new tools except the single pointing tool . . . FUN STUFF . . .
 
Made a trip to the metal supply store and bought some steel to build a very sturdy and rigid bench for the lathe - my friend says that a sturdy and rigid base for the lathe will greatly increase the machines ability for repeat ability . . . and that is very important . . . ( and accuracy too )

As with all my other projects . . . and build ( and our motto ) it'll be Brick Shithouse Strong . . . LOL
 
You might consider anchoring it to the floor while you're at it. --A sturdy base that bounces with vibrations could give grief in some operations.
 
You might consider anchoring it to the floor while you're at it. A sturdy base that bounces with vibrations could give grief in some operations.

Once we get it level . . . It will indeed be anchored and bolted to the floor . . .

although a 800+ pound lathe and a 400 + Pound base will surely go a long way to making it sit still ! ! !

LMAO . . .
 
Made my first project ( or should I say "tool" ) on the lathe . . .

I've got some 1" holes ( fer racing holes - per Goon ) that are in tight spots and I can't get my conventional Dimple Die into the area to do the job . . . so, with my new lathe . . . I thought that building a new ( more compact ) Dimple Die could be of use here . . . and use it on my car . . .

Here's the parts fresh off the lathe ( went pretty well - had my "crash" moments too )

am_dimpledie01.jpg


Here it is with the bolt and thrust washers . . .

am_dimpledie03.jpg


Here's the working parts - all I need is a 5/8 wrench as I built the threads into the tool to ( hopefully ) make it a one hand operation

am_dimpledie02.jpg


And the results of the dimple die process on a 1" hole in the metal . . . turned out pretty nice ! ! !

am_dimpledie04.jpg


Now I can dimple die the holes that I added to my car and could not do with the other set of dimple dies that I purchased . . . and I can custom make any size that I need and customize the look of the impression as well . . .
 
More work on the lathe and the "needed" lathe bench . . .

The building began with it upside down - the top of the bench would be nice to be be level, so it was built down ( clamped to 4 x 4 tubes at each corner ). The 1-2-3 blocks that you can see in the 4 corners is used to set up the fishing line to make sure that the whole assembly is true and level - and it was spot on - didn't need to add a shim to it . . . next it was clamped together and then spot welding, recheck true and level, spot weld, check . . . took some time . . . the the same with the legs . . .

sm_buildbench01.jpg


Until we got to this . . .
just need to add the feet on to the bench, get the lathe "set" on top ( yeah right - "only" 850 pounds of lathe ), and then get it bolted down . . .

sm_buildbench02.jpg


Got some new "oilers" and the old ones were broken and allowing garbage to into the holes ( that' not good - they were all cleaned out ) . . .

Slowly but surely . . . it's getting there . . .
 
I'd beef that up a bit more, looks like it may not support the lathe.... more like a freakin TANK!! Yeap you overkilled that a bit LMAO. Looks great Sasquatch
 
I'd beef that up a bit more, looks like it may not support the lathe.... more like a freakin TANK!! Yeap you overkilled that a bit LMAO. Looks great Sasquatch

Remember . . . built by BSH . . . Brick **** House . . .
 
That bench support looks sized right to me for your lathe. Again just handling the weight of the machine is not enough for a metal lathe.

As far as "overkill" goes --I have a shop work table made from a 60" x60"x3" plate machined flat on both sides.:) I got the plate for free from a power plant construction job I worked on. The plate was drilled and tapped wrong and was scrap. I gave the plate to a friend of mine and he made a frame with giant casters and a pivot to rotate the plate 360 degrees. It weighs about 3500lbs.:rolleyes: But it makes for a great known flat surface to fab things like your lathe table.
 
More progress, more tooling, . . . all kinds of things are getting done . . . Had a pretty good week on the lathe . . .

Got some more time on the lathe making a tool to help with centering the tail stock . . . that went great ! !
BUT . . . when I get the lathe mounted on the new metal BSH bench - I'll have to go through all of the steps again . . .

Then . . . there is some new tooling for the lathe . . .

Got this for my birthday . . . a very cool tool for setting up the height of your cutting tools . . .

sm_lathetoolin01.jpg


Needed a live center and a chuck - and got these added to the lathe tooling . . .

sm_lathetoolin03.jpg


The chuck is an Albrecht . . . told that they are one of the best . . .

sm_lathetoolin04.jpg


And this is one of the best for the live center . . . Riten . . .

sm_lathetoolin05.jpg


And my machinist friend gave me a couple of "spare" things that he's had in his shop . . . this stainless rechargeable oiler . . .

sm_lathetoolin02.jpg


also - a couple telescoping gauges, 1-2 and 3-4 outside micrometers, ( these are Starrett )
Will need to look for a 0-1, 2-3, 4-5, and 5-6 . . . in time . . . ( see below for more )
2 left hand cutting tools, and thread wires ( he's going to show me how these things work )

sm_lathetoolin06.jpg


And then this spare set of Mitutoyo outside micrometers - 6-12 . . . I'll have to find the 9-10 and 10-11 . . . but WOW . . .

sm_lathetoolin07.jpg


It's been an amazing week for me . . . now I need to do a little cleanup, and painting of the bench, and then mount the lathe . . . and redo all the dialing in process . . .

But I'm all ready for it this time . . . and can't wait to get it right !
 
Oh boy . . . what a night . . . wrestled with the lathe and got it placed on the new bench . . .

Boy was that a job . . .

sm_latheonbench01.jpg


now a little work to get the bolts in the holes and get it bolted down . . .
 
Got the lathe mounted to the new table . . . and re-calibrated . . . and I've been using it to make things . . .

Finally got these telescope gauges delivered . . . Brown & Sharpe

sm_tooling01.jpg


And the best thing about them is this . . .

sm_tooling02.jpg


Was making some parts for my neighbor out of aluminum . . .

sm_lathe01.jpg


And got these done . . . even put my BSH and the Year on them . . .

sm_lathe02.jpg


He needed (2) different sets to help make his rims AXLE-centric instead of lug-bolt centric . . .

sm_lathe03.jpg


Here's how it fits into his wheel spacer for one of his cars . . .

sm_lathe04.jpg


And I was putting a little bit of shavings on the floor lately . . . and having FUN doing it too . . .

sm_lathe05.jpg
 
You are going to have yourself a nice piece of machinery when completed.
I have a much smaller lathe/mill combo that has served me well and saved the day more than once.
Congrats on the new toy.
I`ve got one too, but wish I`d gone one more step up in size !
 
Auto Transport Service
Back
Top