You are using an out of date browser. It may not display this or other websites correctly.
You should upgrade or use an alternative browser.
You should upgrade or use an alternative browser.
New Garage
- Thread starter skicker
- Start date
Hemirunner
Well-Known Member
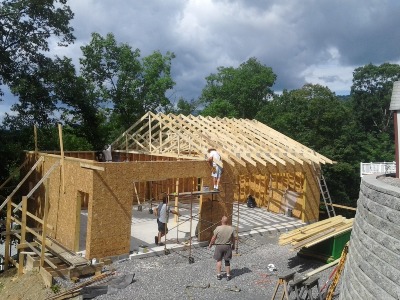
The conventional trusses appear to only be on each end and in between the two bays leaving me to believe that it's for lift clearance and architectural detail only?If you don't mind me asking, how come there are a mixture of conventional trusses and scissors trusses over the floor space??
View attachment 442765
skicker
Well-Known Member
- Local time
- 10:44 PM
- Joined
- Dec 15, 2011
- Messages
- 1,458
- Reaction score
- 3,728
- Location
- Cumberland, Maryland
The scissor truss's align with the garage doors and 8" past. The conventional trusses are at the areas where no garage doors are.
Lift clearance was the original reason but then when I wanted the door tracks to follow the slope it made it wider yet.
Since the doors follow the inside slope the scissor truss's had to be installed a couple inches past each door for the door track clearance.
The flat bottom trusses are also used for additional storage above the ceiling.
Along the sides of the 16' door opening there will be a small soffit (4-5") at the bottom of the conventional truss below the scissor truss's that will create a shelf up high for displaying stuff...
The LH side is set up as a "working" bay and will get used for anything car related...
The RH side is for car storage and clean parts storage.
In building the 70 Satellite and the 69 Dart I found I needed someplace to put parts that were cleaned up and ready to bolt on where they wouldn't get dirty from all the other work that was going on. That's the reason for the wall in the center and this being separated into two small garages...One clean side and one not so much...
skicker
Well-Known Member
- Local time
- 10:44 PM
- Joined
- Dec 15, 2011
- Messages
- 1,458
- Reaction score
- 3,728
- Location
- Cumberland, Maryland
So I took some time off of working on this to go to Carlisle...
On the front side I began installing the roof sheathing and finished up the ladder framing at the end truss's.
When I started the sheathing with a 23 7/8" piece that allowed me to have a 2 1/2" gap at the top for the roof vent.
Doing the layout ahead of time meant that the top sheet could just be installed and not have to be cut. By cutting the first sheet in half I ended up with nearly no waste.

Front side sheathing finished... 1/2 way there...
Attachments


On the front side I began installing the roof sheathing and finished up the ladder framing at the end truss's.
When I started the sheathing with a 23 7/8" piece that allowed me to have a 2 1/2" gap at the top for the roof vent.
Doing the layout ahead of time meant that the top sheet could just be installed and not have to be cut. By cutting the first sheet in half I ended up with nearly no waste.
Front side sheathing finished... 1/2 way there...
Attachments
skicker
Well-Known Member
- Local time
- 10:44 PM
- Joined
- Dec 15, 2011
- Messages
- 1,458
- Reaction score
- 3,728
- Location
- Cumberland, Maryland
I wasn't happy with the 1' overhang at the back side and added an extra 1' at the ends of the truss's to make a 2' overhang.
All of the climbing around bracing in the rafters made assembling the eaves at both ends difficult but persistence does pay off.
I installed the 2x6 at the fascia and then began installing the roof sheathing on the back side. No big deal right...It's only about 19' down from the bottom edge to the ground...

Attachments


All of the climbing around bracing in the rafters made assembling the eaves at both ends difficult but persistence does pay off.
I installed the 2x6 at the fascia and then began installing the roof sheathing on the back side. No big deal right...It's only about 19' down from the bottom edge to the ground...
Attachments
skicker
Well-Known Member
- Local time
- 10:44 PM
- Joined
- Dec 15, 2011
- Messages
- 1,458
- Reaction score
- 3,728
- Location
- Cumberland, Maryland
All of the roof sheathing installed...
Attachments


Attachments
skicker
Well-Known Member
- Local time
- 10:44 PM
- Joined
- Dec 15, 2011
- Messages
- 1,458
- Reaction score
- 3,728
- Location
- Cumberland, Maryland
I dropped the extra coin for the "Titanium" roofing paper rather than using felt. This stuff claims it can sit for 180 days before the roofing is installed...I hope mines done in a week...
Attachments


Attachments
skicker
Well-Known Member
- Local time
- 10:44 PM
- Joined
- Dec 15, 2011
- Messages
- 1,458
- Reaction score
- 3,728
- Location
- Cumberland, Maryland
While everything above was going on I also needed to get the garage doors openings ready.
I used the white PVC trim around the openings...installed the added 2x6 framing the garage door company requested and added the blocking to the ceiling rafters for the track installation.
Attachments


I used the white PVC trim around the openings...installed the added 2x6 framing the garage door company requested and added the blocking to the ceiling rafters for the track installation.
Attachments
skicker
Well-Known Member
- Local time
- 10:44 PM
- Joined
- Dec 15, 2011
- Messages
- 1,458
- Reaction score
- 3,728
- Location
- Cumberland, Maryland
I decided to wrap the interior 2x6's with aluminum rather than have to paint around the garage door tracks later. It makes for a nice clean install.
The gap between the PVC trim and the aluminum will be covered with the garage door seal trim.

Attachments


The gap between the PVC trim and the aluminum will be covered with the garage door seal trim.
Attachments
skicker
Well-Known Member
- Local time
- 10:44 PM
- Joined
- Dec 15, 2011
- Messages
- 1,458
- Reaction score
- 3,728
- Location
- Cumberland, Maryland
A couple things I noticed when framing this...
A) It's wood...it's seldom straight and not always the same dimension and thickness as the one beside it in the stack.

B) Use string lines from known points and leave those lines up that they can be checked periodically as your building.

C) Don't let someone talk you into loading the roof with the roof sheathing prior to having the fascia boards on. In the end it's easier to haul it up a ladder than deal with the point loads on the truss's.

D) It's not any harder to overbuild things rather than cut corners although it does cost a little more.
E) NEVER trust that anything is straight without checking and confirming it.
 Lines and lasers are your friends...
Enclosed is a few pics of ways I found to correct some issues I ran into as I was building this.
I do need to give a shout out to my Dad and brother for the help and knowledge that has been shared.
For now I'm dried in...

Well... the roof anyway...

Attachments


A) It's wood...it's seldom straight and not always the same dimension and thickness as the one beside it in the stack.
B) Use string lines from known points and leave those lines up that they can be checked periodically as your building.
C) Don't let someone talk you into loading the roof with the roof sheathing prior to having the fascia boards on. In the end it's easier to haul it up a ladder than deal with the point loads on the truss's.
D) It's not any harder to overbuild things rather than cut corners although it does cost a little more.
E) NEVER trust that anything is straight without checking and confirming it.
Enclosed is a few pics of ways I found to correct some issues I ran into as I was building this.
I do need to give a shout out to my Dad and brother for the help and knowledge that has been shared.
For now I'm dried in...
Well... the roof anyway...
Attachments
skicker
Well-Known Member
- Local time
- 10:44 PM
- Joined
- Dec 15, 2011
- Messages
- 1,458
- Reaction score
- 3,728
- Location
- Cumberland, Maryland
The metal roof installation occurred Saturday. I found two scratched panels in the delivery so new ones will be delivered this week.
Color is as close as I could get to what I wanted...
This is the back side less the last panel and the end-cap.
Attachments


Color is as close as I could get to what I wanted...
This is the back side less the last panel and the end-cap.
Attachments
skicker
Well-Known Member
- Local time
- 10:44 PM
- Joined
- Dec 15, 2011
- Messages
- 1,458
- Reaction score
- 3,728
- Location
- Cumberland, Maryland
The installers developed a layout on the panels and pre-drilled for the screws on 6 panels at one time.
Then save the top panel and use that layout for the next six panels.
It makes it easier for their install plus makes all the screws line up perfectly when completed.

It's metal so this stuff is never perfect but I think it looks great...and now I'm about 90% dried in...

Attachments


Then save the top panel and use that layout for the next six panels.
It makes it easier for their install plus makes all the screws line up perfectly when completed.
It's metal so this stuff is never perfect but I think it looks great...and now I'm about 90% dried in...
Attachments
skicker
Well-Known Member
- Local time
- 10:44 PM
- Joined
- Dec 15, 2011
- Messages
- 1,458
- Reaction score
- 3,728
- Location
- Cumberland, Maryland
Total installation time was only about 5 hours for the metal roofing...

That let me work on installing the tyvek on the back side and I managed to get the one window on the South elevation installed.
All in all a very productive day...
Attachments


That let me work on installing the tyvek on the back side and I managed to get the one window on the South elevation installed.
All in all a very productive day...
Attachments
Paul Boucher
Well-Known Member
Super garage! Looking great! Hope to be fortunate enough to have one that big one day!
skicker
Well-Known Member
- Local time
- 10:44 PM
- Joined
- Dec 15, 2011
- Messages
- 1,458
- Reaction score
- 3,728
- Location
- Cumberland, Maryland
The rest of the roof metal was installed Saturday...
I know it doesn't look like much but I got all of the wood framing finished for the 36" soffit at the front.
I moved over to the east elevation and installed the home wrap and the window and door.
I picked up all of the siding...soffit and J trims this morning.
I need to p/u 6 4" round light boxes to install for the exterior sconces at the front wall and at all of the doors.
Tonight the transmission comes out of the 69 Dart to fix a broken flex plate and install a slightly bigger convertor.

I won't be back into this until Wednesday.

Attachments

I know it doesn't look like much but I got all of the wood framing finished for the 36" soffit at the front.
I moved over to the east elevation and installed the home wrap and the window and door.
I picked up all of the siding...soffit and J trims this morning.
I need to p/u 6 4" round light boxes to install for the exterior sconces at the front wall and at all of the doors.
Tonight the transmission comes out of the 69 Dart to fix a broken flex plate and install a slightly bigger convertor.
I won't be back into this until Wednesday.
Attachments
skicker
Well-Known Member
- Local time
- 10:44 PM
- Joined
- Dec 15, 2011
- Messages
- 1,458
- Reaction score
- 3,728
- Location
- Cumberland, Maryland
The windows, door frame and the door sill were set in a bed of silicone sealant.
The inside gaps were then caulked back to the wood framing.
The bottoms of the windows were not caulked on the outside so as to not trap water if it were to penetrate the window frames.
Window's were purchased with the J channel for the siding already incorporated into the frames.
Door frames were ordered for 2x6 walls with extended jambs and the PVC trim and frame assembly that is designed to not rot out.
Attachments
Last edited:
skicker
Well-Known Member
- Local time
- 10:44 PM
- Joined
- Dec 15, 2011
- Messages
- 1,458
- Reaction score
- 3,728
- Location
- Cumberland, Maryland
A couple pics of the soffit framing and a stack of siding and soffit that will be the next phase to begin.

All siding and soffit are Mastic Products.
Color for the siding is "Harbor Grey".
Grey J channel will be used on the ends with eaves under the soffit and around the door frames while white soffit trim will be used at the front and rear elevations at the rear of the soffit.
I'm going to make all of the exterior fascia and soffit trim using the .040 aluminum typical to the inside at the garage doors rather than the thin rolled products readily available.
I have some pretty neat materials ordered for the front elevation...no maintenance at all...

I'll post pics once they come in...
Garage door supplier was on site and measured the openings after the trim installation so once they arrive they will be installed also.

Attachments


All siding and soffit are Mastic Products.
Color for the siding is "Harbor Grey".
Grey J channel will be used on the ends with eaves under the soffit and around the door frames while white soffit trim will be used at the front and rear elevations at the rear of the soffit.
I'm going to make all of the exterior fascia and soffit trim using the .040 aluminum typical to the inside at the garage doors rather than the thin rolled products readily available.
I have some pretty neat materials ordered for the front elevation...no maintenance at all...
I'll post pics once they come in...
Garage door supplier was on site and measured the openings after the trim installation so once they arrive they will be installed also.
Attachments
skicker
Well-Known Member
- Local time
- 10:44 PM
- Joined
- Dec 15, 2011
- Messages
- 1,458
- Reaction score
- 3,728
- Location
- Cumberland, Maryland
The garage door install is scheduled for Monday and Tuesday...

I spent all last night installing all of the light boxes and the siding blocks for the electrical devices.
Set the laser up and shot all 4 elevations with a control line to measure from.
I was able to start installing the siding tonight on the east elevation.
I'll continue with the back tomorrow and then fall back and finish the eave above.
It's hard to beat using the windows with the J trim for the siding incorporated around them. Turns out to be a really clean finish...
Attachments
Your garage is looking amazing now. Congrats on doing the bulk of the work yourself - and with family helping it makes the job more satisfying. I too will be 'donkey-deep' in a smaller scale resto at home, so I have enjoyed reading your progress....along with the other outstanding building projects posted here over the last year. 
Similar threads
- Replies
- 20
- Views
- 678
- Replies
- 14
- Views
- 2K


