• When you click on links to various merchants on this site and make a purchase, this can result in this site earning a commission. Affiliate programs and affiliations include, but are not limited to, the eBay Partner Network.

Progress on taking ex-racer A12 back to the street

b-body-bob

Well-Known Member
Local time
3:14 PM
Joined
May 2, 2011
Messages
333
Reaction score
482
Location
Almost Heaven, WV
I bought this car in 2007 out of Akron. Belonged to a guy named Paul McCoy, maybe you know him from the track.

This is just before I bought it:

1765723352049.png


It was all stripped out and cut up, courtesy of this guy
1765723152450.png


I took it to a few T&Ts but eventually I bought a parts car to get everything I needed to turn it back into a street car
1765723310694.png


But I wasn't able to get anyone I trusted to do the metal work so it sat disassembled for about 10 years.
1765723825714.png


Eventually a guy I knew and trusted started up a bodyshop, so it went there in 2022.

CJ8A9647.JPG


Yes the cowl top came off because it had the wiper/louver delete from Arlen, including the bottom of the cowl delete since water couldn't get in there now. You can see there even the V-brace is gone. I guess the moral of the story is to never trust a man who gets cars for free to prep your car.

Eventually it was all patched up, rotisseried, and painted.

PXL_20250728_115323176.jpg


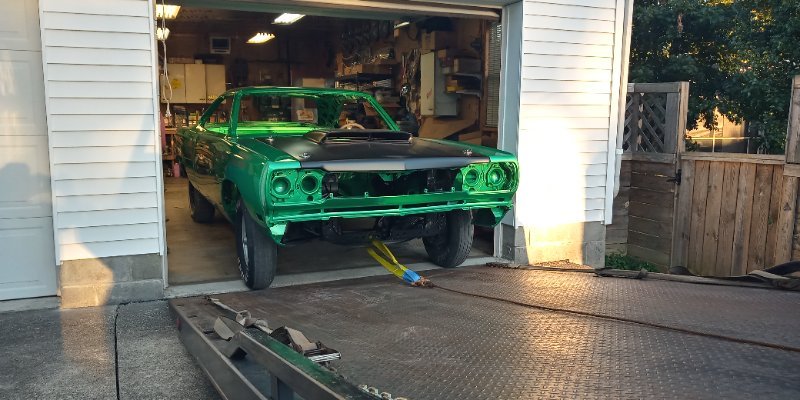
Finally, almost 3 years to the day it left, it's back here
20251013_182119_HDR.jpg

It still has the speed holes, mini-tubs, and the springs are moved into the rails so it's not completely neutered now.

More to follow.
 
Your car looks great!! Myself, having grown up in Akron, it's very cool to see an old Vanke built car. I like that you left a bit of the race car history in it. Looking forward to see it completed. Nice work!!
 
Are those cut rectangles below the sill plates? If yes they really wanted weight gone
Yes. It was crazy. All that cutting, then there was a huge heavy steel roll bar. I guess they had to have the roll bar, but they didn't have to have all that sheetmetal that was cut out.

The inner quarters were cut out. The metal under the kick panels was cut out. The dash frame had all parts you couldn't see and wasn't part of bolting it to the car cut out. The rear window mech was removed with the window bolted up. On and on.

If it had been done neatly I might have just covered it up and left it, but honestly it looked like they trained an apprentice on the job. One side was almost acceptable, the other side was a bloody mess.

I wish I would've scaled it but never took the time to do it and the next thing I knew I had stripped it to bare bones.

BTW if this is in the wrong forum, please move it, I thought it fit in here because of the mini tubs and what not.

2007-03-11 121.jpg
2007-03-11 122.jpg
2007-03-11 144.jpg
2007-03-11 219.jpg


Another unmentioned benefit - all the bodywork had been done old school with brass. Ever tried mig welding close to brass? Brass boils at about 500*, so it's like the 4th of July.
 
Lots of work, I remember pictures of this car from moparts back then.

Cut the rockers out to hide "things" inside, like in the movie French Connection.
 
Y'all should see some of the stuff I did to my 66 Belvedere.....takes a lot of cutting to get a stock K-frame down to 32 lbs. Before doing the K frame, I took the car down from 3370 to 2950 doing sheet work, glass hood, no front bumper and on and on. The car was a /6 auto and 8 3/4 rear. Still had the factory AC on it too.
 
I'm not getting any younger so part of my plan is to not build anything that can't be sold relatively quick. So I'm going to put the heater box and firewall insulation back in it.

You can't imagine how dirty a heater box can get until you work on one from Texas. It had a coating of sand/grit inside and out.

20251019_143951.jpg
20251019_152019.jpg
20251019_152032.jpg
20251019_152059.jpg


Now:
20251122_164923.jpg


I knew all along I should have cleaned all the parts while I was waiting but I didn't.
 
I'm not getting any younger so part of my plan is to not build anything that can't be sold relatively quick. So I'm going to put the heater box and firewall insulation back in it.

You can't imagine how dirty a heater box can get until you work on one from Texas. It had a coating of sand/grit inside and out.

View attachment 1962923View attachment 1962924View attachment 1962925View attachment 1962926

Now:
View attachment 1962927

I knew all along I should have cleaned all the parts while I was waiting but I didn't.

That's not one from me........must be that guy in Conroe........
 
I finally got some real work going on this - installing the brake lines. All the front lines are pre-bent SS tubing but I had to bend the rear line myself so that is copper-nickel with SS armor.

The goofballs who "prepped" the car cut all the wrap-around wire/brake line retainers off the firewall, soo hooray for that.

20260207_172913.jpg
20260207_172936.jpg


Yes there are unexpected holes in the firewall (floor and trunk too) but I'll deal with those as I come to them.

The car has subframe connectors so I had some monkey business to deal with crossing from the inside of the frame rail to the rocker. I ran it back the way it was to begin with. The frame connectors made it more difficult to pass through the torsion bar x-ember than it needed to be.

20260207_173107.jpg


Ran it in the stock clips all the way back to the rear frame rail

20260207_173054.jpg


20260207_173042.jpg


It's hanging loose in this photo, I'll tighten the bends up when I tighten everything else up.

20260207_195225.jpg


There is no feeling like running a full length brake line and getting that last flare done, laying on your back, with a cheap hand-held flaring kit.

FWIW that's tinted undercoating underneath the car.

I could have saved some time by cutting the armor before I slid it on the tubing. I ended up with 16' of armor on a 25' spool of tubing and it became a hassle but the line was in place so I had to get it done the hard way. If I ever do it again I'll cut it onto manageable sections and slide it on as I go.
 
I finally got some real work going on this - installing the brake lines. All the front lines are pre-bent SS tubing but I had to bend the rear line myself so that is copper-nickel with SS armor.

The goofballs who "prepped" the car cut all the wrap-around wire/brake line retainers off the firewall, soo hooray for that.

View attachment 1991124View attachment 1991125

Yes there are unexpected holes in the firewall (floor and trunk too) but I'll deal with those as I come to them.

The car has subframe connectors so I had some monkey business to deal with crossing from the inside of the frame rail to the rocker. I ran it back the way it was to begin with. The frame connectors made it more difficult to pass through the torsion bar x-ember than it needed to be.

View attachment 1991126

Ran it in the stock clips all the way back to the rear frame rail

View attachment 1991131


View attachment 1991134

It's hanging loose in this photo, I'll tighten the bends up when I tighten everything else up.

View attachment 1991140

There is no feeling like running a full length brake line and getting that last flare done, laying on your back, with a cheap hand-held flaring kit.

FWIW that's tinted undercoating underneath the car.

I could have saved some time by cutting the armor before I slid it on the tubing. I ended up with 16' of armor on a 25' spool of tubing and it became a hassle but the line was in place so I had to get it done the hard way. If I ever do it again I'll cut it onto manageable sections and slide it on as I go.
Looks great...
 
Right now I see no way to run the 3/8 fuel line and 5/16 return lines to the outside because of the frame connector and a couple of stubs out to the rocker. Prior the car just had AN hose running down the inside of the frame connector. I'm thinking about running the new hard lines down the inside of the connector as well to avoid the hassle of making the turn to the outside. The car has a driveshaft loop and I will run the lines with solid clips like I used in the engine bay, located high next to the floorboard to protect it as much as possible.

If I do that I will still need to hog out the gap left in the connector weld to get the line through the crossmember rail. If it turns out I will need to run the line to the rocker, I am kind of out of ideas because there's no getting a 3/8 hard line through the frame rail like I did for the brake lines and may end up having to make the fuel line out of multiple sections - and it might still leave a length of line on the inside..

Comments are welcome.

This is the weld gap I mentioned that I need to hog out so I can pass the fuel line through to the other side of the torsion bar crossmember. It is like that on both connectors so it's intentional.
20260208_120757[1].jpg
 
I'm thinking about running the new hard lines down the inside of the connector as well to avoid the hassle of making the turn to the outside.
FWIW I was just looking at photos and realized running it down the inside of the connector might put it close to the exhaust at the muffler, but I can shield it for ambient heat and being a one-piece line front to back should avoid a chance of fuel getting on hot exhaust. It should actually be safer there in case of a T-bone accident, with the frame connector in the way.
 
Back
Top