You are using an out of date browser. It may not display this or other websites correctly.
You should upgrade or use an alternative browser.
You should upgrade or use an alternative browser.
Project Pittsbird Almost Done
- Thread starter Bruzilla
- Start date
74MeepMeep
Member
Fantastic Thread. Thanks for Sharing. I am broke *** poor too and looking for ways to Get My 74 RR up and Running again. thanks for all the input and advice.
chryco_psycho
Well-Known Member
MOPAR: the best on earth
Spoiler: looks good, no matter who made it
paint and decals: killer looks and great show appeal
STEELERS: EVIL CRIMINALS!!!!! (been a raiders fan forever, the ball touched the ground by the way)
seriously, nice car man....come up to the turkey rod run in november and post up with BULLITT
Spoiler: looks good, no matter who made it
paint and decals: killer looks and great show appeal
STEELERS: EVIL CRIMINALS!!!!! (been a raiders fan forever, the ball touched the ground by the way)
seriously, nice car man....come up to the turkey rod run in november and post up with BULLITT
73JF1Bird
Well-Known Member
FANTASTIC PLAY BY PLAY!!!!!! You have us all on the edge of our seats. :clap:
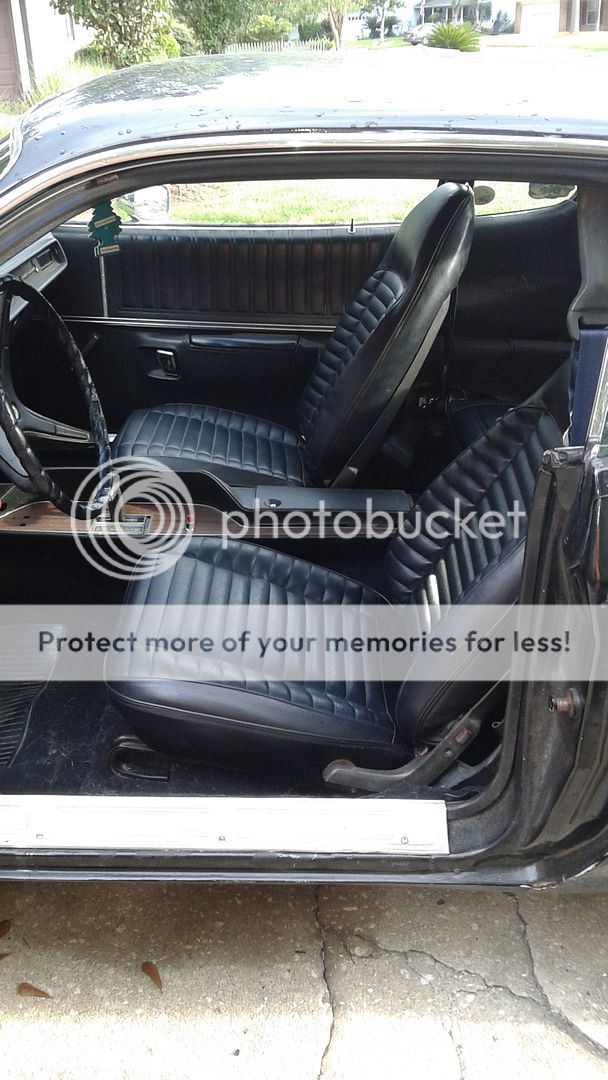
Step 12: Seats
I mentioned before that I had purchased two bucket seats from a 76 Dodge Aspen for $45 and had thrown some universal seat covers on them for the time being. I also put an el cheapo $9.99 cover on the rear seat, which was covered with a blue, splitting cover. Yuck. The personal challenge for me is I've never been a big fan of the 73/74 seat pattern. I like the 71/72 covers much better, so that's what I started hunting for. I was pretty sure the seat frames and backs for the seats were all the same, and if I could find some good foam and covers I should be able to make everything work.
I kept checking Craigslist and ebay for seat covers, and hit the jackpot when I found a guy who was selling a set of 72 seat covers, foam, and seat backs for $400. They were all used, but the seat covers were like new LI pieces. The deal was the owner of the 72 GTX they were in decided to get the front seats recovered but since the back seat looked fine he left it alone. And as many of us have learned the hard way, that back seat that looks fine is actually a dried out piece of tissue just waiting for someone to sit on it to split all the seams apart. So a few years later someone sat on the seat and the cover just came apart. The owner was concerned that if he bought new rear covers they might not perfectly match the front ones, so he decided to just replace all the covers, foam, and backs.
I went out and talked to him, and explained that the seat covers while "like" new weren't new, and if I was going to spend $400 I might as well get new covers. Also, how many people in the area want 72 GTX seat covers? So in the end I talked him down to $225 for the covers, seat foam, and backs.")
I decided to tackle the rear seats first. Keep in mind I have never done upholstery work before, but I watched a lot of videos on YouTube and it seemed pretty easy. I ordered a set of 72 rear seat covers from Classic Industries when they had one of their 30% off specials, so they came out to $279 delivered. I also ordered a set of cheap hog nose ring pliers and 300 hog rings from a Mustang supply store for $8.50 shipped.
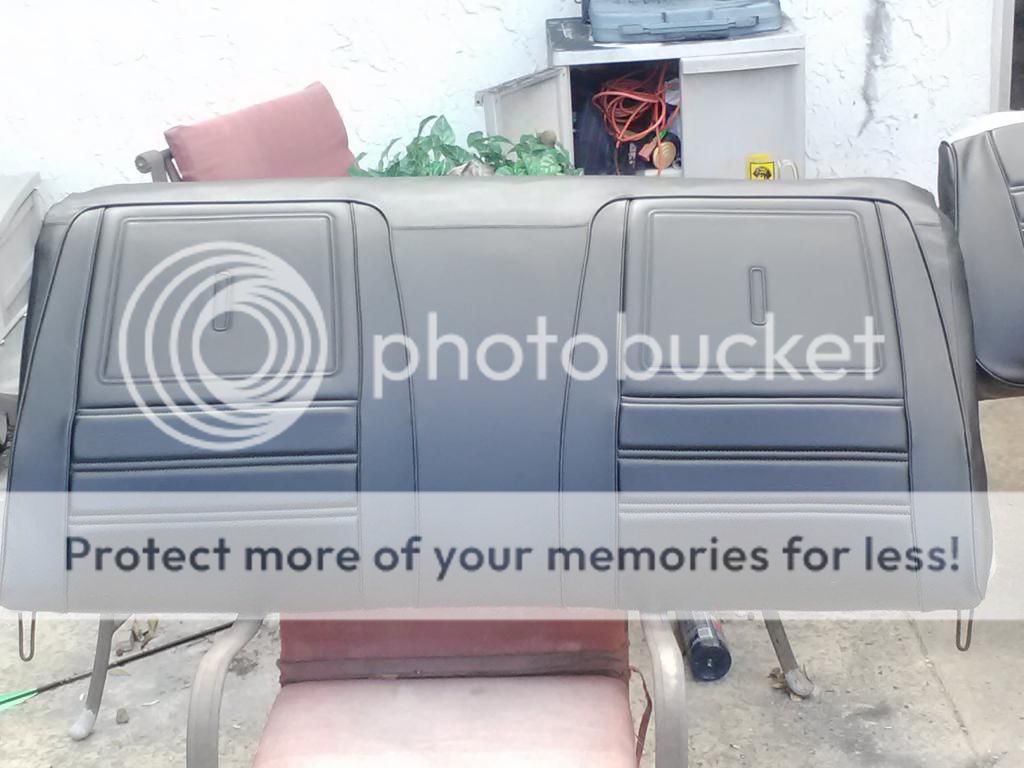
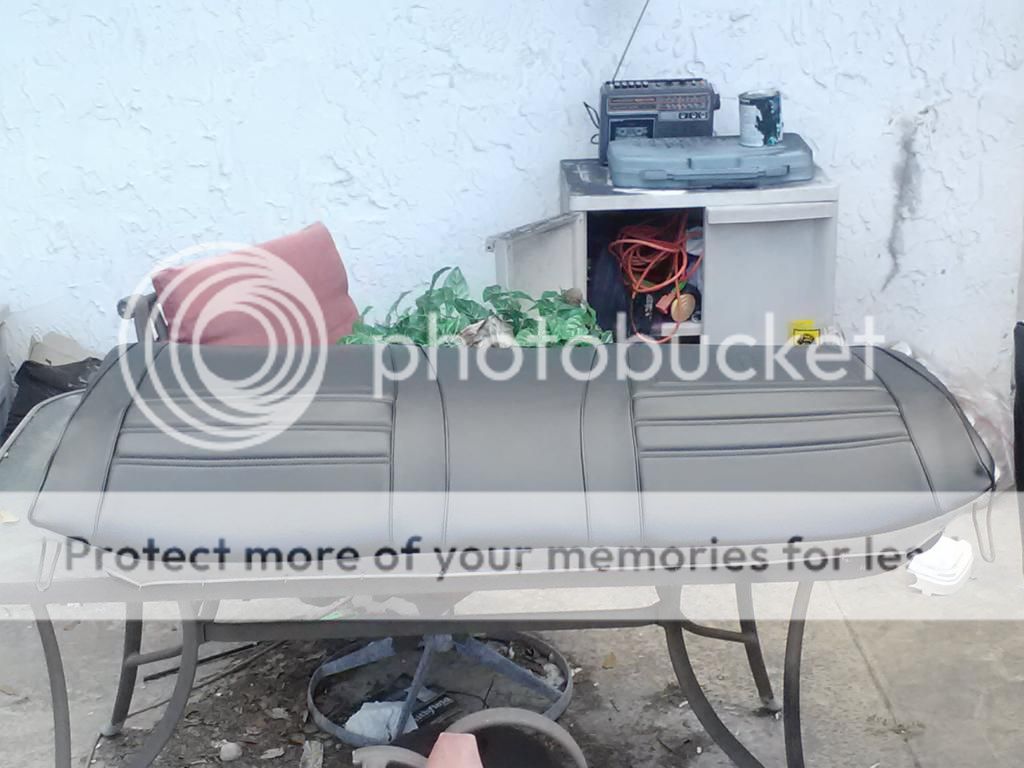
I pulled the rear seats, cut the covers off, and got to work. As the videos showed, it really isn't hard to put seat covers on. My view is if you can make a bed, you can cover seats. So here are the back seats with the new covers after about six hours of work:
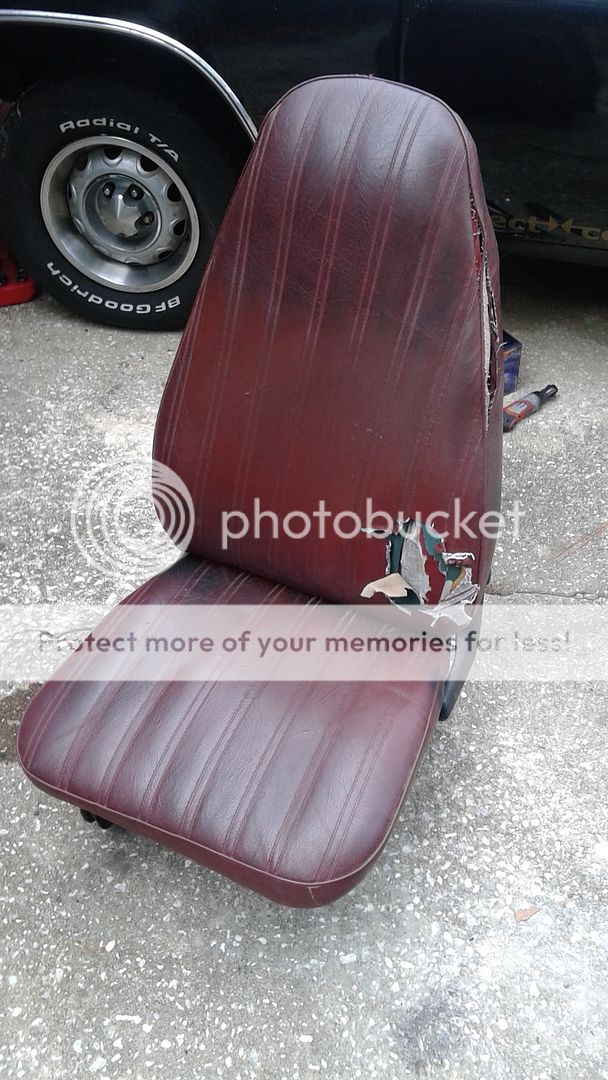
Now onto the front seats. Here's how the seats looked once I pulled them from the car:

I took the seats apart and quickly found out the covers on the Aspen seats were not original. I also found out whoever had put the covers on had put them on right over the top of the original covers! So I had to do a LOT of snipping of old, rusted, hog rings to get the old covers off. I removed the old foam, and cleaned up some rust off the frame. Once that was done I started mounting the new seat covers to the 72 seat foam, and I think this is the hardest part of the process. Getting the metal rods that hold the covers to the foam hog ringed to the rods in the foam isn't hard but it is tricky and took a few minutes to figure out the easiest way to do it.
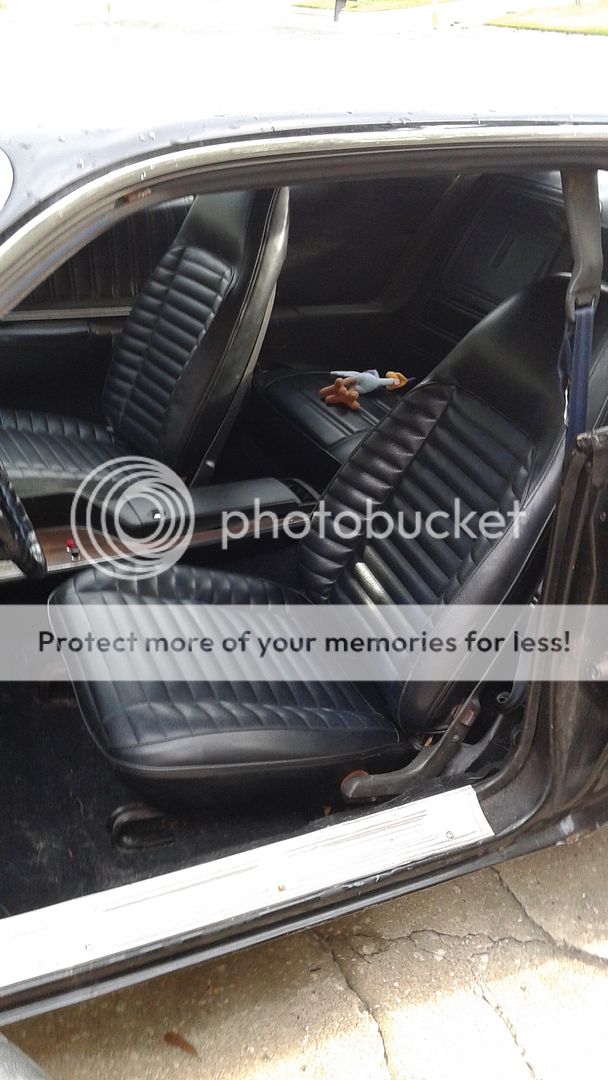
I put the 72 GTX foam, covers, and backs on and found they were a 100% match for the 76 seat frames, so yes... you can change later Mopar seat frames into older seats and save a lot of $$$. Here's how the seats looked before going back in the car:

I ended up spending $270 on the front seats, which is about $30 to $130 less than most folks want for a set of 73-74 frames with crappy foam and ripped covers. I paid $279 for the rear seat covers, and $8.50 for the hog rings and pliers, for a total cost of $557.50 and about 12 hours of work for like-new front and rear seats, which is a bargain compared to what it would cost to use 73-74 frames and have a professional do the work. And I plan on selling the old foam, covers, and backs off the seats on ebay as I know F body guys are always looking for these since no one is reproducing them, so I expect to make about $200 back. And now here's what my seats look like:
I mentioned before that I had purchased two bucket seats from a 76 Dodge Aspen for $45 and had thrown some universal seat covers on them for the time being. I also put an el cheapo $9.99 cover on the rear seat, which was covered with a blue, splitting cover. Yuck. The personal challenge for me is I've never been a big fan of the 73/74 seat pattern. I like the 71/72 covers much better, so that's what I started hunting for. I was pretty sure the seat frames and backs for the seats were all the same, and if I could find some good foam and covers I should be able to make everything work.
I kept checking Craigslist and ebay for seat covers, and hit the jackpot when I found a guy who was selling a set of 72 seat covers, foam, and seat backs for $400. They were all used, but the seat covers were like new LI pieces. The deal was the owner of the 72 GTX they were in decided to get the front seats recovered but since the back seat looked fine he left it alone. And as many of us have learned the hard way, that back seat that looks fine is actually a dried out piece of tissue just waiting for someone to sit on it to split all the seams apart.
So a few years later someone sat on the seat and the cover just came apart. The owner was concerned that if he bought new rear covers they might not perfectly match the front ones, so he decided to just replace all the covers, foam, and backs.I went out and talked to him, and explained that the seat covers while "like" new weren't new, and if I was going to spend $400 I might as well get new covers. Also, how many people in the area want 72 GTX seat covers? So in the end I talked him down to $225 for the covers, seat foam, and backs.
I decided to tackle the rear seats first. Keep in mind I have never done upholstery work before, but I watched a lot of videos on YouTube and it seemed pretty easy. I ordered a set of 72 rear seat covers from Classic Industries when they had one of their 30% off specials, so they came out to $279 delivered. I also ordered a set of cheap hog nose ring pliers and 300 hog rings from a Mustang supply store for $8.50 shipped.
I pulled the rear seats, cut the covers off, and got to work. As the videos showed, it really isn't hard to put seat covers on. My view is if you can make a bed, you can cover seats. So here are the back seats with the new covers after about six hours of work:
Now onto the front seats. Here's how the seats looked once I pulled them from the car:
I took the seats apart and quickly found out the covers on the Aspen seats were not original. I also found out whoever had put the covers on had put them on right over the top of the original covers! So I had to do a LOT of snipping of old, rusted, hog rings to get the old covers off. I removed the old foam, and cleaned up some rust off the frame. Once that was done I started mounting the new seat covers to the 72 seat foam, and I think this is the hardest part of the process. Getting the metal rods that hold the covers to the foam hog ringed to the rods in the foam isn't hard but it is tricky and took a few minutes to figure out the easiest way to do it.
I put the 72 GTX foam, covers, and backs on and found they were a 100% match for the 76 seat frames, so yes... you can change later Mopar seat frames into older seats and save a lot of $$$. Here's how the seats looked before going back in the car:
I ended up spending $270 on the front seats, which is about $30 to $130 less than most folks want for a set of 73-74 frames with crappy foam and ripped covers. I paid $279 for the rear seat covers, and $8.50 for the hog rings and pliers, for a total cost of $557.50 and about 12 hours of work for like-new front and rear seats, which is a bargain compared to what it would cost to use 73-74 frames and have a professional do the work. And I plan on selling the old foam, covers, and backs off the seats on ebay as I know F body guys are always looking for these since no one is reproducing them, so I expect to make about $200 back. And now here's what my seats look like:
Superfreak
Well-Known Member
Much better!!!
You just can't get past the fact that my tires are properly inflated.
1969CoronetR/T
Well-Known Member
I have a black and yellow R/T and it may be just a coincidence since I live in McCandless Township (10 miles north of Pittsburgh) that it gets a lot of attention when I drive it. I do not watch sports although I do like the Penguins.
lol.
I have a second criticism. Why didn't ya get gold stripes in lieu of the white ones?
I gave that a LOT of thought. First there was an operational problem, which was which gold do I use? I wanted the car to reflect Pittsburgh and not necessarily the Steelers, Penguins, or Pirates. That's why some trim items are Steelers colors and some Penguins/Pirates. The only colors that all three share are black and white.
Then there was a logistical problem when I considered using a white center stripe and a gold trim stripe. I could do this by ordering two sets of stripes, one gold and one white, and applying the white stripe and then the gold stripe, but that would double my costs. More of a problem was I wanted reflective stripes and I could get white reflective but not gold (in Steelers or Pirates/Penguins gold). And lastly, I was pretty sure I would have a tough time keeping the trim stripes perfectly distanced from the center stripe the entire way around the car if I applied them separately.
So in the end I just decided to go with white.
Mopar-Charger
Well-Known Member
That is an awesome ride man!
I bought my car for 3,000. Running, driving, stopping.
I've put about 3,000 into it, everything on it/in it is brand new. I was even able to build an engine that puts out over 400 HP to the crank in that budget. All that is left is body work!
It was cool to see the process with the wet sand, I wish I had a place/time to do that, I would do it myself in a heart beat.
I did buy another 73 charger se came with everything but an engine for 1,200. The frame is perfect, most of the interior is stripped, but the only rust is in the lower quarters and just behind the back window.
Here on hilton head they wanted to fix a dent (hit and run, only liability insurance) for $600... They charge out the *** for body work seeing as though there are limited shops here. (not a single machine shop for 200miles) have to go to Charlotte if I wanted anything done right for a good price.
THere's this youtube show (in the works) called "RattyMuscleCars" they take barnfinds and put them back on the road. Very cool.
Thanks for the link!
Glad to hear you save the body work for last. That's been the biggest project killer I've seen throughout my 20+ years in this hobby. Guys buy a project, spend all their time, money, and spousal support getting the body work done, and then what do they have? A couple thousand pounds of great looking paperweight because the car can't be driven. Tough to get approval for more spending at that point, and the car ends up on craigslist.
It's always better to get a car up and running first. That gives you the motivation and support to get the body work done.
- - - Updated - - -
Spent the weekend getting ready to start installing Super Stock leaf springs on the back. The 1974 cars had the rubber-isolated mounts on the springs, so they're going to require some modification to install. I also had a problem with finding out what U-bolts to get. Every resource I looked at told me something different, so I pulled one of the bolts out and I'll get it over to NAPA for a match.
Step 13: Drivetrain Upgrade, Part 1
This has been a LONGGGGGGGGG time coming, but it appears I will finally be giving the Pittsbird the drivetrain I've been wanting, which is a 440-4/727/8.75 one. I have two targets to hit here. The first is I want the car running/driving safe and in a high-performance manner, and I want to do it at a zero or better net cost to me.
This is my second bite at this apple. The first crashed and burned because of a criminal mechanic. Long story short, it ended up costing me two years of time, a 1973 440/727, and a lot of parts, but I was able to get my mechanic arrested on a host of charges and when he gets probation he'll be working for me as I will be getting a portion of his checks, about $300/month, until he pays me the $10,428 in restitution I filed for. But moving on, I've come up with a Plan B that is now underway.
I started looking at using a 440 from a motorhome. I live in Florida, which is where motorhomes come to die, so we have a LOT of them. $400 will get you a complete 440 and 727 most any day of the week, but the engines are low compression and the transmissions are short shaft deals that have to be modified, which equals more costs. There was also the issue I had with a lot of the parts I had purchased before to do the swap are now in legal limbo, so what I needed was essentially a one-stop-shop deal with a doner car.
It took a couple of months, but I think I found what I need. It's a 1973 Chrysler Town & Country station wagon that's been sitting since the owner died two years ago. The owner's friend inherited it and it's been sitting collecting dirt, dust, and pine needles ever since. The car has a 440, 727, and 8.75 rear, and it has the towing package so I suspect the rear is a Sure Grip 3.23 unit, which is what I really want. Best of all, the car has a LOT of parts like front disk brakes, great trim, glass, and other items that C Body guys want and I don't need, so I will be selling those off to make back my money, along with some parts on my Roadrunner that I will no longer need.
As for the rear end, I have had an E-body unit that I traded a couple of wheels for two years ago, and that I've had new mounts welded to, so my plan is to pull the wagon's center, install it into the E-body case, probably take the rear brakes and swap them as well, then sell the remaining C-body 8.75 parts to whoever needs them.
So price wise, the wagon owner was asking $1,200 for the car but I got him down to $800 and I paid $100 for an engine hoist so I could do this at home, so I'm into this for $900. I should be able to make that back. Here are some pics of the car as I found it:


This has been a LONGGGGGGGGG time coming, but it appears I will finally be giving the Pittsbird the drivetrain I've been wanting, which is a 440-4/727/8.75 one. I have two targets to hit here. The first is I want the car running/driving safe and in a high-performance manner, and I want to do it at a zero or better net cost to me.
This is my second bite at this apple. The first crashed and burned because of a criminal mechanic. Long story short, it ended up costing me two years of time, a 1973 440/727, and a lot of parts, but I was able to get my mechanic arrested on a host of charges and when he gets probation he'll be working for me as I will be getting a portion of his checks, about $300/month, until he pays me the $10,428 in restitution I filed for. But moving on, I've come up with a Plan B that is now underway.
I started looking at using a 440 from a motorhome. I live in Florida, which is where motorhomes come to die, so we have a LOT of them. $400 will get you a complete 440 and 727 most any day of the week, but the engines are low compression and the transmissions are short shaft deals that have to be modified, which equals more costs. There was also the issue I had with a lot of the parts I had purchased before to do the swap are now in legal limbo, so what I needed was essentially a one-stop-shop deal with a doner car.
It took a couple of months, but I think I found what I need. It's a 1973 Chrysler Town & Country station wagon that's been sitting since the owner died two years ago. The owner's friend inherited it and it's been sitting collecting dirt, dust, and pine needles ever since. The car has a 440, 727, and 8.75 rear, and it has the towing package so I suspect the rear is a Sure Grip 3.23 unit, which is what I really want. Best of all, the car has a LOT of parts like front disk brakes, great trim, glass, and other items that C Body guys want and I don't need, so I will be selling those off to make back my money, along with some parts on my Roadrunner that I will no longer need.
As for the rear end, I have had an E-body unit that I traded a couple of wheels for two years ago, and that I've had new mounts welded to, so my plan is to pull the wagon's center, install it into the E-body case, probably take the rear brakes and swap them as well, then sell the remaining C-body 8.75 parts to whoever needs them.
So price wise, the wagon owner was asking $1,200 for the car but I got him down to $800 and I paid $100 for an engine hoist so I could do this at home, so I'm into this for $900. I should be able to make that back.
Here are some pics of the car as I found it:
You'll have to post a good picture of the wagon once it's all cleaned off and out in the open. I'd buy a wagon in a heart beat..... unfortunately not in the near future though. Hope it works out for you.
Drivetrain Upgrade Part 2
Okay, so I got the wagon home and started going through it. I had intended to just get the 440 and 727, but I also pulled the center from the 8.75 as it is a 3.23 unit and the one I have now is a 2.76 one. I was also pleasantly surprised to find a complete cruise control system in the car. That would cost me about $300 to buy, so that was a score. I also removed the FM antenna and mount. So I definitely got my $800 out of the car.
The only downer I've found so far are the transmission cooling lines. Since the wagon had a towing package, one of the lines goes from the trans to the radiator, but the other goes over the radiator brace and to a trans cooler, then back over and to the radiator. So I have to order new lines.
I started pulling parts to sell after Thanksgiving. So far I've made back $525 from selling them. In addition, I was contacted by a gentleman who wants to buy what's left for $500. So that'll be $1,025, plus I'm still selling the front disc brake set up and hope to make another $300 off that, which should put me at $1,325 or so. Not too bad, and I still haven't sold any parts off the engine or parts from the Roadrunner that I won't need anymore.
So far I have bought a set of Hedman 78070 headers ($245), a mini-starter ($65), a set of ball joints, rod ends, and other suspension parts ($67), a set of transmission cooling lines ($38) and an upper ball joint removal tool ($24), so that's $439 of that $1,025 gone so far. Lastly, my son got me a set of the Schumacher conversion mounts for Christmas, so that saved me $170 or so.
YY1
Well-Known Member
You're not going to use that factory trans cooler?
I'm interested to know how those conversion mounts work out. I can't figure out why they changed from only needing different mounts to needing different mounts AND a different K frame.
I'm interested to know how those conversion mounts work out. I can't figure out why they changed from only needing different mounts to needing different mounts AND a different K frame.
Where did you see the need for the conversion mounts and a new K frame? That's news to me.
YY1
Well-Known Member
71/72 any engine with correct mounts fits in same K frame.
73 and newer different K frames for SB and BB.
Schumacher says you need to cut the top off your DS K frame mount point and redrill the hole.
What are you going to do about the pass side exhaust issue?
SB and BB inner fenders are different.
Ive been told certain headers will fit without cutting that area of the inner fender, but I have no proof or header brand.
I'm going with the Hedman 78070 shorty headers instead of the longtube headers I bought originally. Those seem to be much easier to install, and the only downside is you have to use a mini starter, which I was going to get one of those anyway. And if there is a problem with the inner fender, it's a whole lot easier to change the path of one exhaust pipe instead of four header pipes.
Yes, you do have top modify the DS K frame pillar. The driver's side mount is longer to allow for more oil pump clearance, which is why you need to drill the hole lower. Looks like a 15-minute mod, so I'm not sweating it.
Yes, you do have top modify the DS K frame pillar. The driver's side mount is longer to allow for more oil pump clearance, which is why you need to drill the hole lower. Looks like a 15-minute mod, so I'm not sweating it.
Similar threads
- Replies
- 8
- Views
- 1K
- Replies
- 41
- Views
- 6K


