• When you click on links to various merchants on this site and make a purchase, this can result in this site earning a commission. Affiliate programs and affiliations include, but are not limited to, the eBay Partner Network.

Taking Up New Residence

I think it will boil down to which air cleaners you'll use. Another member here (Rick62, I think) is using the CH28 intake and football air cleaners and it fits under stock '62 hood - not sure if he has spacers tho..
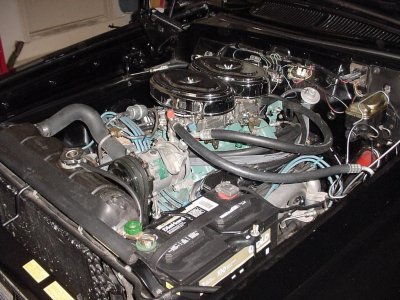
Regarding air cleaners. I used the old Chrysler 300 style "football" air cleaners on my '62 Sport Fury. I bought mine from a Chrysler 300 club member. They aren't cheap. http://www.chrysler300club.com/rcmstuff/partsforsale.html Plus the carb throat opening is the old AFB smaller size. I modified mine but Jegs, Summit and others sell an adapter. K&N makes the air filters. There are too different heights. You will need to shorter one as the taller one makes the height too tall for the hood to close. While you are using 1" spacers the spacers I'm using are only 1/2". If you have any other questions about '62s or the 2X4 set-up drop me a note. I'd be happy to help where I can. How's the project coming? feel free to PM me.

Convert engine 3.JPG
 
Plus the carb throat opening is the old AFB smaller size.
I bought a reamer on ebay for the correct size and used an old carb base for a fixture.
20160618_135432.jpg
20160618_134547.jpg

You can see the ones on the right are done. I did the ones on the left then smoothed out some of the partition. Good to go for a newer style carb.
20160618_133728.jpg
 
I guess I need to update the progress. This global warming is great! Well on the East Coast anyway.

I wanted to include the inside of the cowling when it's paint time. I used rust inhibitor with a long straw on the rattle can.
20170119_121457.jpg

The inside of the engine compartment looked like it was shot with a shotgun. Chips, chips and more chips. Practically sanded everything down to bare metal then sealed as I went.
20170125_162224.jpg
20170207_235008_001.jpg
20170208_141544.jpg
20170209_203919.jpg


Next was the K frame.
20170211_140314.jpg
20170221_134700.jpg
20170220_202028.jpg


Funny how one thing leads to another. Scraped off the undercoating in the tunnel area and front floor useing a heat gun and putty knife. I was amazed how good things look. The factory dipping process and undercoat really did its job. Ford engine gray is a pretty good match.
20170222_222135.jpg
20170223_115803.jpg
 
Last edited:
I hate masking with a passion!
20170223_212740.jpg
20170224_140111.jpg
20170224_140036.jpg


Finally laying down some color!
20170224_163324.jpg
20170224_185224.jpg
20170224_163220.jpg
20170224_232407.jpg


Get this unmasked and I can't believe I'm ready to start on some mechanical. Damn I'm sore and tired. Did I mention sore?
 
Last edited:
Damn that is looking great 'Kid. Congrats on how that turned out....can't wait to see that beautiful engine going in again.:thumbsup:
 
I hate masking with a passion!View attachment 399249 View attachment 399250 View attachment 399251

Finally laying down some color!
View attachment 399253 View attachment 399254 View attachment 399252 View attachment 399255

Get this unmasked and I can't believe I'm ready to start on some mechanical. Damn I'm sore and tired. Did I mention sore?
The Wow Factor is In Kid! Looks Fantastic. We are somewhat paralleling each other. My 65 is at about the same point .Beautiful work. Thanks for the tip on the Ford gray engine paint. I am going to steal that one! Thunder
 
Looking good!! I'm about to get started doing the 'apartment' compartment on my 66 Belvedere. Got to fill up some holes and get the complete front end painted. I'm about ready to bolt in the K frame and start hanging suspension pieces...
 
Looks great Kid. Are you sticking with original colors both in and out?
 
Looks great Kid. Are you sticking with original colors both in and out?

Yes I'm sticking with the original color. I'll be leaving the patina on the outside for awhile until I get all of the mechanicals finished.

I went to a local PPG dealer and they didn't have a formula for the "Shell Beige" in enamel, just lacquer. They contacted their tech line, they sent back a formula for their "Shop Line" product and it was too dark. I had taken the hood with the insulation removed for a test area. I ended up leaving it there till the next day so the guy could try and match it. The next day they delivered the hood and the paint. It was a good match. It ended up being a Chrysler color, mid sixties, called "Alabaster". Good to go!
20170124_125003.jpg
 
Looks like we are just about at the same juncture. I'll be installing my 440 and 4 speed from underneath in a couple weeks. Good luck.
IMG_5615a.JPG
 
Auto Transport Service
Back
Top