• When you click on links to various merchants on this site and make a purchase, this can result in this site earning a commission. Affiliate programs and affiliations include, but are not limited to, the eBay Partner Network.

Re-Rebuilding the 440-493 in a 1970 Charger

I’m still waiting for the pedal-to-the-metal, mind blowing, change of underwear, test drive report.
I cannot get past half throttle in first. The tires just spin. In second, the same gets me walking sideways if the road is crowned. In third, the tires are holding just fine. I think the power will be adequate. It idles smoother than I recall from when I used this cam before.
I haven't hammered on it a whole bunch. The brakes are not fully bled out. I didn't want to get in a spot where I couldn't get the car back down to a safe speed without panic. There are a few excuses for not bleeding the brakes....Mary has been busy and stressed with work and I didn't want to burden her. Not many car guys are nearby either. I decided to get one of those "One Man Bleeder" kits from Motive. I have a story on that one too....
Saturday I decided to drive to the Summit Racing store in Reno and got turned around by the Cops because of road conditions. SNOW. It wasn't bad yet but supposedly was worse up ahead. Sunday I tried again and was turned around again. I'm not buying chains for this truck:
Ram Jam 2.JPG

I'd worry that the chains would come loose and shred the bedside.
Sunday I ordered the brake bleeder and a few other things. They are due in today. I'll report on that as it develops.
I did adjust the float level of the carburetor. The rear bowl fuel level was to or above the top of the sight glass so that is likely the reason for the stalling during braking and on steep downhill slopes.
Dadsbee is sending me a diode that will eliminate the bouncy tachometer needle. The FBO box I installed led to an erratic tach needle and the "fix" is supposed to be to solder in the diode on the tach wire.
The roads have been wet lately from much needed rain and I try to avoid driving in the rain. I'm not a prima donna....If I'm out and it starts raining, I don't hide under an overpass but I don't look at this car like I would a daily driver. I need to replace the windshield wiper pivot seals. I bought two sets awhile back from Detroit Muscle Technologies. I already put one set in Jigsaw. This car is next. I was caught in a downpour in April while driving to Van Nuys. The windshield seems to seal well but I did get streams of water in under the dash. I suspect the pivot seals since they are original!
In short, the power feels good. The brakes do too but should inspire more confidence once they are fully bled out. I like brakes to react quickly without having to press the pedal halfway to the floor.
Does anyone remember the sway bar end links that I modified back in page 12, post # 226 ?

274 R.jpg


277 R.JPG


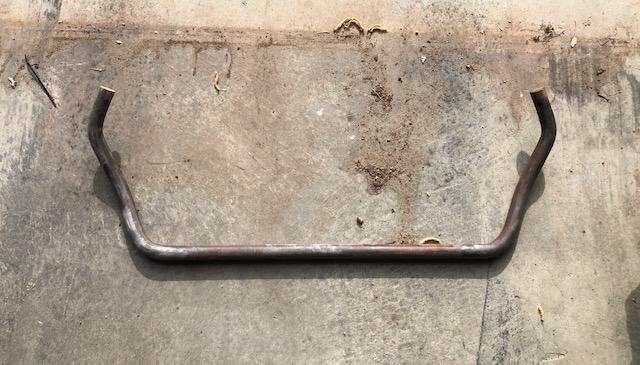
They work as intended and have less compliance than the urethane bushings did. There is no noise coming from them as far as I can tell. There is only one small drawback. This sway bar is a modified unit from a 1973-87 Chevy 2wd One ton truck. The holes where the end links attach are slightly closer together than the stock sway bar. This puts the end links in a position that isn't a true "plumb" position, they are not straight up and down. The control arms move in an arc and as they do, the end links tilt in and out. Rubber bushings squish a lot and would tolerate this just fine. Urethane would as well. These links are solid with small ball joints at the ends:
260 RB.jpg


I didn't want to push the car to the point where it would snap the end links so I bought a new sway bar, due in later today.

I have the bad habit of getting stuff almost entirely finished and THEN getting distracted by something else. I am trying to change that. The remaining small details of this project can be handled in a day or so.
 
I ordered a QA 1 hollow 1 1/4" unit. I'll post a write-up on it as soon as I can.
The rear bar is a 3/4" solid bar from a 1983 Imperial. It is frame hung.

58 A.JPG
59.JPG
 
Finally! The Summit Racing equipment order that I placed on Sunday arrived today....and the parts were just 2 hours away the entire time.

First up, I got the QA 1 front sway bar.

618 A.JPG


This is a 1 1/4" hollow bar. Check out the weight of it:

618 B.JPG


The solid bar that I've had in this car since 2001 is a modified unit from a 1973-87 Chevy 1 ton 2wd truck and it also measures 1 1/4".

618 G.JPG


Back in 2001 when I was a bit short on cash, I was underneath this car looking at the small stock front sway bar and wanted a cheap alternative. Addco and a few others did make larger bars but with my junkyard mentality, I wanted to find a cheaper way. I was under my 84 Chevy truck and noticed that the shape of the front sway bar was similar to the Charger. I removed both and set one over the other and found them to be pretty close.
The truck bar had weird ends that had to be cut off.

FSB 6.jpg


FSB 12.jpg


The ends were tapered with a flapper disc on an angle grinder....

FSB 30 mns.jpg

FSB 32 jh.jpg


I drilled through the end and boom....for under $100 I had a big front sway bar ready to go.
It worked but was not quite ideal. The space between the eyelets was about an inch narrower than stock.

618 J.JPG


618 I.JPG


This put the end links at an angle that I thought was too much.
 
There are numerous options for this Motive pressure bleeder system.

One is the universal flat plate that would work on all the stock cast iron master cylinders:

Motive Products Power Bleeder Kits 0105​

4 out of 5 stars ( 113 )

Part Number: MVP-0105
View attachment 1381310

$80.96

One of the others is this type that looks like it works with the aftermarket aluminum MCs with the 2 plastic caps:

Motive Products Aftermarket Power Bleeder Cap Adapters 1113​

Part Number: MVP-1113
View attachment 1381307
$44.96
Read the reviews.. The basic unit & concept are okay, execution not so much, the plate is fine, the chains & J bolts are a joke... Couple 6" C clamps are better... I actually made a pair of clamps that work excellent...

IMG_7598.jpg
 
Before the teardown this past June, I had end links like these:

76.JPG


These are common. One long 3/8" bolt, a series of washers, bushings and spacers. I had urethane bushings in place for better response as opposed to rubber bushings. I read an article in Mopar Action magazine about Moog end links that omit the bushings...


256 R.JPG

260 R.JPG


Rock Auto had three with the same part number. I bought the most expensive ones. Good thing too, they look great. They are a bit longer than the end links I had though.

267 R (3).jpg


The trial fit showed that they would hang too low below the lower control arm.

272 R.JPG


I cut and sectioned them to a proper length, welded then sandblasted them to look untouched.

274 R.jpg


They fit and worked but since there were no actual bushings to provide any compliance....And with the Truck sway bar eyelets closer together than stock, these end links were at an angle. I wondered if they may end up bending or breaking something.

With the properly shaped QA 1 sway bar in place, it looks like there will be no binding.

618 L.JPG


618 N.JPG


Oh...Remember what the new bar weighed?

618 B.JPG


Now here is the solid bar:

618 F.JPG


That is an 8 lb weight reduction at the front of the car.
Weight reduction wasn't a primary goal of this project but it was considered. I figured that if I were to change something, I'd look for options that weighed less than the parts I had.
The Borgeson steering box swap saved 14 lbs since I also went from the longer Fast Ratio idler and Pitman arms to stock length arms.
The 13" front brakes shed another 14 lbs due to the aluminum hubs, aluminum calipers and the compact adapter bracket.
I still have a vacuum booster but I'm using an aluminum master cylinder that weighs 4 lbs less than the iron one, though I added the vacuum pump and hoses that negated that 4 lbs.
This sway bar shed 8 lbs.
36 lb weight loss over the front wheels is a great thing.
I believe I was at 3960 before all of this.
Now, you might be thinking that the new sway bar might not be as effective as the old one due to the fact that this new one is hollow and they are both the same outer diameter.
I thought the same thing.
I've read that the diameter is what gives the bar it's strength and that the resistance to twisting is almost entirely carried by the outer ends of the diameter.....that the center of the bar does almost nothing.
I say almost because the center does carry some importance but it is only a fraction. These hollow bars are often sized 1/8" or more larger than a comparable solid bar to achieve a similar roll rate.
In short, this 1 1/4" hollow bar has the same rate as an 1 1/8" solid bar.
Back to the comparison:
The solid bar that I had also had slightly longer lever arms. The shorter arms of this new bar result in a higher roll rate.
My bonehead logic leads me to believe that this bar is probably very close in rate to the old one.
I drove the car and while I didn't corner it hard, it did respond as quickly as before to steering input. No increase in body roll/lean.
 
Last edited:
The second part of todays delivery was the Motive bleeder jug and attachments.

617 E.JPG

There are several options to pick from to fit almost any combination. They revolve around this 2 quart jug. It reminded me of an Ortho chemical sprayer you get at Home Depot. It uses the a pump to pressurize the clear hose that attaches to the top of the master cylinder.
The attachment that came with the tank fits flat top master cylinders like the stock cast iron units.

617 H.JPG
617 G.JPG


Randy is right....the retention hardware is really cheap and flimsy.

617 I.JPG


For my car, I needed something with a screw on cap since I have the plastic reservoir on an aluminum MC.

617 N.JPG


For this type, you need this attachment:

617 L.JPG


Three pronged red cap.

617 M.JPG


The procedure is remarkably simple. Add a quart of brake fluid to the tank, connect the red cap to either end of the master cylinder and start pumping it up.

Uhh...why isn't the tank building pressure?

617 Q.JPG


I forgot that both caps on these master cylinders are vented. I had to screw on the special cap supplied in the package.

617 S.JPG


Once the black cap was in place, the tank was able to hold pressure. The instructions state to pump it up to 15 psi or whatever the manufacturer suggests but to not exceed 20 psi. I took it to 15 and proceeded to bleed the system.
I didn't find many air bubbles but it but it must have been enough. The pedal is firm now.
I checked air pressure. The front tires were down to 20 psi each. The rears were at 25. I brought them up to 35 and went for a drive.
Steering response is excellent. The ride is still damn good for such a stiffly spring car. The brakes? Hmmm...
I'm still not amazed by them. They are not bad. They just are not fantastic. I've driven disc-drum cars that stop better.
I noticed that the front wheels had a lot of brake dust after I bedded in the brakes last week. The rears hardly have any dust on them at all.
It has me wondering about a few things.
Are the calipers stuck or somehow not working to their potential?
Are the pads crappy?
Is there a restriction in the distribution block?
A few weeks back, I wrote about trying to find a way to plumb the system without using the distribution block. I have a union to connect the rear line:

617 B.JPG
 
It looks like a no-brainer.

617 C.JPG


The front though.... I would need a T with tapered seats. The port sizes are different from input to output.
The white arrow points to the input from the master cylinder. It is a large fitting. I think it is 9/16" because it is a similar size to the forward port on the master cylinder.
The black arrows are the left and right ports to the wheels. They are one size larger than the ones near the blue arrows.

617 AA.jpg

I simply don't know what sizes these are for the purposes of identification. If I knew, I could call some places and order exactly what I want.
I have had a nagging feeling about the brakes in this car for awhile now. I always thought that they should be better than they are. I make changes and keep getting disappointed.
In situations like this, I look toward what was changed and what wasn't changed.

I still have the same rear calipers and pads, the same hard lines and the rear flex hose from the body to axle.
The distribution block too.
When I bleed the rear calipers, I get fluid but not nearly the volume that the fronts push out.
What if the shuttle in the distribution block is off center or gunked up and the front brakes are getting more pressure?
I simply don't know what sizes these are for the purposes of identification. If I knew, I could call some places and order exactly what I want.

Ideally, it would just be like this:

617 AAA.JPG
 
Holy crap.....

leb-bpg001_xl.jpg

$54.99
LEED Brakes Brake Pressure Gauge Kits
Brake Pressure Gauge, 0-3000 psi, 1 5/8 in. Diameter, Analog, Full Sweep, Black Face, Kit

*************************************************************************************************************************
This is an excellent idea. I thought that these were far more expensive.
I will order this tomorrow.
What kind of pressure should I be seeing at the front and at the rear?
I've read as much as 1200 psi.

leb-bpg001_s.jpg


leb-bpg001_xb_s.jpg


leb-bpg001_ri_s.jpg


leb-bpg001_mj_s.jpg
 
Last edited:
I found this from a Duck-Duck-Go search.......
"Typical full-lock operating pressures on conventional OEM-style automotive hydraulic-brake systems are 900 to 1,000 psi with manual brakes and 1,400-plus psi with power-assisted brakes. To check the pressure, you'll need a simple brake-pressure gauge. They're sold by several sources, including Lamb (PN 882) and Wilwood (PN 260-0966). Use the gauge to check pressure at each caliper or drum and at each master-cylinder outlet port. (Deactivate or bypass any proportioning valve or ABS computer.) If the pressure is much lower at one or more wheels than it is up at the master cylinder, the problem is in the lines or at the calipers and drums. If there's high pressure everywhere but the brakes don't lock up, the master cylinder and calipers or drums are mismatched or incompatible. If pressure is low everywhere, look at the master cylinder, the power-assist unit (if applicable), or brake pedal."
 
So it sounds like it worked fine and you would buy the Motive bleeder again?
 
Thanks to Randy… I ordered the brake pressure gauge from the link he posted. I really should have bought one of these years ago instead of all the parts swapping that I have done.
If the pressures at all four corners are within spec, maybe the rear pads are something to look at. These are 16 years old from when I installed this kit in 2006. Maybe Dr Diff didn’t have access to high performance pads then. I can only tell that they are semi metallic.
I still am curious about the distribution block. I may still plumb the system without it. I ordered some fittings from a hydraulic store today after the man helped me identify the sizes of the ports.

1BE07F5F-1225-43F3-9D17-409C0FC5CB8E.jpeg
To recap:

4FB5F266-5C98-4DC7-A487-CD116E45751A.jpeg


Brake warning switch.

F8CB3E94-F561-4CEE-B878-5DB9C3514C4D.jpeg


Typical male inverted flare.

642D7497-264E-4115-AE25-36C08689F776.jpeg
49F4ACDC-FDCD-4ECC-B3C7-50C6D57DEFD3.jpeg


Here is my line of reasoning. The red ink in the drawings below depict the “shuttle” that is supposed to move back and forth through a passage.
If a fluid loss is at the front, pressure from the rear (Bottom) moves the shuttle up and the end of it is supposed to touch the nub on the switch. This is also supposed to block flow of fluid from the side with the leak. That was the rumor anyway.

ADA82A9D-56E1-4594-B575-D7AE97D7B69E.jpeg

The screwdriver points to the switch.

55EF3EAB-D102-43BF-9F16-E4063C21D7A8.jpeg


This is a shuttle from a "proportioning valve". The 4 wheel drum distribution block is supposed to have a similar shuttle inside.

83188C89-12BD-4363-99E0-669CA9661386.jpeg


My suspicion is that the shuttle in this car now could be gunked up and stuck partially blocking flow to the rear.
I took a spare apart.

866B98B2-8A56-4006-AADC-7ADE9D55F8DF.jpeg


You can see the brass shaft in the middle. I can’t get this one to move or come out. I’ll have to soak it in something to dissolve the gunk.
It is because of this that I suspect a flow restriction to the rear. The pressure test should provide some insight.
 
Last edited:
Greg, have a look at the flare seats in the block. Make sure they aren't indented from the flare nuts as you may get leaks there. I was going to reuse the block on my car until I saw that. Will get a new one when its plumbing time.
 
Greg, have a look at the flare seats in the block. Make sure they aren't indented from the flare nuts as you may get leaks there. I was going to reuse the block on my car until I saw that. Will get a new one when its plumbing time.
You should probably start a post asking about how the new valves have been working for people... Cause there are plenty of "issues"....
 
The Doc said to just use the drum/drum unit which is what was on it even though the PO did a disc conversion many years ago. I have the same package Greg has for the brakes. All of the info on the treads are giving me more info to use when the time comes. Like your suggestion about the gauges.
 
On Thursday, I stopped by a hydraulic shop and ordered some fittings to plumb the system without the distribution block. I also ordered the brake pressure gauge.

4212D9DC-EEAE-43BA-BE48-8E2225F518CF.jpeg

02AA6157-7FEF-4315-9B28-587F591CAE3B.jpeg


Today I hooked it up and tested it.

Despite a small leak, the numbers did come in around 1250. The rear is getting adequate pressure. Why is the car so hard to skid then?
Are the caliper pistons stuck in the bores? Are these pads simply terrible?
More detective work ahead…
 
On Thursday, I stopped by a hydraulic shop and ordered some fittings to plumb the system without the distribution block. I also ordered the brake pressure gauge.

View attachment 1386123
View attachment 1386124

Today I hooked it up and tested it.

Despite a small leak, the numbers did come in around 1250. The rear is getting adequate pressure. Why is the car so hard to skid then?
Are the caliper pistons stuck in the bores? Are these pads simply terrible?
More detective work ahead…
The Mystery continues... But at least you have a better idea of where to look....
 
Since there is adequate pressure, that seems to rule out anything upstream. These are the calipers in the back:

98B9E140-0E53-4021-ADAE-D6E87636B5E6.jpeg

Yeah… insert your FORD jokes here!
These are the calipers in Dr Diffs 10.7 and 11.7” rear disc brake kit. I am not certain but I recall that they are supposed to be OEM for specific 1994-2001 Mustang models. I recall that these calipers have some weird internal piston design. I’ve read that they have to be “screwed” back into place when new pads are installed. I don’t understand how that works. Every other caliper I’ve seen just gets pressed back into the caliper body.
Am I to believe that when these are pressurized, the caliper piston rotates? If so, why aren’t there any grooves or scuffs on the back of the pads?
Anyway…. I suppose that there are high performance pads that would have more bite than these. I’ll have to look into those. I have to determine the exact model these brakes are from to get the correct pads.
 
I’m not a doctor, but I’ve watched a few shows, I think in medical terms what you have done is a kidney swap, but you didn’t make sure the donor was a match. now the body is rejecting the new kidney. :poke: :rofl:
 
Auto Transport Service
Back
Top