You are using an out of date browser. It may not display this or other websites correctly.
You should upgrade or use an alternative browser.
You should upgrade or use an alternative browser.
1966 Plymouth Satellite HP2
- Thread starter dadsbee
- Start date

- Local time
- 7:49 AM
- Joined
- Jan 29, 2018
- Messages
- 21,685
- Reaction score
- 69,018
- Location
- Midland Ontario, Canada
Just catching up on Friday's work while I sit here waiting for #1 Son to get out of surgery from having his thyroid removed. The unfortunate **** show part of parenthood, but hopefully pathology lets us all breath again by days end.
As I clean up the bottom of this car I continue to be amazed by it's original condition. Not something a guy from salt laden Ontario is use to seeing, that's for sure!

A bit of Krown onto the brake lines, that have little to no surface rust on the protective spiral wrap.

Cleaned the road grime off the torque boxes and the dip primer is still mint, just like the metal it's on.

Passenger torque box side has some "good" factory welding on it.

Drivers side parking brake cables and mint frame rails and some not so pretty factory welding on the torque box. What you get for a buck an hour! Guess I'd better get back under there and grab that piece of sock cotton I left hanging out of the hole....

As I clean up the bottom of this car I continue to be amazed by it's original condition. Not something a guy from salt laden Ontario is use to seeing, that's for sure!
A bit of Krown onto the brake lines, that have little to no surface rust on the protective spiral wrap.
Cleaned the road grime off the torque boxes and the dip primer is still mint, just like the metal it's on.
Passenger torque box side has some "good" factory welding on it.
Drivers side parking brake cables and mint frame rails and some not so pretty factory welding on the torque box. What you get for a buck an hour! Guess I'd better get back under there and grab that piece of sock cotton I left hanging out of the hole....
- Local time
- 7:49 AM
- Joined
- Jan 29, 2018
- Messages
- 21,685
- Reaction score
- 69,018
- Location
- Midland Ontario, Canada
Well we're still holding our breath as no sign or word from the Surgeon as of 9PM. He's in a great mood though, no IV hooked up, refused pain killers and ate a solid supper for the first time in months and then 20 timbits while we were there. He's in a great mood as evidenced by the nurses board. You'd think he was RC ffs... "How would you like to be addressed " = Your Excellence. "Preferred Language" = Pearl Fortan and/or Assembly. "What are your goals" = #1 World Dominance and #2 To date smart and hot ! I assume his gf add the two check marks.


- Local time
- 7:49 AM
- Joined
- Jan 29, 2018
- Messages
- 21,685
- Reaction score
- 69,018
- Location
- Midland Ontario, Canada
Son is home, but still no news on pathology. Brain not into much but swinging a hammer, so I did!
Really annoys me that someone took the time to buff the paint to 8000, but put dinged trim back on. The stuff is unobtainium for good replacements, but you could at least try to make it better.

Nice sharp dent in the passenger front that stands out like a sore thumb.

Grabbed some of my Father's old chisels and ground them to fit the trim shape.

A little tap here and another there while backed up with a heavy bucking bar.

And then a bit more serious with the shaped chisel in the vise and my favourite trim hammer.

Quick polish with rouge only and then back on the car.

One down, three to go. It's not perfect, but you can at least walk by the car without noticing the remains of the dent.

Drivers side is really pranged, but at least the anodizing isn't chipped.

Wood block and the 3lb brass hammer while still on the car.

Finally got to use my UPS account card, for paint protection!

Really annoys me that someone took the time to buff the paint to 8000, but put dinged trim back on. The stuff is unobtainium for good replacements, but you could at least try to make it better.
Nice sharp dent in the passenger front that stands out like a sore thumb.
Grabbed some of my Father's old chisels and ground them to fit the trim shape.
A little tap here and another there while backed up with a heavy bucking bar.
And then a bit more serious with the shaped chisel in the vise and my favourite trim hammer.
Quick polish with rouge only and then back on the car.
One down, three to go. It's not perfect, but you can at least walk by the car without noticing the remains of the dent.
Drivers side is really pranged, but at least the anodizing isn't chipped.
Wood block and the 3lb brass hammer while still on the car.
Finally got to use my UPS account card, for paint protection!
- Local time
- 7:49 AM
- Joined
- Jan 29, 2018
- Messages
- 21,685
- Reaction score
- 69,018
- Location
- Midland Ontario, Canada
Somewhat better and close to correct shape, now it comes off the car.

A few more taps here and there.

Polish and back on the car.

Rear drivers side someone tried to fix and poked it too much from the back side.

Nice proud "blister".

Ground a plastic file head to shape and gave it a few wacks.

Best she's gonna be.

Passenger side rear with a sharp ding as well.

Trim off for a few taps with the shaped chisels

Back on and we'll call that a win.

A few more taps here and there.
Polish and back on the car.
Rear drivers side someone tried to fix and poked it too much from the back side.
Nice proud "blister".
Ground a plastic file head to shape and gave it a few wacks.
Best she's gonna be.
Passenger side rear with a sharp ding as well.
Trim off for a few taps with the shaped chisels
Back on and we'll call that a win.
Been there. Done that. Looking good Wayne! Can't be in a rush when you tackle stuff like that.
Hope the young fella is doing Ok.
Hope the young fella is doing Ok.
- Local time
- 7:49 AM
- Joined
- May 14, 2011
- Messages
- 18,949
- Reaction score
- 38,258
- Location
- On the Ridge, TN
All the best wishes for your son!Just catching up on Friday's work while I sit here waiting for #1 Son to get out of surgery from having his thyroid removed. The unfortunate **** show part of parenthood, but hopefully pathology lets us all breath again by days end.
They took my thyroid in 2017 (cancer #4 of what's wound up to be 6 so far) and I literally woke up from
the surgery like I'd been shot out of a cannon.
Didn't sleep for the next 36 hours straight - and I walked around the hospital campus all night and into the
next morning, when I announced I was going home - which I did.
")
What they don't tell you about the meds you take in "place" of the thyroid aren't capable of doing everything
it did - it's a very complex little critter, turns out.
They'll adjust and adjust, chasing this test number or that - but it'll not be the same again ever.
(My wife has seen me go through absolute hell and even she says the thyroid surgery made the most difference
in me - and she's right).
Still....it beats the alternative.

- Local time
- 7:49 AM
- Joined
- Jan 29, 2018
- Messages
- 21,685
- Reaction score
- 69,018
- Location
- Midland Ontario, Canada
I hate doing anodized as you can't really finish the job unless you destroy the coating and polish bare aluminum. Stainless you just pound it proud, grind, file, sand and polish to perfection. On this stuff I didn't want to bust or chip the coating so got it as close as I dared so you can at least walk by the car with out it calling out hey you !Been there. Done that.
No they certainly don't Wayne, They all look good. I just do the stainless. Pretty forgiving.
- Local time
- 7:49 AM
- Joined
- Jan 29, 2018
- Messages
- 21,685
- Reaction score
- 69,018
- Location
- Midland Ontario, Canada
Top of window and vent frame too far in, only one way to tackle that.

Off with the handle and hardware .

Nothing like cracking a Virgin door on a Thursday afternoon.

Nobody has been in here since a Chrysler worker closed it up 57 years ago.

First guy to tear the factory paper tape.

Crank handle hole with three clearance cuts in the vapor barrier.

Vent frame glass track has an adjustment fitting near the bottom. Unlike a 68/69/70 that has a "foot" on a peg that can be adjusted through a hole in the bottom of the door.

Peeled carefully just enough to make adjustments. Also note the vapor barrier is glued vs draft seal caulk as used on newer cars.

Factory paper tape is 3" wide.

Glass rear guide track lower adjustment fitting. On 68/69/70 this is accessible through a hole in the rear face of the door.

Off with the handle and hardware .
Nothing like cracking a Virgin door on a Thursday afternoon.
Nobody has been in here since a Chrysler worker closed it up 57 years ago.
First guy to tear the factory paper tape.
Crank handle hole with three clearance cuts in the vapor barrier.
Vent frame glass track has an adjustment fitting near the bottom. Unlike a 68/69/70 that has a "foot" on a peg that can be adjusted through a hole in the bottom of the door.
Peeled carefully just enough to make adjustments. Also note the vapor barrier is glued vs draft seal caulk as used on newer cars.
Factory paper tape is 3" wide.
Glass rear guide track lower adjustment fitting. On 68/69/70 this is accessible through a hole in the rear face of the door.
- Local time
- 7:49 AM
- Joined
- Jan 29, 2018
- Messages
- 21,685
- Reaction score
- 69,018
- Location
- Midland Ontario, Canada
Vent frame retained/adjusted similar to 68/69/70 with a bolt and nut accessible by removing plastic plugs, but has a Phillips screw vs a hidden Allen head screw at the vent post to door clamping area.

Vent frame and rear edge glass channel fully inboard at their lower adjustments and we have a good fit. Prior to this the top of the glass was hitting the seal when the top of the door still had an inch to go when closing.

I also tipped the vent frame back a bit while adjusting to get a nice even gap and the door glass parallel to the roof rail at the same time.

Plastic vapor barrier back into place.

Upper stainless trim is ON the door card vs screwed to the door like newer 68 up cars.

Trim just a friction fit.

Purdy nice for it's age.

Paper tape I got when doing the vapour barriers on the Bee.

Identical to factory, but unfortunately only 2" wide vs the 3" that was used on this car.

Next guy will know he wasn't her first. Need to touch up the paint on the door as well.

Vent frame and rear edge glass channel fully inboard at their lower adjustments and we have a good fit. Prior to this the top of the glass was hitting the seal when the top of the door still had an inch to go when closing.
I also tipped the vent frame back a bit while adjusting to get a nice even gap and the door glass parallel to the roof rail at the same time.
Plastic vapor barrier back into place.
Upper stainless trim is ON the door card vs screwed to the door like newer 68 up cars.
Trim just a friction fit.
Purdy nice for it's age.
Paper tape I got when doing the vapour barriers on the Bee.
Identical to factory, but unfortunately only 2" wide vs the 3" that was used on this car.
Next guy will know he wasn't her first. Need to touch up the paint on the door as well.
Last edited:
- Local time
- 7:49 AM
- Joined
- Jan 29, 2018
- Messages
- 21,685
- Reaction score
- 69,018
- Location
- Midland Ontario, Canada
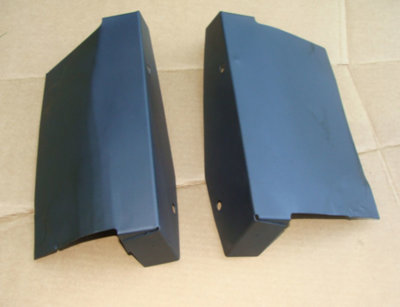
New pair of K frame splash shield for installation. Originals removed at some point in time. $105 Cdn + tax.

Got the last OE style console boot that National Moparts had with the moulded in steel frame, not two separate pieces as all will be from here on out. $205 Cdn + tax...

New seal that goes from the air dam/rock shield to the front bumper. Another item removed from the car at some point, but I have a mint replacement in transit from New York State.

Door paint damage from the door card's upper stainless trim being left loose, for some time apparently.

Lower paint missing from kicking the door open. All prepped and ready to paint.

Quick shots of gloss black spray, three coats in all.

While the paint is drying. Scubbing bubbles for showers is on the job.

Gave the stainless a quick run through the buffer wheel.

Door cards are so clean I almost thought they were reproductions. Have never seen one this mint with all of it's retainer clips.

2656453 P is the OE part #. Suspect W K is the suppliers initials

Got the last OE style console boot that National Moparts had with the moulded in steel frame, not two separate pieces as all will be from here on out. $205 Cdn + tax...
New seal that goes from the air dam/rock shield to the front bumper. Another item removed from the car at some point, but I have a mint replacement in transit from New York State.
Door paint damage from the door card's upper stainless trim being left loose, for some time apparently.
Lower paint missing from kicking the door open. All prepped and ready to paint.
Quick shots of gloss black spray, three coats in all.
While the paint is drying. Scubbing bubbles for showers is on the job.
Gave the stainless a quick run through the buffer wheel.
Door cards are so clean I almost thought they were reproductions. Have never seen one this mint with all of it's retainer clips.
2656453 P is the OE part #. Suspect W K is the suppliers initials
- Local time
- 7:49 AM
- Joined
- Jan 29, 2018
- Messages
- 21,685
- Reaction score
- 69,018
- Location
- Midland Ontario, Canada
Door touch up paint ready for tape peel.

Came out pretty nice.

Nigel shipped me the wrong $200 lower shifter boot. This is Hurst only, even after I made him verify that the upper console boot would fit an Inland shifter handle and he dug one out of his mess at home to check it out. Correct one is on it's way Canpar for Monday or Tuesday delivery. Unfortunately he wants this one back..

Original upper console boot with it's cracks. Not bad for it's age..

Not looking forward to changing out the shifter boots. Apparently the lower Inland boot I have to disassembly the shifter mechanism and then put it back together in the boot.

At least when someone removed the K frame splash shields they put the attachment bolts back in the frame rails.

Same with the front air dam/rock shield. Clip nuts and bolts back in the radiator support, just no air dam.

Bolts for each end of the air dam/rock shield also in place ready to use. Just need the air dam that's on it's way USPS.

Original "anchor" head self tap bolts with washer-ed heads that retain the splash shields. I cleaned them up and dipped in Boeshield T9.

Splash shields both bolted to frame rails. Still can't decide if the plastic straight with the frame rail is correct, or the "curtain" parallel to the strut bar as shown.

Came out pretty nice.
Nigel shipped me the wrong $200 lower shifter boot. This is Hurst only, even after I made him verify that the upper console boot would fit an Inland shifter handle and he dug one out of his mess at home to check it out. Correct one is on it's way Canpar for Monday or Tuesday delivery. Unfortunately he wants this one back..
Original upper console boot with it's cracks. Not bad for it's age..
Not looking forward to changing out the shifter boots. Apparently the lower Inland boot I have to disassembly the shifter mechanism and then put it back together in the boot.
At least when someone removed the K frame splash shields they put the attachment bolts back in the frame rails.
Same with the front air dam/rock shield. Clip nuts and bolts back in the radiator support, just no air dam.
Bolts for each end of the air dam/rock shield also in place ready to use. Just need the air dam that's on it's way USPS.
Original "anchor" head self tap bolts with washer-ed heads that retain the splash shields. I cleaned them up and dipped in Boeshield T9.
Splash shields both bolted to frame rails. Still can't decide if the plastic straight with the frame rail is correct, or the "curtain" parallel to the strut bar as shown.
Last edited:
I hate to tell you, but your ''66 should have the early metal shields ............
 www.forbbodiesonly.com
FOR SALE - 66-67 B body STEEL K frame splash shields $50 pair
This is a hard part to find! It is a set of the sheet metal k frame splash shields that came stock on a 66 and some 67 B bodies. (after those years, this part was replaced by the much more common plastic splash shields)These are NOT perfect. The corners were bent and I hammered them out (leaving...
- Local time
- 7:49 AM
- Joined
- Jan 29, 2018
- Messages
- 21,685
- Reaction score
- 69,018
- Location
- Midland Ontario, Canada
Well now you tell me! I guess National Moparts is the only one that lists correctly as 67 up... as everyone else lists 66 up and I figured NM was wrong. Now is that $105 wasted or do I need to find another car in need.....
Last edited:
Well now you tell me! I guess National Moparts is the only one that lists correctly as 67 up... as everyone else lists 66 up and I figured NM was wrong. Now is that $105 wasted or do I need to find another car on need.....
Which means that you really need to check with on everything. Consider me as your southern lifeline.

- Local time
- 7:49 AM
- Joined
- Jan 29, 2018
- Messages
- 21,685
- Reaction score
- 69,018
- Location
- Midland Ontario, Canada
You using yours for anything....Which means that you really need to check with on everything. Consider me as your southern lifeline.
Big bill
Well-Known Member
I may have some I will check.
Similar threads
- Replies
- 0
- Views
- 455
- Replies
- 5
- Views
- 2K


