You are using an out of date browser. It may not display this or other websites correctly.
You should upgrade or use an alternative browser.
You should upgrade or use an alternative browser.
80 Grit!
- Thread starter Grabinov911
- Start date
HEMIVISION
Active Member
I have done 1 frame off rotissertie restoration..and fixed up many more..the last one I fixed up I stipped all the paint off..but welded all the patches (there was only a few) Texas car and hand blocked everything..When it was done most people thoguht I did a frame off..however if you looked underneath it wasn't shiny..the purpose of this car (1971 442 rag) was to drive me and my kids around..The frame off restored car I was paranoid about, it raining, stones, people in general being around it..this is my hang up but all that work and cash sitting there makes me that way..so for the most part I will use nice rust free southern stuff and make really nice drivers..
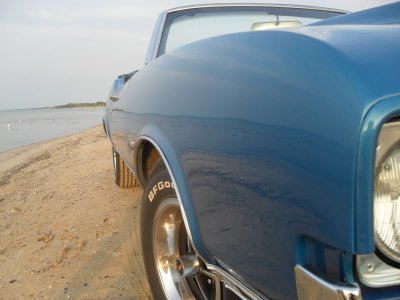
- - - Updated - - -
This was of course "just fixed up" good results can be had that way..non mopar but I still love it..

- - - Updated - - -
This was of course "just fixed up" good results can be had that way..non mopar but I still love it..
Last edited:
Grabinov911
Well-Known Member
Sweet ride for the Silver State...any vids coming soon. :headbang:
Yeah. Silver State is still on my mind. At the moment I'm doing 3,000RPM at 63MPH with this new trans. Supposedly it's a very efficient converter (6% slip at constant load), so I'm guessing that's roughly what a lockup converter would be turning. It's the 3 speeds that's makin' it tough. A .78 overdrive (Gear Vendor) would put me at 2,340RPM at the same speed, or 3,700 at 100MPH. That's do-able... Going back to the 3.23 rear end (from the 3.55) would give me another 10% decrease in RPM.
Hmmm... I've never done a video. Gonna need to try that - maybe a camera on the fender or something like that. Lemme think up a road course where I won't get arrested...
Grabinov911
Well-Known Member
Interior
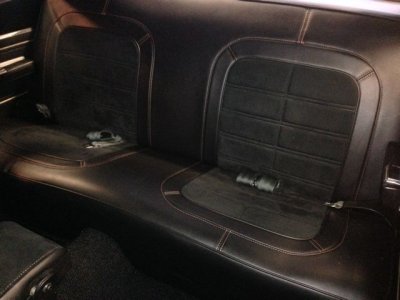
Been a while since the last update, but been busy on a few things. I have finally given up and decided to do the interior (in anticipation of the new gauges coming from Dakota Digital - still on back order due to delays in production). I've put this off for a long time because I can't do any of it myself. It's not exactly a project writing a check. Nonetheless, it needed to be done. I found a guy through a guy. The photos of the cars he's done are unbelievable. One of the first things he pointed out: the interior that was in the car as long as I've had it was not stock upholstery. It must have been redone sometime. I had had my suspicions about it in the past. As soon as he started to point out the little details - misaligned welts, curved stitching, it was easy to tell he was right.
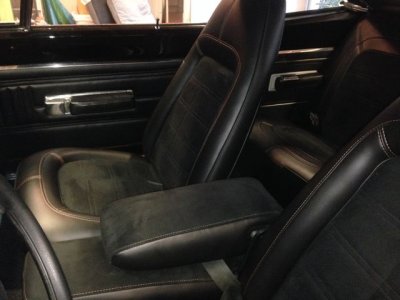
I've gone back and forth again and again about sticking to perfect original versus making tasteful (to me) changes. But hey. "It's my car" so I've continued down the "tasteful mods" path. Take a look at my choices for the seat upholstery and tell me what you think. To me, it's a little more modern, with a little more flash, but still pretty true to stock. I used seat foam which I got Year One - for $100.00 in shipping - and it turned out to be manufactured by that company (PLC or something like that?) that folks seem to have doubts about. The upholstery guy liked it.
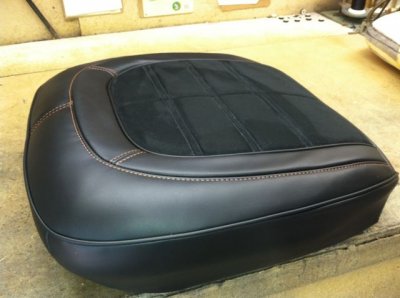
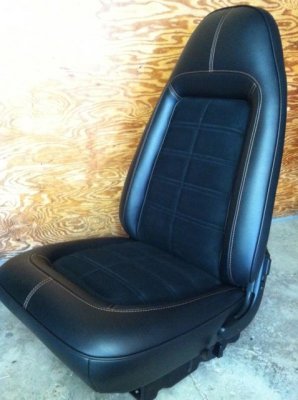
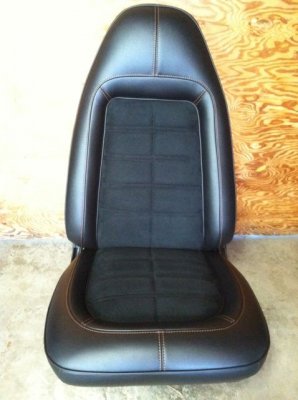
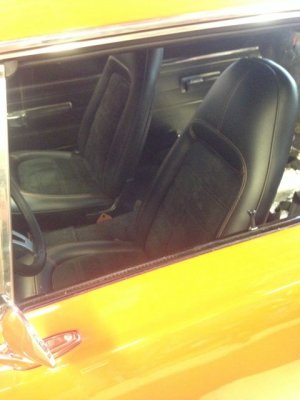
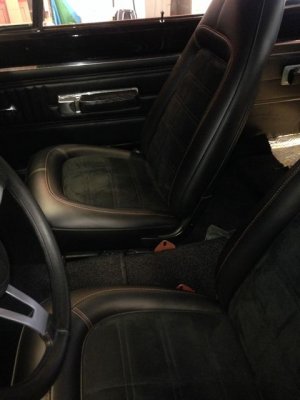
The car is EV2 (Tor Red / Hemi Orange) so the stitch is orange around the perimeter of the seat. The center section is suede to help hold the driver still a little better than the stock vinyl. Believe it or not, the main body of the seat is vinyl - though it looks just like leather, both in person and in the pics. I tried to take a pic with the exterior of the car showing, but it's nearly impossible to avoid the glare. The interior pic shows pretty well... You can see in the photos that I don't have the rear bench seat or the center "buddy seat" back yet.
BTW he covered the package tray in the rear window in the same vinyl (with STP sound material on the back) and it looks spectacular. It really looks good in this car where the tray is so visible through the giant back window. It helps show how the curve in the package tray matches the curve of the window. Sexy...
Been a while since the last update, but been busy on a few things. I have finally given up and decided to do the interior (in anticipation of the new gauges coming from Dakota Digital - still on back order due to delays in production). I've put this off for a long time because I can't do any of it myself. It's not exactly a project writing a check. Nonetheless, it needed to be done. I found a guy through a guy. The photos of the cars he's done are unbelievable. One of the first things he pointed out: the interior that was in the car as long as I've had it was not stock upholstery. It must have been redone sometime. I had had my suspicions about it in the past. As soon as he started to point out the little details - misaligned welts, curved stitching, it was easy to tell he was right.
I've gone back and forth again and again about sticking to perfect original versus making tasteful (to me) changes. But hey. "It's my car" so I've continued down the "tasteful mods" path. Take a look at my choices for the seat upholstery and tell me what you think. To me, it's a little more modern, with a little more flash, but still pretty true to stock. I used seat foam which I got Year One - for $100.00 in shipping - and it turned out to be manufactured by that company (PLC or something like that?) that folks seem to have doubts about. The upholstery guy liked it.


The car is EV2 (Tor Red / Hemi Orange) so the stitch is orange around the perimeter of the seat. The center section is suede to help hold the driver still a little better than the stock vinyl. Believe it or not, the main body of the seat is vinyl - though it looks just like leather, both in person and in the pics. I tried to take a pic with the exterior of the car showing, but it's nearly impossible to avoid the glare. The interior pic shows pretty well... You can see in the photos that I don't have the rear bench seat or the center "buddy seat" back yet.
BTW he covered the package tray in the rear window in the same vinyl (with STP sound material on the back) and it looks spectacular. It really looks good in this car where the tray is so visible through the giant back window. It helps show how the curve in the package tray matches the curve of the window. Sexy...
Grabinov911
Well-Known Member
Grabinov911
Well-Known Member
HA!
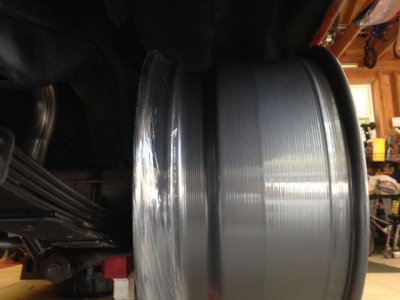
Ha! After 5 months of waiting, the new wheels are finally done. 18x8 on the front and 18x10 on the rear. After 3 years of invisible mods (chassis, suspension, engine, dashboard) to create a road racer, this is the first REALLY visible change in the look of the car. Can't wait to see what they look like on the car. Pics tomorrow hopefully!
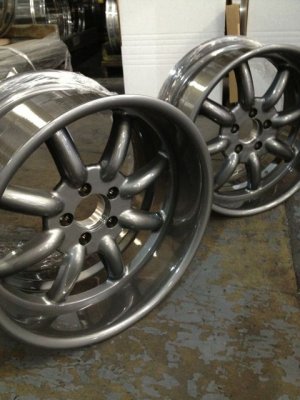
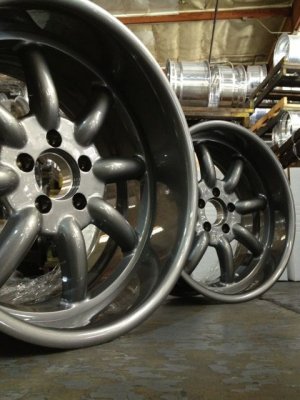
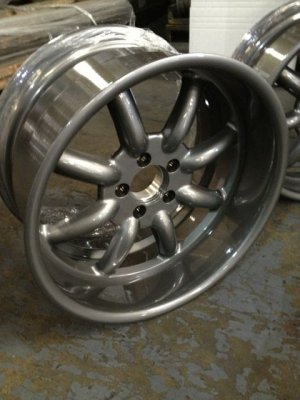
Ha! After 5 months of waiting, the new wheels are finally done. 18x8 on the front and 18x10 on the rear. After 3 years of invisible mods (chassis, suspension, engine, dashboard) to create a road racer, this is the first REALLY visible change in the look of the car. Can't wait to see what they look like on the car. Pics tomorrow hopefully!


gdrill
Just enjoying "B"-ing here
- Local time
- 6:12 AM
- Joined
- May 29, 2013
- Messages
- 6,719
- Reaction score
- 13,749
Those seats look great. I love the idea of the suede and the stitching stands out nicely. Well done.
Grabinov911
Well-Known Member
Tires
That's a good question. I read a Hot Rod article where they did a tire test on a 1970 4-Door Satellite - the Autocross Taxi. Pretty sweet car. The used 275/35/18's on a four wheels and their favorite tire was the Dunlop Direzza ZII. The tire sounds great. the problem is that a 275/35/18 is 25.6" high compared to the 275/60/15 I'm running now. That means an 8.6% decrease in circumference/diameter, or an 8.6% increase in RPM. That's not exactly what I'm looking for given that I live in CA and need to do 70+ on the highway to keep from getting run over. They sell a 285/30/18, but that's worse.
I am looking at the Continental Extreme Contact DW in 285/40/18, which is only 3.6% smaller than my existing tires. I could go even wider in the rear, but since I'm looking for even handling, I don't want to go big in the back and little in the front. The car would just understeer terribly.
I also don't really want to put 285's on all four corners like they did in the Hot Rod tire test, or I'll loose a lot of steering lock - the tires will rub too much on the inside. the Conti offers a 255/45/18 for the front which I think will be pretty good with the 285s in the back.
The Continental Extreme Contact DW has good reviews on Tire Rack and is built for big heavy German road cars - Mercedes, Audi, etc. I'm thinking that means quiet ride, good high speed performance, relatively stiff sidewall, and comfortable performance on heavy, understeering cars.
Thoughts?
Nice looking wheels what rubber is going on.
That's a good question. I read a Hot Rod article where they did a tire test on a 1970 4-Door Satellite - the Autocross Taxi. Pretty sweet car. The used 275/35/18's on a four wheels and their favorite tire was the Dunlop Direzza ZII. The tire sounds great. the problem is that a 275/35/18 is 25.6" high compared to the 275/60/15 I'm running now. That means an 8.6% decrease in circumference/diameter, or an 8.6% increase in RPM. That's not exactly what I'm looking for given that I live in CA and need to do 70+ on the highway to keep from getting run over. They sell a 285/30/18, but that's worse.
I am looking at the Continental Extreme Contact DW in 285/40/18, which is only 3.6% smaller than my existing tires. I could go even wider in the rear, but since I'm looking for even handling, I don't want to go big in the back and little in the front. The car would just understeer terribly.
I also don't really want to put 285's on all four corners like they did in the Hot Rod tire test, or I'll loose a lot of steering lock - the tires will rub too much on the inside. the Conti offers a 255/45/18 for the front which I think will be pretty good with the 285s in the back.
The Continental Extreme Contact DW has good reviews on Tire Rack and is built for big heavy German road cars - Mercedes, Audi, etc. I'm thinking that means quiet ride, good high speed performance, relatively stiff sidewall, and comfortable performance on heavy, understeering cars.
Thoughts?
Grabinov911
Well-Known Member
Wheels
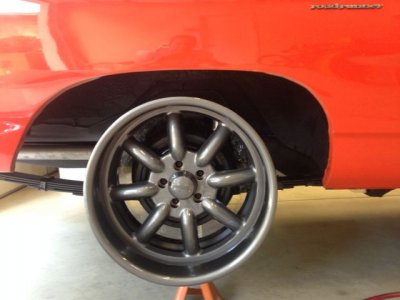
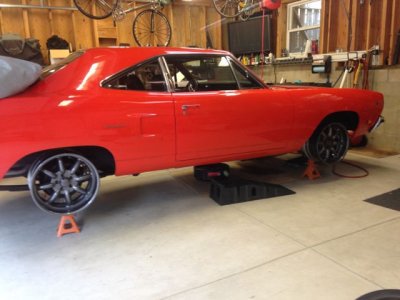
On the car. For anyone wondering about fitment, these are 18x10 w 5" backspace in the rear and 18x8 with 4" backspace in the front. Appears to be perfect. I have ordered 285/40/18's for the rear and 255/45/18's for the front. Interestingly, the tires on the car today are 2.5" taller in the rear than in the front (275/60/15; 225/60/15), or the radius is 1.25" larger in back. That means the rake on the car (from the tires at least) is 1.25". The new tires are both 27" high, front and rear. So the rake on the car will decrease by that 1.25". In fact, the back will come down by half an inch and the front will come up by three-quarters of an inch.
We'll see what that looks like. It will at least help to offset the extra rake caused by the new rear springs I installed, which, I think, put the back too high. If I can get the car closer to level and KEEP the spring arch in the rear, that's the ideal solution. The car is lowered 2" in front using Magnum Force dropped spindles.
BTW I learned (long after ordering them) that this is the first set of Bonspeed Race-Lites ever produced.
Oh and I figured out what was going on with my transmission - hellacious 2/3 shift overlap - enough to throw you against the seatbelt. Scary, and no fun at all. I backed off the front band by one turn. We'll see if that fixes it.
On the car. For anyone wondering about fitment, these are 18x10 w 5" backspace in the rear and 18x8 with 4" backspace in the front. Appears to be perfect. I have ordered 285/40/18's for the rear and 255/45/18's for the front. Interestingly, the tires on the car today are 2.5" taller in the rear than in the front (275/60/15; 225/60/15), or the radius is 1.25" larger in back. That means the rake on the car (from the tires at least) is 1.25". The new tires are both 27" high, front and rear. So the rake on the car will decrease by that 1.25". In fact, the back will come down by half an inch and the front will come up by three-quarters of an inch.
We'll see what that looks like. It will at least help to offset the extra rake caused by the new rear springs I installed, which, I think, put the back too high. If I can get the car closer to level and KEEP the spring arch in the rear, that's the ideal solution. The car is lowered 2" in front using Magnum Force dropped spindles.
BTW I learned (long after ordering them) that this is the first set of Bonspeed Race-Lites ever produced.


Oh and I figured out what was going on with my transmission - hellacious 2/3 shift overlap - enough to throw you against the seatbelt. Scary, and no fun at all. I backed off the front band by one turn. We'll see if that fixes it.
Boise68
Well-Known Member
The mounted Bonspeeds are killer. My 18's are similarly backspaced front and rear and have no issues after 4,000 miles. I too went with same diameter tires front and rear but with 245/45's & 275/40's. On a whim I tried the 275/40's on the front to test for same on all fours, no rubbing after a couple fast laps around the neighborhood(private road).:icon_smile: When I wear these tires out I may go to same tire on all fours.
Grabinov911
Well-Known Member
And Tires...
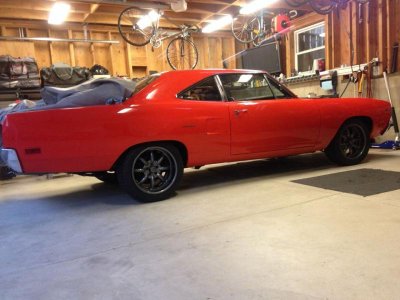
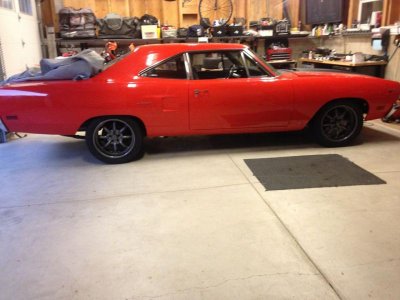
New wheels and tires. Waited 6 months for the wheels, and 4 days for the tires - but I suppose the tires weren't custom made were they...
Sorry the pix aren't so great. Need to get out in the sun.
Now I need to get lower again as I accidentally added 2 inches of rear height by replacing my rear leaf springs with new ones from Firm Feel. I'm not quite low enough for the road racing feel I'm looking for. I think I am going to try a 2 inch lowering block to see what I get. That should put me back to level, and where I was before the new rear spring fiasco. I may go a little lower in front then, but gotta watch the steep-driveway issue. Put some tracks in it last time I got the car too low...
Whaddya think?


morrow_jacob
Well-Known Member
That looks fantastic, nice work, thanks for the great thread.
Grabinov911
Well-Known Member
Cooling...
Well I finally got to my cooling project. The Summer pretty much sealed the deal. Global Armageddon (Warming, Cooling, Flooding, etc.) has lead to the hottest year in recent memory in good old SoCal. October 10 and it's still 95 degrees, and that's down from 102 last week! I had two projects to contend with: The first was getting the factory AC working for the first time since I've owned the car. I already had a modern compressor installed on the engine as I was unable to complete the pulley setup without one. I put that on when the engine was installed more than a year ago, but I hadn't messed with the rest of the system until recently.
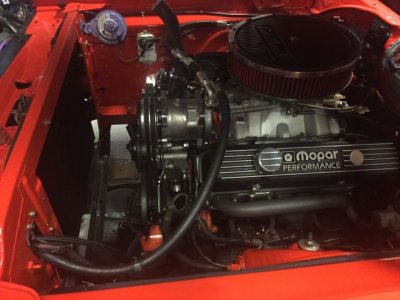
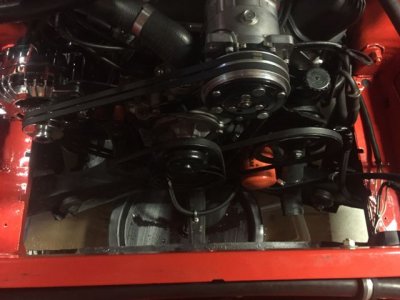
I messed around with the interior switches and wiring in order to get the compressor clutch actuator and fan functioning, but that was about the, limit of my expertise with air conditioning systems. I gave up and took the car to a local shop that specializes in AC and had them complete the project. Either way, I new that I'd need custom hoses and a fill with R134, so the car would have had to go in sometime. They ended up ordering me a new condenser and drier and setting up the engine compartment side of the system for me. Inside I simply set the air control doors on the Heating/AC box in the AC position and left the levers alone. I do not have the complex vacuum control system hooked up, as my engine pulls very little vacuum in the first place and, well, I don't really need anything but AC! Overall the system is reasonably clean (for a Road Racing Engine with air conditioning). Most of the components are in the stock locations but for the Sanden compressor.
I drove the car for about a week with the new AC running, and I'd say it works reasonably well. I know some guys talk about "ice cubes" coming out of the dash and all... I wouldn't claim to have THAT problem, but it's much cooler in the car than before - tolerable in the summer after the car has been outside in the sun for a bit... BUT, the engine WAS running hotter than before. I guess fair is fair: it's a 493 cubic inch motor with 10.5 to 1 compression and running AC and pump gas on a 102 degree day! Kinda figured this might happen. I was running a stock (but reconditioned) 26" Mopar radiator with a Flex Fan and a 160 degree thermostat. The car would generally run around 180 (on my Dakota Digital gauge) but would push to as high as 211 with the AC on in the sun - before I shut it off to cool down. This is with the AC on, a big Mopar AC condenser AND a trans cooler in front of the radiator.
As I said, I kinda figured I'd be looking for a radiator and had done some research. I finally settled on a Wizard Cooling radiator and, after a really good discussion with Scott at Wizard, also settled on one of their shrouds rather than an all-electric system. I can't say enough about the customer service there. Every time I called, someone picked up the phone, and most of the time I could get Scott - and he remembered me and my project. I know there are cheaper solutions, but they probably don't look like this:
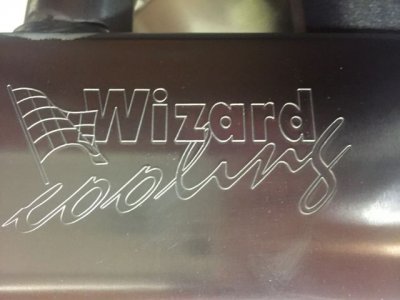
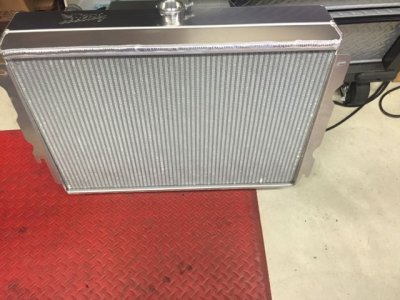
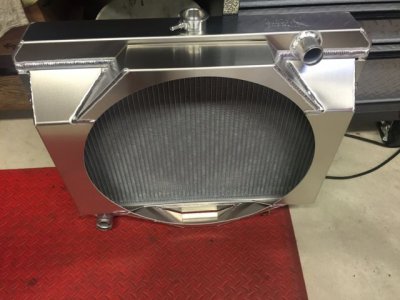
All in all the radiator and shroud look to be of very high quality, and are clearly hand built - in a good way. The welds are beautiful.
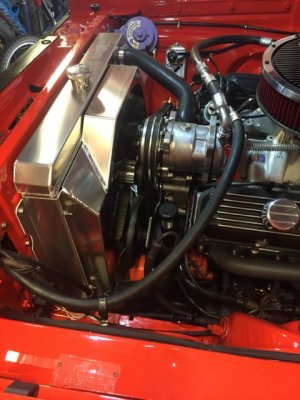
I was actually shocked at how well the radiator fit in the stock location. Lots of companies SAY that their parts are a direct replacement for the factory parts, but this one required literally not the slightest mounting modification. Again, granted, it's only four bolts, but the hoses line up and the whole thing FITS! The shroud is a good fit as well, but could have used just ONE little instruction (none are provided). You'll see above in the picture of the radiator on the floor with the shroud mounted that there is, across the bottom inside of the fan opening, a small 1/2" by 12" piece of 1/16 aluminum "bar" across the opening. There is another at the top not visible in the picture. It turns out that these are added during the welding process to keep everything true as the shroud heats and cools, but they are not needed once the part is mounted to the radiator. With them in place, they just barely interfere with the fan. I discovered this after I had everything together - but before I tried to turn over the motor - good thing I guess! Everything was MUCH easier once they were removed.
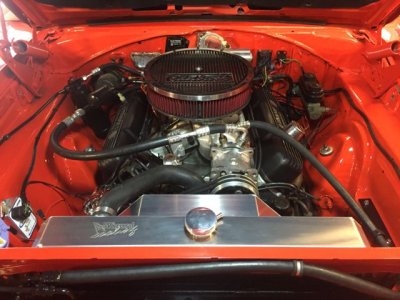
Luckily I hadn't filled the cooling system yet as in my case I actually had to remove the radiator to get the shroud back off. The fan bolts which hold the fan, spacer and water pump pulley on are so close to the radiator that I just couldn't get the fan on last (or off first) as you would normally. If I have to take the system apart again I'll give those bolts another shot, but I just couldn't get my hand in there in the right position to mount the fan with the shroud and radiator already in place, even with the shroud "hung" back over the pulleys. Now that I think about it, maybe it WILL work now that those un-needed shroud supports are cut out...
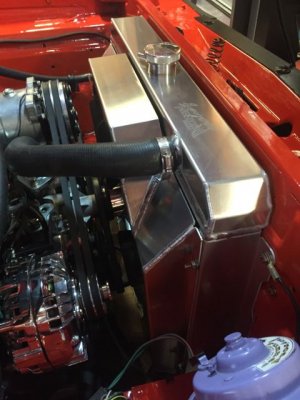
My car is an automatic so I purchased the radiator with the transmission cooler at the bottom. One thing to note about this cooler is that the fittings are 1/4 NPT rather than the 1/8 NPT size used by the factory. Some time ago when I added an external transmission cooler I switched from the factory steel trans cooler lines to #6 hoses and fittings so, as pointed out by the guys at Wizard, my factory radiator with its 1/8 NPT fittings was probably actually something of a restriction to fluid flow through the coolers. With the 1/4 NPT fittings and the larger lines inside of the Wizard radiator I'm hoping to see better trans fluid flow and better trans cooling as well.
I started the car to check for leaks and watched for the radiator fluid start moving as the water temp climbed to 160 degrees. Everything looks good. Hoping to go for a test drive this evening. Sorta starting to look like a race car. Except for the Air Conditioning!
Well I finally got to my cooling project. The Summer pretty much sealed the deal. Global Armageddon (Warming, Cooling, Flooding, etc.) has lead to the hottest year in recent memory in good old SoCal. October 10 and it's still 95 degrees, and that's down from 102 last week! I had two projects to contend with: The first was getting the factory AC working for the first time since I've owned the car. I already had a modern compressor installed on the engine as I was unable to complete the pulley setup without one. I put that on when the engine was installed more than a year ago, but I hadn't messed with the rest of the system until recently.


I messed around with the interior switches and wiring in order to get the compressor clutch actuator and fan functioning, but that was about the, limit of my expertise with air conditioning systems. I gave up and took the car to a local shop that specializes in AC and had them complete the project. Either way, I new that I'd need custom hoses and a fill with R134, so the car would have had to go in sometime. They ended up ordering me a new condenser and drier and setting up the engine compartment side of the system for me. Inside I simply set the air control doors on the Heating/AC box in the AC position and left the levers alone. I do not have the complex vacuum control system hooked up, as my engine pulls very little vacuum in the first place and, well, I don't really need anything but AC! Overall the system is reasonably clean (for a Road Racing Engine with air conditioning). Most of the components are in the stock locations but for the Sanden compressor.
I drove the car for about a week with the new AC running, and I'd say it works reasonably well. I know some guys talk about "ice cubes" coming out of the dash and all... I wouldn't claim to have THAT problem, but it's much cooler in the car than before - tolerable in the summer after the car has been outside in the sun for a bit... BUT, the engine WAS running hotter than before. I guess fair is fair: it's a 493 cubic inch motor with 10.5 to 1 compression and running AC and pump gas on a 102 degree day! Kinda figured this might happen. I was running a stock (but reconditioned) 26" Mopar radiator with a Flex Fan and a 160 degree thermostat. The car would generally run around 180 (on my Dakota Digital gauge) but would push to as high as 211 with the AC on in the sun - before I shut it off to cool down. This is with the AC on, a big Mopar AC condenser AND a trans cooler in front of the radiator.
As I said, I kinda figured I'd be looking for a radiator and had done some research. I finally settled on a Wizard Cooling radiator and, after a really good discussion with Scott at Wizard, also settled on one of their shrouds rather than an all-electric system. I can't say enough about the customer service there. Every time I called, someone picked up the phone, and most of the time I could get Scott - and he remembered me and my project. I know there are cheaper solutions, but they probably don't look like this:


All in all the radiator and shroud look to be of very high quality, and are clearly hand built - in a good way. The welds are beautiful.

I was actually shocked at how well the radiator fit in the stock location. Lots of companies SAY that their parts are a direct replacement for the factory parts, but this one required literally not the slightest mounting modification. Again, granted, it's only four bolts, but the hoses line up and the whole thing FITS! The shroud is a good fit as well, but could have used just ONE little instruction (none are provided). You'll see above in the picture of the radiator on the floor with the shroud mounted that there is, across the bottom inside of the fan opening, a small 1/2" by 12" piece of 1/16 aluminum "bar" across the opening. There is another at the top not visible in the picture. It turns out that these are added during the welding process to keep everything true as the shroud heats and cools, but they are not needed once the part is mounted to the radiator. With them in place, they just barely interfere with the fan. I discovered this after I had everything together - but before I tried to turn over the motor - good thing I guess! Everything was MUCH easier once they were removed.

Luckily I hadn't filled the cooling system yet as in my case I actually had to remove the radiator to get the shroud back off. The fan bolts which hold the fan, spacer and water pump pulley on are so close to the radiator that I just couldn't get the fan on last (or off first) as you would normally. If I have to take the system apart again I'll give those bolts another shot, but I just couldn't get my hand in there in the right position to mount the fan with the shroud and radiator already in place, even with the shroud "hung" back over the pulleys. Now that I think about it, maybe it WILL work now that those un-needed shroud supports are cut out...

My car is an automatic so I purchased the radiator with the transmission cooler at the bottom. One thing to note about this cooler is that the fittings are 1/4 NPT rather than the 1/8 NPT size used by the factory. Some time ago when I added an external transmission cooler I switched from the factory steel trans cooler lines to #6 hoses and fittings so, as pointed out by the guys at Wizard, my factory radiator with its 1/8 NPT fittings was probably actually something of a restriction to fluid flow through the coolers. With the 1/4 NPT fittings and the larger lines inside of the Wizard radiator I'm hoping to see better trans fluid flow and better trans cooling as well.
I started the car to check for leaks and watched for the radiator fluid start moving as the water temp climbed to 160 degrees. Everything looks good. Hoping to go for a test drive this evening. Sorta starting to look like a race car. Except for the Air Conditioning!
- Local time
- 8:12 AM
- Joined
- Jan 23, 2009
- Messages
- 6,767
- Reaction score
- 5,636
- Location
- New Jersey The State of Tax Theives
I really enjoyed watching this project!
bkleenfltx
Well-Known Member
that car is fairly PERFECT! Love the wheel style...
Radiator and cooling look great! So many people overlook the shroud aspect, and the shroud is one of the most important parts. Your setup looks great and I'm sure the car will run good and cool. Nice project!
Grabinov911
Well-Known Member
Hah!
Hah! Sitting in my garage, 85 degrees outside, AC running; car idling; heat-soaked after driving around in the sun:
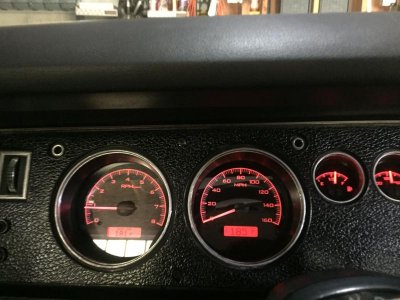
That's as hot as I can get it with the new radiator and a 160 degree thermostat. The new aluminum radiator is essentially good for exactly the 20 degrees they promised - or better as I did manage to see 211 degrees a few weeks ago. Can't beat the digital gauge for REALLY knowing what is going on. That's 185 degrees water temp. and 181 degrees trans temp.
Hah! Sitting in my garage, 85 degrees outside, AC running; car idling; heat-soaked after driving around in the sun:

That's as hot as I can get it with the new radiator and a 160 degree thermostat. The new aluminum radiator is essentially good for exactly the 20 degrees they promised - or better as I did manage to see 211 degrees a few weeks ago. Can't beat the digital gauge for REALLY knowing what is going on. That's 185 degrees water temp. and 181 degrees trans temp.
mmissile
Well-Known Member
Thinking a complete resto is always necessary is how unfinished projects are created
Not knowing your limitations[financial or abilities] is more often the problem.
- Local time
- 7:12 AM
- Joined
- Dec 4, 2009
- Messages
- 39,395
- Reaction score
- 56,216
- Location
- Pasadena, Texas
Cool build!! No pun intended 
My car has been sitting for 17 years now! Yeah, I've done some work on it and was going together when my dad passed away in 98. When I got done with his estate, another close relative passed, then another and it continued for the next several years. I pretty much lost interest in the car but I'm getting back on it little by little.I figure my 70 Coronet is worth about 20k in parts (I got alot of nice parts). I'll put about 20k into restoring it, and when I'm done it will be worth about 20k.You do the math all you want but it will never make sense, and yet I'm going to do it anyway. What the hell is wrong with us? I tore the car down 25 years ago and am just now getting around to it. Wish I would have just primered it and drove it into the ground, would have been alot of fun in my twentys. Looking forward to seeing the paint finished, looks good so far.
Have fun, Don
Similar threads
- Locked
- Replies
- 6
- Views
- 3K
- Locked
- Replies
- 0
- Views
- 2K
- Locked
- Replies
- 16
- Views
- 5K
- Replies
- 6
- Views
- 6K
- Locked
- Replies
- 7
- Views
- 6K

