• When you click on links to various merchants on this site and make a purchase, this can result in this site earning a commission. Affiliate programs and affiliations include, but are not limited to, the eBay Partner Network.

AMD door jambs, 68-70 b-body

b-body-bob

Well-Known Member
Local time
9:30 PM
Joined
May 2, 2011
Messages
155
Reaction score
80
Location
Huntington WV
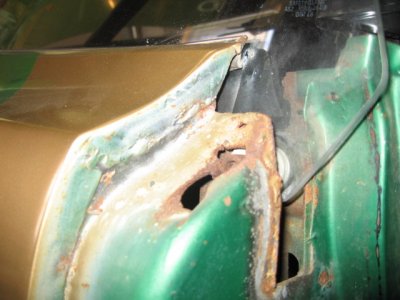
I'm looking for inputs about fit from anyone that has installed the AMD door jambs. I'm also wondering what brackets/supports are welded to the part from the factory. The part I'm talking about is the upright that the door striker bolts to that caps the front of the quarter panel.

Thanks in advance for any info.
 
Down load their catalog and it will show a view of the car and parts.
It what I did when I went to order my metal.

if you have it apart, you will know what is bad or need. That will keep you from over or under ordering.
 
Thanks. The photos don't show the back side but the exploded view shows the brackets/reinforcements I was wondering about as separate parts so that must mean they don't come with the jamb.

Still wondering about fit though.
 
I haven't done any on a bbody yet.I have used them on a bodies and ebodies.I haven't run into any fit issues that are of any concern.Their is always some issue with these cars,just because the lack of qaulity control from the factory.You will have to reuse your striker retaining nut.All the brackets were installed and proper holes also.To be honest I haven't had any real issues with amd parts at all.I have installed my fair share of their parts.
 
B-Body-bob -
I keep ordering my parts (fenders, floors, wheel houses, cowl, deck filler, inner fenders, etc, etc, etc) from Jeff at 521restorations. He's in here somewhere. Not to keep plugging him, but he has been extremely helpful in contacting amd for me on this type of stuff. I suggest giving him a call or shooting him an email.

Good luck

His email is really easy.

[email protected]
 
I talked to Jeff yesterday. He's installed the jambs personally, and said he had no problems. I forgot to ask about the danged brackets though. Hopefully I'll have the parts by the end of the week, it'll definitely take me longer to install them than it does to get them. :)

Still debating on cross bracing the quarter to hold it while the jamb's out. I could see some idiot (me) leaning in and bending it.

Thanks everybody.
 
You can't go wrong dealing with Jeff.......One of the best guys to deal with when it comes to getting parts for our mopars. Plus his current coronet resurrection he's doing himself let's you know he's actually using the parts he's selling, so he has hands on as well.

I'm sure a little chunk of brace wouldn't hurt..Maybe a little hunk of 1/4" rod from the inner frame to the inside surface of the quarter. Be sure to leave the doors on, so you have original fit to line up your new jamb and quarter when you reinstall.

Good luck!
 
Doors are off, and original fit is long gone since the car had fiberglass doors on it since 1976 until I took them off and sold them. I've got doors and could bolt them on, but unsure how I'd clamp the jamb in and shut the door to check the fit before welding. Something for me to keep in mind for sure, maybe at least do it before I get too far along toward the point of no return.

Was thinking about a brace from the inner edge of the quarter where the cat whiskers go out to the floorboard somewhere. That way I don't end up with a blister on the quarter from welding to the skin where it'd show.
 
Ahhhh...I see. And good idea about the whisker area. Looks like you get to start out fresh with alignment Bob. I guess jiging the quarters is a very good idea looking at it from that standpoint. Hold them in place and then at least you'll have a factory alignment to work off of...

Doors are a pain in the rear to get lined up and we've all see a lot of threads asking how to get it done. 66 B Body 4ever had a great write up on how to properly do it and I used his advice myself on my recent roadrunner project, even after have doing them in the past..


Check it out:

http://www.forbbodiesonly.com/moparforum/showthread.php?t=7222

Best of luck to ya. Hope it helps....and by the way, nice avtar pic! LOL
 
Excellent, thanks for the link on aligning the doors. Part of the reason for replacing the jamb is a cracked, then badly repaired, and then re-cracked striker area. Hopefully that won't repeat if I restore the hinges and get the doors installed right.

Avatar is a distant relative of mine but after all these generations in WV I think almost everyone's his relative by now. That reminds me, I need to put my .sig in too. (weird, it doesn't show up here, oh well)
 
Avatar is a distant relative of mine but after all these generations in WV I think almost everyone's his relative by now. That reminds me, I need to put my .sig in too.

Cool! Neat stuff. West Virginia....I'm guessing there's some coal mining in your blood somewheres along the lines. Beautiful country out that way. Always enjoyed taking the interstate through the hills.
 
Yes, one great grandfather was a coal miner, others worked around or for the railroad which was really here for the coal too. I agree it is amazing all the open tree covered land along the highways here even when you've seen it your entire life.
 
Hey bob........Just stumbled upon these, didn't even new they made a patch for that area, but just thought you should know in case that could be an option for you.

199-DR014R-1.jpg


http://www.megapartsusa.com/proddetail.asp?prod=199%2DDR014R

http://www.megapartsusa.com/proddetail.asp?prod=199%2DDR014L
 
Thanks.

That patch just confuses me - there's nothing to bolt the striker to and that's what cracks out.

I also found this http://www.dynamicrenovation.net/detail.php?ID=17 but got no reply to an email asking for more info.

I've got a mess at the top of both sides too where the car was modified to bolt the windows up so all that extra weight could be gone. With my welding skills being what they are I'd only make a mess trying to butt weld patches in. If it was hidden under or behind something I'd give it a go, but it's right out in the open in one of the first places people look.

So my idea is to fall back on my ability to plug weld like a maniac and just replace the whole thing. IIRC the tracking showed they'd be here tomorrow, so the fun gets going full speed ahead this weekend.
 

Attachments

  • 2007-03-11 219.jpg
    2007-03-11 219.jpg
    104.3 KB · Views: 304
  • akronarlen.jpg
    akronarlen.jpg
    11.5 KB · Views: 315
Last edited:
Yeah, i'd agree someone made a pretty good mess of that area on your car. It's amazing what people sometimes consider a good idea. Good luck on the project and fill us in on your progress. I'd be intersted in the results being i've never heard how the fit up and the installation of those AMD jams went for folks in the past.

Factory Rallye green car?
 
Yes, it's a factory rallye green A12 that was sent to Akron Arlen in 76 for prep. All removed parts were sold in a yard sale. The bolt-up-the-windows trick is just the start of it. I'm doing just enough to make it road worthy and trying to keep its race car nature.

I'll keep updating this thread with progress. No guarantee it'll be fast progress though.
 
Update, just got the parts. The "nut" the striker bolts to was included. The brackets around the window opening slot and under the curved part of the jamb to the quarter panel were not so I'll have to re-use the crusty old parts that are on the car now.

I guess they include the nut to keep people from breaking those bendy tabs trying to put the old one in. I wish they'd have included the other brackets too. Oh well.
 
FYI - Look for stress cracks on the top edge of the quarter panel where it is bent over and attaches to the jamb. On my Sport Satellite, drivers side had to be totally replaced. Passenger side had a hair line crack. I made L shaped pieces to fit tightly behind then plug welded in for support. Remember when welding a crack you should drill a hole on each end to stop it from getting longer.
 
I'll be sure to look at that closely once she's all apart. Thanks for the tip.
 
Auto Transport Service
Back
Top