Sure sounds like things are working out good bud, I never used there spot weld cutters but in an advertizement kind of thing MMM was doing with a build with AMD and front clip alignment on a 69 RR they were advertizing HF's spot welder! I have been thinking about that but with the finances the way they are ill be thinking awhile longer! Great work!!
You are using an out of date browser. It may not display this or other websites correctly.
You should upgrade or use an alternative browser.
You should upgrade or use an alternative browser.
Don selleck's 68 charger rt project
- Thread starter Don selleck
- Start date
me and a friend spent about 4 hrs. with two spot weld bits got most of passengers and trunk pan out, should have both those removed tomorrow, looks like tail light panel got wacked pretty hard, along with both rear quarters, drivers door, trunk extensions, trunk pan, and right lower trunk gutter, everything else looks rust free and mostly dent free. Should be done with metal work in a couple weeks will be calling epxoy dipper for scheduling.
Attachments
Wow that dip is some impressive stuff, makes the steel look new again. I'm curious to how the epoxy dip works, with epoxy being a 2 part deal how do they do that? If it was activated in the dip I would think the whole tank would set up or do they have a way of activating it afterwards? Looking great
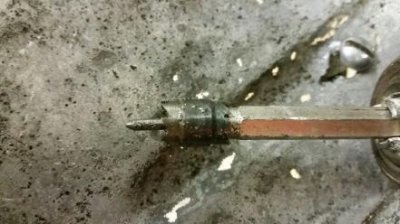
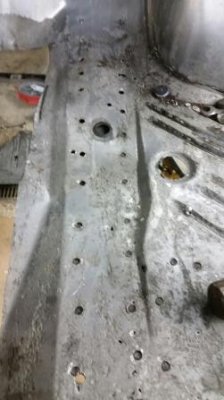
good point, ill have to check into that further, that was the phrase used, there are other dipping places down by detroit also that offer these services too. the alkaline dipping is so awesome you can see every spot weld, which made the trunk pan way easier than thought, going to swap meet in mt. clemens sunday to meet a vendor to pick up the rest of the metal to continue on the car next week, should have that part completed by next weekend if i can stay on it. tried to drill thru the metal i wasnt gonna keep and not thru the stuff i wanted too. kinda hard to do. the spot weld cutter works better than i thought if you take a wedge and put some pressure between the two panels they pop apart as you go, u can also see a little rust and dirt start flying when you get thru the first layer, but one push to hard and your thru both, then u got another hole to fix or camo. trunk pan out and most of pass. rea quarter


 , here's a few more pics. had to set trunk pan in to see how close the fit was seems to be pretty close.
, here's a few more pics. had to set trunk pan in to see how close the fit was seems to be pretty close.checked into the epoxy dipping more, it is a PPG black cathodic epoxy electrocoat. they use an 8 coat pretreatment system with zinc phosphate, which stops the rusting, will be scheduling this week for about two weeks from now to give me plenty of time to finish metal work
showard
Well-Known Member
Wow! you are starting from scratch. That is a lot of work. It will be fun to watch your progress.
Hemirunner
Well-Known Member
Could you share the info of where you're taking it and how much it costs? I may be interested in something like this.checked into the epoxy dipping more, it is a PPG black cathodic epoxy electrocoat. they use an 8 coat pretreatment system with zinc phosphate, which stops the rusting, will be scheduling this week for about two weeks from now to give me plenty of time to finish metal work
This all new to me but sounds pretty cool, Hope it works out good for you, nice job your doing!!!
i was quoted $850 for this process which seems cheap, my work has kicked off again so the project has been at a stand still, i have not scheduled anything, they dont like when you use names on this forum I guess to keep it a little more honest, which is a good thing, I dont know how to pm you so if you want to pm me i can give you the name of the place in elkhart, indiana. i postponed this step for about a month, so i will let you know how it comes back, at that time
Back at it again, cant say on how good these body panels rolled into position. Started at door pillars and stretched every thing into place, not leaving any gaps anywhere trunk pan is welded in, both quarters are in there final resting place, screwed and clamped, welded bottom rear quarter corner pieces onto rear quarter prior to rear quarter assembly, gave it a very nice reveal, centered rear valance, and brought both quarters into place, trial fit of trunk lid seemed to be nearly perfect. need to prep the rear valance and tail light panel, screw into place, and assemble trunk lid. Have new door hinges coming monday, just to double check the fit of everything. Then I will be welding my *** off for a couple days. Mig plug welded the trunk already, wasn't really sure of the structural of the single sided spot weld which would have been about 20% of the trunk, the standard double spot worked great on the trunk extensions and gave it a factory look and saved a ton of grinding to make it look stock, will be using that as much as possible on the rest of the panels, and buttoning up the rest with the mig about 1 week of work left till I can have it dipped, cant wait till thats done, here's a few more pics.


Wow - great progress. It looks like a car again! Nice work!
CHARGERSTEVEN
Well-Known Member
great work im glad your corner pieces fit so nice on the 68,s as the 69 they made the rear quarter panel to short, this dipping process will really clean the car up.
- Local time
- 7:53 PM
- Joined
- Jan 16, 2011
- Messages
- 78,881
- Reaction score
- 127,409
- Location
- NorCal Sierras
Man that looks clean after the dip,
great starting point
good luck & have fun on the 68 Charger project
great starting point
good luck & have fun on the 68 Charger project
prepped tail panel and valance screwed and clamped, started in center on tail pan and sprung into position to create the curve for the trunk lid, the rigidity it creates is amazing, makes it rock solid. Set up bumper into place came out nearly perfect with a slight adjustment at rear valance on drivers where it meets the corner at the new rear quarter. back to work tomorrow, will continue on thursday to start welding. Also bought a set of sub frame connectors from car tool, contours to bottom of floor pan, should be here in a couple days adds a little more welding, but what the hell, it looks cool, and looks factory.


I agree, That is some great work you have done, looking great....
Yea it does, thank god my shop is well insulated, makes a huge difference, i remember changing a trans in a 66 olds in my dads driveway back in the 80's in a snow storm, really wasn't as bad as it sounds, piled snow up around the windward side blocked most of it, Had to get my car goin to chase some tail around on the weekend. thats when i could lay the tranny on my chest an lift it into place holding the tail shaft with my leg, and fumbling to get two bolts started in the bell housing, and say those were the good ole days. What really is gonna be fun is the day before i take it to be dipped I have to powerwash the car to remove the water based rust inhibitor. so I gotta wait till it gets above freezing, I do have drains in my shop but I dont want to wash everything inn there to, but i do have a big roll of plastic, maybe i can build a tent.
charger360
Well-Known Member
really nice work!
Similar threads
- Replies
- 20
- Views
- 1K
- Replies
- 2
- Views
- 467
- Replies
- 9
- Views
- 551


