• When you click on links to various merchants on this site and make a purchase, this can result in this site earning a commission. Affiliate programs and affiliations include, but are not limited to, the eBay Partner Network.

Don selleck's 68 charger rt project

1.jpg

2.jpg

3.jpg
 
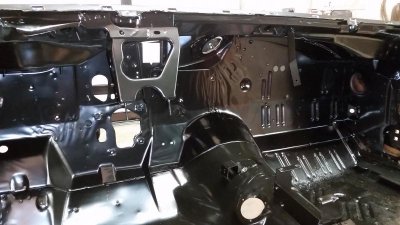
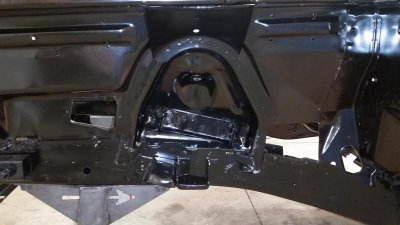
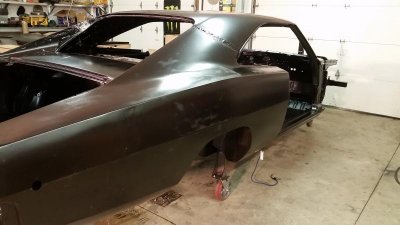
just got it back overall great job car is coated looks like a new panel when u get it had a few areas where there was a little goo between seams that was cooked out it kinda oozed out, unfortunatly they did manage to dent my brand new rear quarters which i took such care installing knocked them out and a little filler will have to do. biggest thing every seam, inside frame rails, pretty much everything looks just the the outside, there was a little primer on the new panels that were sanded down looks a little rough, should have left them alone, didnt stick to new radiator support that was not sanded, just areas where i welded, that looked good, and by no means you should never bondo your car first before this process, it will blow that **** right off your car, and create a big mess, that what i was told by the guy who dipped it. I did notice it melted the lead even a little and had one blow out in sail panel, there was some original lead at cowl and pillar that was stock that has a few minor blemeshes that werent there before. all in all, i think i have a charger that will last a very long time. well im beat been running for a while heres a few pics will add some more next week when i get in back on rotisserie20150403_155249.jpg20150403_155300.jpg20150403_155315.jpg20150403_155412.jpg20150403_155422.jpg20150403_155522.jpg20150403_155613.jpg20150403_155628.jpg

20150403_155249.jpg 20150403_155300.jpg 20150403_155315.jpg 20150403_155412.jpg 20150403_155422.jpg 20150403_155522.jpg 20150403_155613.jpg 20150403_155628.jpg
 
Simply amazing Don! It looks really really good!
And when you factor in the cost of paying someone to paint it with epoxy, that $850 seems well spent.
 
just like i thought 850 turned into $1177.00 after the rest of the panels, but i can see inside of my rockers with a flashlight looks just like the outside, still money well spent.20150404_172017.jpg20150404_172027.jpg20150404_172043.jpg

20150404_172017.jpg 20150404_172027.jpg 20150404_172043.jpg
 
Damn Don! What a first class resto.

From teardown, new panels and double dip that is an amazing process.

Thanks for sharing your great work with us. Keep the updates coming.

The fun is going to start now. What engine do you have planned?

TU.jpg
 
thank you, i found an era correct 440 hp block assembled two months before build date on car and a casting date made on the day I was born. Probable aluminum heads shootin for around 550 hp and same in torque. headers, stock looking after that have a 727 reverse valve body, torque converter is 11 inch think its a 2800 rpm, came with it looks to be in good shape was working fine when took it apart, fluid looked great, will clean replace seals, 8 3/4 came with it, but it has 48something in it, way to low for what i want, looking for a 323 at most. Stock shifter.
 
Well Its been a while, busy with work, stocked away some more cash, Body work starts in two weeks, have talked to a guy with a nice paint booth, mixing station, got him lined up in around 6 weeks, will have it painted before summer ends at latest. have an engine builder lined up, who's an engineer at chrysler, owns his own machine shop, and has been building mopar race engines since the 60's and started with his dad, have heard nothing but good about, feeling pretty confident about that, waiting to talk to him in person, anticipating his input about what i'm trying to accomplish. Well will post more pics after the dust is blown off and body work begins.
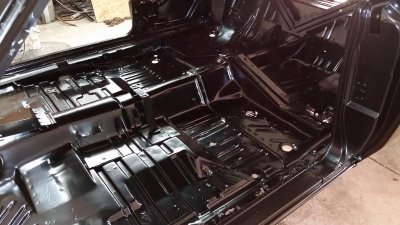
 
Nice update Don, and the project look great so far. One of the most important things I have tried to do while restoring my car was plan and take my time to do things right. Looks like you are doing the same, and all that planning work, while it doesn't by itself progress the car, does a lot to avoid problems and mistakes down the road.

Keep up the good work!
 
Don, Saying great work sounds weak here, Just your pictures look like something brand new, ready from a factory fresh! That is some fantastic and ill bet back wrenching work bud..
 
Nice update Don, and the project look great so far. One of the most important things I have tried to do while restoring my car was plan and take my time to do things right. Looks like you are doing the same, and all that planning work, while it doesn't by itself progress the car, does a lot to avoid problems and mistakes down the road.

Keep up the good work!
thanks, for the re-assurance on my plan, this is my first resto, but i have ran similar jobs in the past related to the construction industry from demo to finish learning from my mistakes, (thats one thing I'm trying to avoid) but I do have several good friends and connections to get it as close to being right as I can.
 
she made to the body shop today work begins monday. The owner of the shop is an old friend of mine that has done a couple other cars i've had, i will be sanding along side of him and basically be his flunky, but I want to a part of everything on this, originally was gonna try to tackle it myself but, i think a professional needs to be in charge of this step. One thing is the trunk lid was bent up slightly from an accident i thought it could be saved but the outer skin has separated from the inner panel and seems to have a gap in between cant see anythin inner panel is solid just wondering if other lids had the same separation as mine or if it was hit hard enough to lift it, so any input would be very appreciated, so if I need to start looking into a new trunk lid. thanks in advance for any help with this.
 
Auto Transport Service
Back
Top