• When you click on links to various merchants on this site and make a purchase, this can result in this site earning a commission. Affiliate programs and affiliations include, but are not limited to, the eBay Partner Network.

For the Love for my Father, My 69 GTX Restoration

Status
Not open for further replies.
The Great Cranium has provided several examples of original cars showing these positioned the way pictured below. So far I have received more examples in the way Marks cars were versus the reverse. So I believe that I had them backwards and the few examples I had were the same...

Mark thanks for the keen eye and it is nice to have these things pointed out and researched. So we/I can get the smaller details correct based on what was done originally....

View attachment 537982 View attachment 537983

Thanks to both of you, my extensions have been missing since late eighties when I restored the GTX, just bought a set of repos and will install soon.
 
Yup. Now I recommend to everyone. Some also claim Flotrol by flood works well.
What was Napa's version...you told me but I cannot recall the name of it...I heard that works well also
 
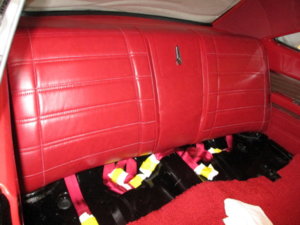
Finally, got everything I needed from Legendary to redo the front and rear seats. The rear upper cover had a couple issues. One was there was an extra stitch place that when stretched showed a dimple in the seat. Shown in the pics below. The second issue was the horizontal stitching which was off. The third issue was wrinkles in the center either due to the cover or the install.

As I dug deeper into the seats a lot of problems arose from the poor installation. Upon disassembly of the rear upper seat back the next layer was just the padding. That padding was suppose to have muslin cover it completely to create a uniform cover and to keep the material in place. Without it and with uses the padding will fall and bunch up and could have caused the wrinkles in the cover. The other issues was that padding requires the minimum of 3 layers to a max of 5....I had ONE....Below that was a 1/2 thick foam material glued to the burlap which was not correct to use and led to the bunchy appearance ton the top of the seat...

So I made the decision to fix everything myself and I am glad I did....It has broken my fear of doing seats....

IMG_1113.JPG
IMG_1206.JPG
IMG_1207.JPG
IMG_1209.JPG
IMG_1302.JPG
IMG_1303.JPG
IMG_1304.JPG
IMG_1305.JPG
 
They also added a thin band of foam on the top portions which led to the bunchy top appearance. The burlap didn't lap over in the second pic which is for protection. The sides did not have burlap covering them...
IMG_1309.JPG
IMG_1310.JPG
IMG_1311.JPG
IMG_1312.JPG
 
Well here we go....no fear....

I will say I had a big help which was the installation video on Legendary's site. I highly suggest them and I followed them to the "T"...There is not much that they do not talk about...

These clippers I bought just for this job are Awesome to say the least.

The top portion originally installed was done correctly(the only thing they did right). So I had no need to make another.

IMG_1307.JPG
IMG_1313.JPG
IMG_1314.JPG
IMG_1315.JPG
IMG_1316.JPG
IMG_1317.JPG
IMG_1318.JPG
IMG_1319.JPG
IMG_1320.JPG
IMG_1321.JPG
 
Since I was redoing them I had to take them to the next level. The original burlap had wire threaded through and of course no one sells that. So Darrin told me what he used for his seats to mimic the original look. I didn't use what he suggested but I found a wire that was able to be threaded. I will say I was about to give up when I first started because it took forever, lol...but I just kept going and was in too deep at that point. I think it turned out really well..

So the white pad material comes in 2 rolls. As I said earlier only one was put on and legendary recommends 3-5....So I did 4...I will say just do three your fingers will thank you lol....Once that is on the you cover it with the white material called muslin(which it didn't have previously)..

IMG_1322.JPG
IMG_1323.JPG
IMG_1324.JPG
IMG_1325.JPG
IMG_1326.JPG
IMG_1327.JPG
IMG_1328.JPG
IMG_1329.JPG
IMG_1330.JPG
IMG_1331.JPG
 
The emblem is easy to figure out where to punch the holes in the seat cover. I just took it and lined it up in the area on the seat and pushed in on it and it created dimples in the seat cover....Once I place it on I added a little dab of epoxy on the back.

Some elbow and finger grease and the upper back is finished!
IMG_1332.JPG
IMG_1333.JPG
IMG_1334.JPG
IMG_1335.JPG
IMG_1336.JPG
IMG_1337.JPG
IMG_1338.JPG
IMG_1339.JPG
IMG_1340.JPG
IMG_1341.JPG
 
Moving on to the seat bottom...More errors....One there was a layer of the padding below the seat cover. With use that would eventually bunch up. Below that was 1/2 foam which was not what I supplied them to use from the Legendary kit. The burlap was done wrong and the foam was not rolled over the front....Sad

IMG_1343.JPG
IMG_1344.JPG
IMG_1345.JPG
IMG_1346.JPG
IMG_1347.JPG
IMG_1348.JPG
IMG_1349.JPG
 
Now I am going to make it right!

The seat bottom was a little easier to do than the upper cushion.

IMG_1350.JPG
IMG_1351.JPG
IMG_1352.JPG
IMG_1353.JPG
IMG_1354.JPG
IMG_1355.JPG
IMG_1356.JPG
IMG_1357.JPG
 
:D

Now were talking......Mad skills.....Hope I will say the same for the front seats...Stay tuned!

IMG_1360.JPG
IMG_1358.JPG
 
looks like you got it under control, as usuall, sucks having to redo other peoples stuff. can't wait to see the buckets redone. the wire I noticed in mine also, left some of the original stuff on there so my apolsterer could see it. doubt if it was reinstalled though. mine looks good in the back but my fronts are little wrinkled.
 
looks like you got it under control, as usuall, sucks having to redo other peoples stuff. can't wait to see the buckets redone. the wire I noticed in mine also, left some of the original stuff on there so my apolsterer could see it. doubt if it was reinstalled though. mine looks good in the back but my fronts are little wrinkled.
Don

Thanks! Man it takes some time to tackle these....I will say to you guys it is an area you should explore and not to shy away from. After doing the rear seat I wish I did this a long time ago. The redo stuff..man it is not the first with this car.
My redo list:
1. Headliner
2. Heater Box
3. Seats

You do not want to see my parts redo list on the ones I sent out and had to resend back, lol....

So far everything I have done has had ZERO problems...Imagine that!

I will say every restorations has the "ups" and "downs".....
 
Thanks Justin,
I have been seriously thinking about doing my own seats also. I have watched the how to videos from Legendary also and think that I will try it also.
Now go for the front seats, I know you will do a great job.
 
This is my first complete resto as you can probably tell ha ha. I've worked on these things my whole life though. I have a few things I have redone that I've paid for too on this one, thank god I pulled my car out of the other paint shop. The guy is a friend of mine which made it that much worse I left on good terms but redid body work and paint peeling off that wasn't prepped right. my seats are questionable also, I think were just to damn picky for today's crowd. I did have a redo on my part when I somehow messed up my core support, thank you Showard for the numbers on everything to get me squared back up! by the way Your airplane projects are way cool! wish I had the know how for that. but press forward Justin and don't let anyone bring u some junk!!
 
Status
Not open for further replies.
Auto Transport Service
Back
Top