• When you click on links to various merchants on this site and make a purchase, this can result in this site earning a commission. Affiliate programs and affiliations include, but are not limited to, the eBay Partner Network.

Lookie what $5000 buys you....

Anyone ever heard of the "Snowball Effect" ?
I started using this term a few years back. It refers to the situation where a person starts a simple project but keeps adding to it along the way, making this reasonably short and easy task a monumental one.
Uhhh, yeah.
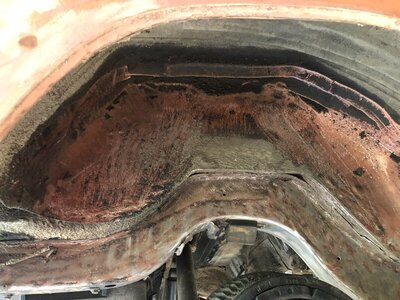
So, I decided to put the car up on the lift to form and install the fuel and vent lines. I figured that with my future plans to remove the undercoating, maybe I should at least remove it where the fuel lines are going to be.
Yeah....
Pictures will follow...The Wife just announced that it is dinner time!
 
The fuel line wraps around the frame rail just forward of the axle. The line going over the axle and behind is the vent line that runs to a galvanized tube behind the right wheel tub.
Jigsaw UC 1.jpg

Jigsaw UC 2.jpg


I started off using the needle scaler.

N S 1.JPG

N S 2.JPG
 
Last edited:
In just a few short minutes, the Wuhan Wonder lost half the rods. Ever try eating a steak with only half a mouthful of teeth?
So yeah.... using the tool with fewer rods takes more time. At least the work is over head so that helps. (No it doesn't)

Jigsaw UC 3.jpg

I used the DeWalt 4 1/2" angle grinder with a wire wheel on it to clean it up after using the needle scaler.
Jigsaw UC 4.jpg

JIgsaw UC 5.jpg

Jigsaw UC 6.jpg


I'm also using a couple of scrapers. A couple areas were softened by years of the leaky 383 and 727. It got me wondering what I could spray on this stuff to soften it enough to just scrape it off.
I'm going to go back to Hazard Fraught to get more rods for the needle scaler, maybe another wire wheel for the grinder as well.
This undercoating is a mess. I had to use rubbing alcohol to get it off of my face. What remains on my hands will have to wear off.
 
Ultimately, I will spray new undercoating in the wheelwells. Oddly, while this car had the pancake batter thick undercoating down the middle, the wheelwells barely got any. Huh ???
 
Anyone ever heard of the "Snowball Effect" ? It refers to the situation where a person starts a simple project but keeps adding to it along the way, making this reasonably short and easy task a monumental one.
Ummm...
No...:poke:
Lol...:lol:
OF COURSE! :thumbsup: :bananadance:
Despite my thinking I had "everything I needed" some of the collection of parts and systems going back 3 years "waiting" for installation, I've still added quite a bit.
Most of it because I was unaware of what should/could be added to the stiffening and strengthening process. The nice thing is my mechanic is enthusiastic about the additions, and hasn't raised his (substantial) flat rate quote for labor. It's good when the shop owner takes a personal interest in producing a top notch result.
 
Undercoating removal continues. I voluntarily wore a mask during the process. Gavin Newsom would be proud...

Jigsaw UC L 10.JPG
Jigsaw UC L 12.JPG


Jigsaw UC L 16.JPG


Jigsaw UC L 17.JPG
Jigsaw UC L 19.JPG
Jigsaw UC L 20.JPG
Jigsaw UC L 14.JPG
 
I'm going to replicate the same appearance that my red car has....Just undercoating in the wheelwells and painted steel everywhere else.
For now, I decided to move ahead with the wheel tub modifications.
Since I bought the wheels and tires for "Ginger" in 2003, the rear tires rub the wheel tub if I hit a hard bump or have passengers in the car. I wanted to modify the wheel tubs in the car for years but hadn't got around to it. THIS car allows me to practice and develop a way to do it.
LWT 1.JPG
LWT 2.JPG


See that ridge in the center of the picture? From the top side, it looks like this:

WW 2.jpg


With stock width tires on narrow wheels, there isn't a clearance problem.

Charger RH.jpg


The tire sits far enough in that it would not come close to touching anything.

Put on a wheel almost double the stock width and clearance gets tight.
FFFF.JPG
19.JPG
 
The right side of Jigsaw is as expected, a mirror image.
RWT 1.JPG
RWT 2.JPG

Strange, to some people, it might appear in the picture as if the ridge is inverted instead of sticking out. I had to look away then look again to get it right in my head.
Regardless, my plan was to cut along the ridge and push each side toward the quarter panel.
RWT 3.JPG
RWT 4.JPG
RWT 5.JPG
 
Looking at the last 2 pictures, you'll see slits in the tub that are about an inch and a half from the wheel opening lip. This is what makes me nervous about doing this to the other car. These cuts were made with a 4 1/2" DeWalt grinder. One slip and I'm either touching the quarter panel or cutting the wheel lip!
I took a light duty air powered saber saw and cut a bit further toward the wheel well lip to allow the metal to flex a bit more.
 
Last edited:
The point where the tire made contact was at the bulge at the rear.
Forgive the sloppy cuts here! I am just getting started and I'm sure they will close up as I do some hammer and weld work.
To be clear. this is the right side wheel tub.
RWT 6.JPG
RWT 7.JPG

The goal wasn't to push the opening to sit flush to the edge of the outer body, just to round off the sharp ridge line.
RWT 9.JPG

You can see the way the ridge still exists at the bottom but transitions to a flat section then a concave.
RWT 11.JPG


Looking toward the rear in the next picture:
RWT 12.JPG

Now compare this to the untouched left side:
LWT 3.JPG

LWT 4.JPG


Once the zipper is welded and undercoated, it will look like a factory effort!
 
I am trying to get AMD to make widened outer wheel houses for B body cars,they just released widened inner wheel houses. My friend is going to ask Mark to make the outer ones too.
 
That is a lot of cutting and welding! I'd have likely just heated it up red and jacked a shaped steel form up into it.
 
Welding doesn't bother me. Keep in mind that I am using this car as a "Pattern" for doing the same thing to my red car. I don't want to risk paint or metal damage to a finished car.
Also, I don't have a torch!
 
if you do that to your painted car (or even this car), use panel bond to glue a tasty patch over it.......the **** is awesome.......... a structural adhesive with anti corrosive properties.......I use it for a lot of different problems that pop up, it is addictive
 
That is a great idea and I have considered it. Welding that close to a painted and finished quarter panel makes me nervous. A guy with more skills may be able to do it with more confidence but I'm just not there yet. This car is easy enough though.
 
That is a great idea and I have considered it. Welding that close to a painted and finished quarter panel makes me nervous. A guy with more skills may be able to do it with more confidence but I'm just not there yet. This car is easy enough though.

welding also promotes rust on the back side where you cannot access.....panel bond solves that issue......grinding dirty weld also sucks
 
Do you have a product that you like best?

I prefer anything 3m...... I have also used Norton...... 40-50 bucks for a cartridge, you need the gun (one time purchase, you WILL use it in the future)......I rarely use the mixing nozzles (they do have a purpose), I usually squeeze it out onto cardboard and mix it like body filler.....I always keep some "5 minute" on the bench, it's my "go to" for almost anything. Perfect for what you're in to.
 
That has to be faster and easier than welding and grinding ! I do need some training on how to weld better. Most of my welds are too tall. If I try to get somewhat flat welds, it seems that they want to burn through. Maybe it is a matter of wire speed?
Regardless...All of my welds need to be knocked down when doing thin sheet metal.
Jigsaw RWT 14.jpg


Maybe I'll try a slower wire speed when I do the other side.

Jigsaw RWT 15.jpg


I need to knock them down a little more.

Jigsaw RWT 18.jpg


The increase in clearance will be great!

JIgsaw RWT 17.jpg
 
Auto Transport Service
Back
Top