• When you click on links to various merchants on this site and make a purchase, this can result in this site earning a commission. Affiliate programs and affiliations include, but are not limited to, the eBay Partner Network.

Lookie what $5000 buys you....

I have a few things to do before stuffing the cluster back in.
I really would like to find a "drop in" Voltmeter to use in place of that ammeter.
 
I messed around a bit with an aftermarket voltmeter.


Dash 1 Y.jpg


I removed the outer bezel and glass, then trimmed the housing a bit. The diameter is close to the stock gauge but I don't know if I'll be able to fit it in since the black plastic cover hits the face of the gauge.

XH 5 D.jpg


If that raised upper section was at the same height as the lower, this voltmeter would fit right in.

XH 5 H.jpg
XH 5 I.jpg

I'm going to search and see if I can find a better way to go.
 
Last edited:
I talked with Shannon at Redline Gauge Works. He confirmed what I thought....NOBODY makes a "drop-in" Voltmeter gauge for the 68-70 Rallye cluster. They do conversions though, taking the ammeter and converting it and the cluster housing to allow the entire assembly to bolt in like stock. He also stated that in most instances, the ammeter is perfectly reliable. It is the addition of higher amp alternators and accessories with high current draw that cause trouble with ammeters.
I converted my red car, the '75 Power Wagon and a '72 Duster to avoid the potential future problems even though those cars don't have big stereos, electric fans or any crazy electrical toys. None of them showed damage to the wiring or any heat spots.
This car shows no evidence of a big stereo. It had a 383 2 barrel with single exhaust so I can't imagine it had electric fans but the bulkhead plug is damaged and the ammeter was mangled with the wires bypassed . Something went wrong way back when.
modify_inline.gif
 
Try and butcher the new voltmeter some more. You don't need the housing it came with, it will be much easier to fit when removed.
 
Kern, when I did my 500" stroker build I took the time to deburr all the areas of casting flash inside the block when I was clearancing the block for the stroker rod swing on the lower cylinder walls. Does it do anything???....F*&k if I know lol, but I went nutso on that engine doing anything and everything I saw/heard/read about to ensure it was the best I could do. Build is looking damn good so far man. Keep up the good work!


I had two 440 blocks, one was an HP block and one was out of a Chrysler New Yorker. The speed shop doing my machining suggested that they sonic test the blocks before boring them to check for any issues with the blocks and the thickness of the cylinder castings. Then he told me how much it would cost to hot tank them. I think he said it was either $100 or $150 each. I said I'd do it myself. Mike (the owner) told me that if they weren't clean enough, he'd have to clean them and charge me anyway. I took them home and put the blocks one at a time in a 55 barrel filled with water, sitting on cinder blocks with a turkey cooker burner underneath then added Tide and Dawn to the water. You should have seen the oily scum that came bubbling up out of the top. I lifted the block out of the water and hit it with my 4500 lb. pressure washer then dropped it back down again and let it bubble away for another 3 hours. When I thought it was clean, I started on the second block in the 55-gallon barrel with fresh water and soaps. While the second block was bubbling away, I cleaned the block with rags and lacquer thinner, making sure to get all the oil passages and also the bores. I finished that up about the time the second block was ready to come out so I finished the second block up like the first. I took them both in and when Mike saw them, he asked me how much I would charge him to clean up a block like does and I said, "I don't think you can afford me, but I'll think about it and give you a price later. Then after testing them, Mike said the Chrysler block was a lot stronger than the HP block which surprised him and said he'd start on the machining right away. I told him I'd need the block at home for a week first. Once at home, I then enlarged the oil pick up to 1/2" and ground off all the casting flashes through the engine, chamfered, and re-threaded all the tapped holes in the block. When I brought the block back in for the machining, Mike was very impressed with what I had done.
 
Yesterday I returned the cam to the Summit Racing store in Nevada. Three clerks looked at the cam and all were amazed at the poor quality. One asked me if I wanted a replacement but fully understood when I politely declined,
With the refund, I bought a MSD Blaster 2 coil, Taylor spark wires, a Milodon water pump and the Comp Cams Crank socket that 1 Wild R/T suggested. No sharp edges on this one....
 
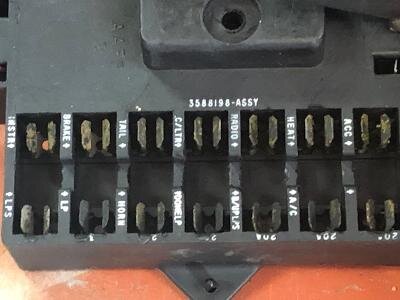
The stock fuse panel has 6 terminals. In the red car, I slipped in a 7 fuse unit from my stash. I had another so I am using it on this car. Yesterday, I set it in a jug with Evaporust in it. Check out the difference. The 6 unit fuse panel is actually cleaner than the 7 unit was 2 days ago.
Harness 1.jpg
Harness 2.jpg


The car had the connections to the fuse panel messed up. Look at the panel at left: The top row is the feed, the bottom row is the service. Putting a wire directly on the feed side means that the fuse on the terminal is bypassed and offers no protection. A wire chafes and hits metal and the wire will melt, possibly taking out other wires along the way. Harness 3.jpg
 
I extended the Ammeter leads so I can attach the wires and still reach the nuts. I'm going to extend the wires to the instrument panel for the same reason.
Dash 2 H.jpg

Dash 2 L.jpg


Dash 2 G.jpg


I removed every wire from the old plug, cleaned them, then snapped them into the replacement.

Dash 2 M.jpg


Dash 2 Q.jpg

Dash 2 R.jpg
 
Each wire and terminal was inspected. I was able to identify most of them using the Factory Service Manual but it wasn't as complete as it should be. There are several wires that are clearly factory installed but the manual doesn't state what they are.
Dash 2 N.jpg
Dash 2 O.jpg
Dash 2 P.jpg
 
Each wire and terminal was inspected. I was able to identify most of them using the Factory Service Manual but it wasn't as complete as it should be. There are several wires that are clearly factory installed but the manual doesn't state what they are.
View attachment 1014596 View attachment 1014597 View attachment 1014598
Usually the wires that aren't shown on the main wire schematic page of the service manual will be in another diagram a few pages away under a subassembly.
 
Whew, just finished reading the whole damn thing! Looking good. I think that seat is just like the bench I got for my X.
Travis..
 
Usually the wires that aren't shown on the main wire schematic page of the service manual will be in another diagram a few pages away under a subassembly.
I tried looking. The heater and A/C section had no color codes or wire diagrams as far as I could see.
 
I tried looking. The heater and A/C section had no color codes or wire diagrams as far as I could see.
Kern,

I remember always being frustrated by the FSM because (a) it had wiring diagrams for various areas split to different sections and (b) there were always a bunch of different that didn't apply to my Road Runner. One day I simply went through the whole darn thing, printing all the electrical diagrams for my Road Runner. I then assembled these into a mini electrical FSM. I still use it today and I can't recall ever NOT finding a specific wire referenced in the manual.

Bottom line is I think they are all in there, they are just a pain in the arse to find!
 
Dash 3 B.JPG

I have the wiring under the dash done. The wiring on the engine side is connected to the bulkhead too. Today I mounted the voltage regulator, the spark box and ballast resistor. I have the engine side harness pretty well sorted and ready to run.
I put a battery in and connected to the big lug on the starter relay.
I get headlights low and high beam, taillights too. The turn signals are not connected.
The dash lights don't light up though.
The bulbs looked good. The wire plug for the panel dimmer had some ugly on the terminals. Can that be enough to stop the dash lights from working? The high beam light comes on.
The steering column fitment was a real pisser.
I got this column with the car and since it is painted Burnt Orange like the rest of the interior, I figured it was original. The problem is, it came with no mounting bracket....the one that wraps under the column and attaches to threaded studs as part of the dash frame. I had a few A-Body columns and parts so I bolted one of those on.
With the coupler on the steering box, the shifter collar was too close to the dash. With the shifter collar in the right spot, the coupler was too short and the column support bracket was too far forward. I measured my Red car and found that this column was short by about 2 1/2 inches. It became evident that this column may have been compressed during the collision that killed the car in 1995. There is an inner and outer shaft as part of the safety design....It allows the column to shorten during am impact to reduce the risk of a human shish-K- Bob! This one just needed to be brought back to the original length.
I used a pipe wrench and a hammer and extended the column out to the proper length. Next up, the column support bracket needed to be modified to fit. I cut the slots and welded them about 1 1/4" closer to the firewall. This allowed the column to sit in the stock position.


Dash 3 C.JPG


The center panel that sits below the radio was missing from this car when I got it. A guy from the 1970 Charger Registry site came through for me with this panel:

Dash 3 D.JPG


I need to clean it and paint it to match. It has two holes below the wiper switch but I'm just grateful to have found something.
Dash 3 E.JPG

I still need an ashtray. I do have a glove box door but I need the liner. Are they all cardboard? A 2 piece plastic one would be a lot more durable.
 
Last edited:
Headlights!

Dash 3 M.JPG


The drivers side has no lights yet.

Dash 3 N.JPG


The center taillight bulbs lit up but the outers on both sides are finicky. I may have to solder in different sockets.

Dash 3 O.JPG


Yeah, those are office type file cabinets. I have about 25 of them here for small parts storage. REAL handy!
 
Last edited:
Yeah, those are office type file cabinets. I have about 25 of them here for small parts storage. REAL handy!
That's a great idea. File cabinets are durable and with the drawers the parts don't get all dusty and dirty like they do sitting on an open shelf.
 
F R E E.
Yeah.....The company the Wife works for has downsized their office three times The first time was in 2011. I had almost 100 file cabinets in my shop. I gave over 80 of them away to friends and other businesses. The next 2 times I took more and did it again.
 
Auto Transport Service
Back
Top