• When you click on links to various merchants on this site and make a purchase, this can result in this site earning a commission. Affiliate programs and affiliations include, but are not limited to, the eBay Partner Network.

My GY8 '71 Road Runner

I've never been much of a fan of high impact colors...give me a brown, green any day, but I do love FK5 Burnt orange and A4 silver. ;)

Look forward to your progress on the Bird...nice to see the shop finishd and life starting to settle down enough to have some spare time. :)


I like the earth tones too.

Took a while to get my shop wrapped up. I still need to add a door at the stairs leading to the loft and I also need to insulate & drywall the loft, as well. But, that’s for another day.

The past two years have been a bit of a **** show. My wife getting diagnosed with breast cancer last year was a real kick to the nuts. She is a beast and has always been super healthy: soccer most of her life, avid runner (marathons), fitness, etc. In fact, she ran last years Boston Marathon 6 days out from her last dose of chemo. She’s cuckoo crazy! I got diagnosed with Microscopic Colitis this past May, sick with explosive diarrhea for almost 3 weeks (TMI), lost about 20lbs. Thought I was dying. It was terrible. Doing much better now. Life can throw you knuckle balls once in a while, i guess.

Thanks for looking everyone.
 
What a coincident - yours is a GY8 with an orange paintjob, mine is a GY8 with a red paint job.
Keep up the great work, you will get there.
My buildup is over at the Road runner nest website.
Dec. 11 (4).JPG
 
What a coincident - yours is a GY8 with an orange paintjob, mine is a GY8 with a red paint job.
Keep up the great work, you will get there.
My buildup is over at the Road runner nest website.


Nice! I’m on the Nest too but, have’t updated on there yet. You going to paint it back to GY8 or keep it red?
 
Last edited:
860BF0E2-192B-45D9-814A-42D9F1CAA2A4.jpeg


Making some progress. Cut a bunch of saddles for mounting RR to jig. Also drilled some holes too.
F3B97DED-4008-46BB-8C8E-2FCBFDB81A32.jpeg

I then mounted the RR to the jig at four points that are level, according to engineering sheet. In retrospect, I probably should have made the jig about a 10-12” lower.
7498FF41-6CAB-4D27-9715-A7B0EDD0C5A2.jpeg
E89328B1-5EAA-4269-9614-5D9CAAD3F44B.jpeg


I just need to add mounting points to the rear and front. The RR is resting on the saddles but still attached to my rotisserie. And, of course, my welder stopped working half way through for some reason...super!

For shits and giggles, I also started removing the rest of the undercoating. I read somewhere, maybe here, that Goo Gone Automotive works well. So, I hosed one of the wheel wells down and let it sit overnight. I was able to scrape off a pretty good area with a plastic scraper with relative ease.

19BB4913-31E5-405E-8A07-69FF741E220B.jpeg


28544622-E94F-4BB7-9B8E-C99257A78FD4.jpeg


I soaked it again and let it sit overnight. I was able to get even more off with ease. All of the undercoating that I sprayed is soft now as apposed to hard as a rock when I started. And the citrus smell is quite pleasing.


F38B3BF1-BEFB-42ED-8C55-84FD4D54491E.jpeg
 
Another quick update; Got the mounts pretty much done with the exception of the left side rear. I knew my left rear frame rail was messed up but didn’t know the extent. It definitely got crumpled. It is sitting about 1/2” lower than the right side. You can see in previous pictures that there is a crumple in the rail toward the back and another in the arch. I knew it was going to need to replaced from the get-go and have a replacement being shipped from MoparMark (thank you Mark). Also, it is punched in (toward front) about a 1/2” as well. My welder is working again...Yea! But I ran out of wire...Crap!

I also spayed the rear wheel wells with more Goo Gone and wrapped them in plastic to soak overnight.


642D721D-1A42-4FE1-B12C-1473450F100C.jpeg


8FC05370-A4A7-4A09-BD20-F1593BF60D12.jpeg
 
I guess the GooGone works! The plastic sheet definitely helped too. It kept the GooGone from drying out. It took me about 20 minutes to scrape the entire wheel well.


AFEAED28-2C2B-46AD-BF78-AEAAAD21EE13.jpeg


1D42A4A0-02F3-44F1-907D-A9706269AEEA.jpeg


D84E4569-4EAA-431F-9B86-7D41BB5EE162.jpeg
 
Still plugging along. Got the RR off of the rotisserie, it’s been on there for about 6 years :eek:.
The RR is now sitting on the chassis jig, plumb and level. Got the glass out too but, the windshield did not survive. Honestly, it probably needed to be replaced anyway.


6F4EA7D2-4967-4364-89A1-BD17E1D6B570.jpeg


F222D870-D5C4-4769-9DF5-43AD50E3A5C9.jpeg


I’m also still playing around with removing the undercoating with Goo Gone. The left side appears to be much thicker for some reason but, the Goo Gone is working well.


CC308F74-B588-470B-A514-A4CC495BAEAA.jpeg


754DF14C-DEFB-4D9E-8BFD-1086FA8D5045.jpeg
 
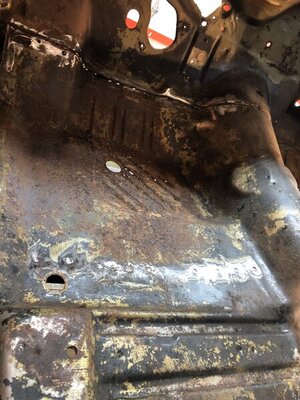
Started removing the driver’s fron and rear floorboards and the passenger’s rear floorboard. The driver’s front is pitted pretty bad and the rear has a huge dent that pushed the seatbelt mount almost horizontal.

Font:
36B36245-A9A6-49CD-8BF6-FA5F3D35C04D.jpeg


DBCE7B65-31DC-4FAA-840F-D4D63C0C230D.jpeg


Driver’s rear:
B396FBAB-2328-4271-96D3-E0959C60D2A6.jpeg


This is what it’s supposed to look like:

DA1C926E-352C-47C3-BB11-32B246D8A858.jpeg


And the passenger’s rear is dented at the tunnel:
DF5373B7-47FC-40CE-9DAA-0D5B2DB992A0.jpeg


DE06C503-445B-4692-B40B-C34B61DBC07B.jpeg


The joy of cutting spot welds. And of course, I drilled all the way through on a bunch. Also, someone welded the seams in a bunch of places so I’ll have to figure out how to cut the welds. Air hammer?:
7A56896D-880F-48EC-B477-96B59D0ED57F.jpeg


View attachment 1021970

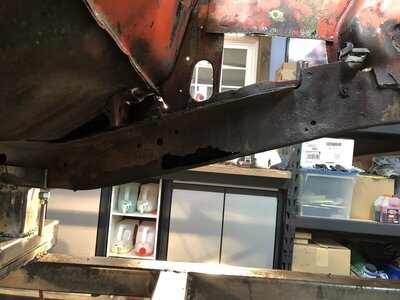
Once the floorboards are out, I have to replace the frame rail, as well: Hard to tell from the picture but that dark spot along the bottom is a hole about 8” long. The surrounding metal also toast.


EE446653-C173-495C-90F5-6A7C3283036C.jpeg FDD8ED05-2474-4B54-A49A-A51A2EF24260.jpeg
 
Last edited:
I thought I had an air hammer, thought wrong. Picked one up at Home Depot. Played around with it a little after work today. I was able to remove the passenger’s rear floorboard.


96E2C866-35DE-4F6E-A558-48B7C87796B4.jpeg
 
Last edited:
Just read your whole thread. It all takes time, just keep plugging away and it will get done. I really like the jig you made, that was some fine work.
 
Had an hour or so after work today and got the driver’s side rear out.


0285106D-6B07-40A4-A6FA-FEE7E7CEABE1.jpeg


B8FBD888-2E6B-4DB9-9D93-FFBA1AEB80E4.jpeg


Thanks for the comments Builderguy!
 
You may already be planning this, but when you have it all disassembled I suggest cleaning out and putting POR-15 or similar into the frame rails and supports to help avoid future rust. Once the floor boards go back in you won't have easy access anymore.

Keep up the good work!

Hawk
 
You may already be planning this, but when you have it all disassembled I suggest cleaning out and putting POR-15 or similar into the frame rails and supports to help avoid future rust. Once the floor boards go back in you won't have easy access anymore.

Keep up the good work!

Hawk


Thanks for the info Hawk. I plan on using POR15 for the rails i can’t get direct access to sand and RustBullet on the two rails I have to replace. From what I’ve read, POR15 bonds better to actual rust and RustBullet bonds better to clean (sanded) metal. I have to replace the front and rear frame rails on the left side. I’ll sand these down and coat them with RustBullet. The back half of the rear right side rail will be exposed when I replace the trunk floor so, I’ll sand that and hit it with RustBullet, as well. The front right rail I’ll hit with the POR15 because I wont be able to sand. I’m also thinking of using Eastwoods rail coating spray that you can feed into the rail and it sprays conically to seal.

F0F63A35-F926-40AB-9A86-A5B4E54CEA6A.jpeg


E136799D-78EE-44D8-AE2C-AF78A6A03FFF.jpeg
 
Nice to come across this. I got the same car, same color same condition. Reach out if you need help. Not that far away.

Crap! Sorry Bill, totally missed this post. I appreciate your offer and may take you up on it! Thanks again, Chad.
 
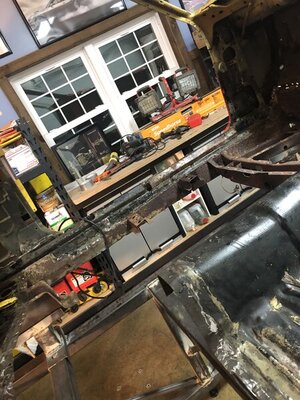
A little more progress. I got the driver’s floorboard out:


DE4625E2-6100-4AEA-A577-8F951351D163.jpeg


The junk pile is growing:


D811B36B-215C-416A-A4DC-E1C7B0AFAF35.jpeg


Next I have to get the left front frame rail out which, should be fun :) 4122C1EC-D7C0-44C1-9FA7-8218963F1E2C.jpeg
 
Last edited:
Auto Transport Service
Back
Top