You are using an out of date browser. It may not display this or other websites correctly.
You should upgrade or use an alternative browser.
You should upgrade or use an alternative browser.
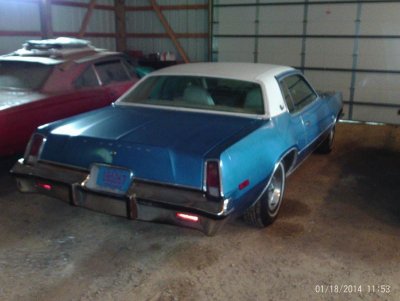
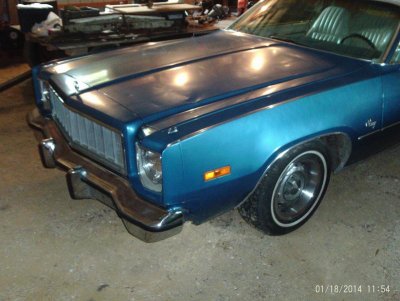
My New 1976 Fury Sport Project
- Thread starter 1778ppr
- Start date
dieseldazzle
Well-Known Member
Great work. These cars are just awesome to me. Especially the factory big block cars. My cousin took me for a ride in his 75 cordoba with a 400 in it and a purpleshaft cam in the 80s on enkei rims. It was the first time I ever got sideways in a car as a passenger. Ill never forget it.
Did the sport furys all come with 400s in them??
Also where did you get the parts cleaner at? I like it!
Did the sport furys all come with 400s in them??
Also where did you get the parts cleaner at? I like it!
1778ppr
Well-Known Member
- Local time
- 8:39 AM
- Joined
- Jan 14, 2014
- Messages
- 176
- Reaction score
- 116
- Location
- South West Wisconsin
Thanks for the support. The ultra-sonic cleaner works pretty good. I bought it off ePay.
I got it started up, timed, idle set, and started to set the idle mixture. After about 15 minutes or about the time the car got up to operating temperature the lifters started clattering. I shut it down. I installed a Stewart Warner mechanical oil pressure gauge. When I prime the pump/oiling system with my drill I get 65 psi oil pressure. When I start the engine it reads 65 psi and slowly drops as the temperature rises to just under 15 psi hot (normal operating temperature). So, now I’m chasing an oil pressure problem. I’m dying to get this thing on the road.
I got it started up, timed, idle set, and started to set the idle mixture. After about 15 minutes or about the time the car got up to operating temperature the lifters started clattering. I shut it down. I installed a Stewart Warner mechanical oil pressure gauge. When I prime the pump/oiling system with my drill I get 65 psi oil pressure. When I start the engine it reads 65 psi and slowly drops as the temperature rises to just under 15 psi hot (normal operating temperature). So, now I’m chasing an oil pressure problem. I’m dying to get this thing on the road.
1778ppr
Well-Known Member
- Local time
- 8:39 AM
- Joined
- Jan 14, 2014
- Messages
- 176
- Reaction score
- 116
- Location
- South West Wisconsin
It’s alive!
It’s finally a “running” project car. I took it out Sunday for a drive. The first stop was the auto parts store for new wipers. It looked like rain so to keep the rain away I bought new wipers. Then on to the drive in for a cheese burger and fries and a shake. Then a nice long cruise. It was great weather for it.
It seemed like I was never going to get this thing on the road.
I broke a tap off in the engine block while chasing the oil pump mounting holes. I made a tap extractor tool from a screw driver and it worked well. The high volume oil pump increased my hot idle oil pressure to about 18 psi or so at 750rpm.
The u-joints were bad and the front u-joint was missing all of its rollers on 2 opposing cross. It made a loud clunk every time I shifted gears. The 315G u-joints I bought at Weaver Auto Parts are actually made in the USA. That was a nice surprise.
The Edelbrock 1806 carb worked great right out of the box. I needed their square bore to spread bore adapter and you will need the “Chrysler” throttle adapter to hook up the throttle cable correctly. Everything bolted on and in and worked great. I set the initial timing at around 15* BTDC at 750 rpm with 17”hg of vacuum. It idles well and accelerates without drama. It is running a little fat though. I can smell it. A wide band sensor would tune it perfect. I plan to install the sensor(s) when I put in new exhaust. I’m putting the original TQ back on there after I rebuild it.
I’m going to post a parts wish list for this car soon. But mean while...


Does anyone have a battery tray for a ’76 Fury?
It’s finally a “running” project car. I took it out Sunday for a drive. The first stop was the auto parts store for new wipers. It looked like rain so to keep the rain away I bought new wipers. Then on to the drive in for a cheese burger and fries and a shake. Then a nice long cruise. It was great weather for it.
It seemed like I was never going to get this thing on the road.
I broke a tap off in the engine block while chasing the oil pump mounting holes. I made a tap extractor tool from a screw driver and it worked well. The high volume oil pump increased my hot idle oil pressure to about 18 psi or so at 750rpm.
The u-joints were bad and the front u-joint was missing all of its rollers on 2 opposing cross. It made a loud clunk every time I shifted gears. The 315G u-joints I bought at Weaver Auto Parts are actually made in the USA. That was a nice surprise.
The Edelbrock 1806 carb worked great right out of the box. I needed their square bore to spread bore adapter and you will need the “Chrysler” throttle adapter to hook up the throttle cable correctly. Everything bolted on and in and worked great. I set the initial timing at around 15* BTDC at 750 rpm with 17”hg of vacuum. It idles well and accelerates without drama. It is running a little fat though. I can smell it. A wide band sensor would tune it perfect. I plan to install the sensor(s) when I put in new exhaust. I’m putting the original TQ back on there after I rebuild it.
I’m going to post a parts wish list for this car soon. But mean while...
Does anyone have a battery tray for a ’76 Fury?
1778ppr
Well-Known Member
- Local time
- 8:39 AM
- Joined
- Jan 14, 2014
- Messages
- 176
- Reaction score
- 116
- Location
- South West Wisconsin
Thanks for posting. I'm not sure if any one is even interested but I figured I'd keep posting. Also I'm looking for some parts. The 2 priority parts are the battery tray and bumper filler.Very nice! I'm a little late but good work!
Here is a list of parts I’m looking for my ’76 Fury Sport. If you have any of these parts or know of a good source to get them please post it here.
Parts wish list for ’76 Fury:
Front left bumper filler
Front left inner fender well
Battery tray
Rally wheel 15x6-1/2
Bumper jack
Factory tach for rally dash
Windshield
rr horn
1975 “road runner” door emblems
1975 Road runner bird decals
1975 Road runner grill badge
1975 Road runner stripes
1975 Road runner dash emblem
5 lug studs rear
Windshield washer bottle
3.55 gears
True track differential
Dual exhaust
Gas tank small for dual exhaust
Rear springs XHD


1778ppr
Well-Known Member
- Local time
- 8:39 AM
- Joined
- Jan 14, 2014
- Messages
- 176
- Reaction score
- 116
- Location
- South West Wisconsin
Forget the bumper fillers, tuck that bumper!
Are there any pictures of the “tucked” bumper? I’d like to see what that looks like. Please post them here.
Darter6
Well-Known Member
Interested?? of course we are.!! That thing is cool.Keep showing the progress. I follow along as I have a 79 300 that will be my daily driver.Yesterday my TTI exhaust came in. Hope to have it installed mid week. This question goes out to all,, What size tires are most of you running ??
Whoa, you don't see many of those at Carlisle or the Nats. It's nice having the 400! She looks clean.
1778ppr
Well-Known Member
- Local time
- 8:39 AM
- Joined
- Jan 14, 2014
- Messages
- 176
- Reaction score
- 116
- Location
- South West Wisconsin
Having the 400 is one of the biggest reasons I bought this car. I plan to run dual exhaust, 3.55 gears, and a road runner cam.
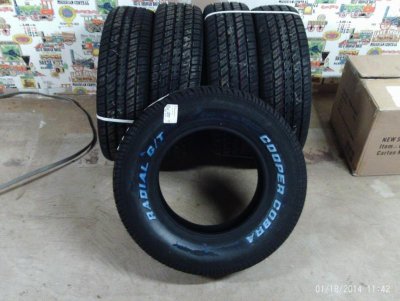
There are P215/70R15 on the front and P235/75R15 on the back of my ’76 Fury mounted on 15x6-1/2JJ Rally Wheels now. Does anyone know what the JJ means? The mismatched, dry rot cracked, white wall tires must go. I just bought Cooper Cobra’s RWL P225/70R15 which is the equivalent size of the factory spec tire size of G70-15 (GR70-15). I think 1976 may have been the first year for radials on Fury’s. From what I’ve read a few members here have the Cooper Cobra tires and like them. Can’t wait to get them on. So basically I'm running stock tire size.
But first I need to get my speedo working. None of my gauges work right now. I really want to get that speedo working so I’m not worrying about going too fast or too slow.
On a completely different note. Has anyone re-glued a mirror onto their windshield before? What’s the best stuff/way to do it? I bought some permetex stuff. When I took the car out for the first drive I reached up to adjust the mirror and off it came in my hand. Just one more thing to fix. LOL
Attachments
ArtH
Well-Known Member
It's an easy job. Permatex is a good product for that job, I've used it. Using a Sharpie, trace the area where the little mounting button goes on the outside of the windshield. This will ensure that you glue it back in the same spot as it was originally in. Clean the inside area completely, I used Windex and alcohol on the inside of the windshield after removing all the old glue with a razor. Go easy if you do that so you don't scratch up the windshield. Once the area is really clean and dry apply a small dot of the glue on the mounting button. BTW remove the mounting button from the mirror assembly and make sure it's real clean to. There is an adhesive activator or catalyst in the kit, IIRC this is applied the windshield mounting area (remember the Sharpie outline?) make sure the button is oriented in the correct position. The mirror assembly should mount from the top of the button. Apply the button to the windshield right after the activator is applied and hold in position for a about minute. Then let it sit a couple hours before putting the mirror back on. I've done this many times over the years and generally, the stuff will hold 5 or more years if you did it right. All of this is on the package instructions and if you follow them you will be successful. I think sunlight has a tendency to weaken the bond over time especially in warmer climates. Good luck!
BTW, you do nice work, I've been following your project here. Looks like you will have a real nice car when it's completed (do we ever really complete these things?). I've always liked the Fury series of cars made in the late 60's and early 70's. I recall my Dad had a rental from Avis when he traveled for work that was a yellow convertible. It was a beautiful car, I think it was a late 60's model. Back then Avis featured mostly Chrysler Corp products. I rented a nice 67 four door for my senior prom. I believe the Fury I was standard equipment for the NY State Troopers.
BTW, you do nice work, I've been following your project here. Looks like you will have a real nice car when it's completed (do we ever really complete these things?). I've always liked the Fury series of cars made in the late 60's and early 70's. I recall my Dad had a rental from Avis when he traveled for work that was a yellow convertible. It was a beautiful car, I think it was a late 60's model. Back then Avis featured mostly Chrysler Corp products. I rented a nice 67 four door for my senior prom. I believe the Fury I was standard equipment for the NY State Troopers.
1778ppr
Well-Known Member
- Local time
- 8:39 AM
- Joined
- Jan 14, 2014
- Messages
- 176
- Reaction score
- 116
- Location
- South West Wisconsin
Thanks for the information and taking the time to write that up ArtH and the compliment. I’m usually pretty good about reading and following directions, but that doesn’t mean the product works or I’ll do it right. Your review of the product will make it easier to spend the time and effort do it right the first time once I get started. And no I don’t think they are ever completed. Some just more than others.
I’ve got the dash all ripped up right now in an attempt to get all my gauges and controls working. I’m still trying to get the instrument panel out. I have the speedo cable removed and I think I need to remove the wiring harness before I can get it out. PO must have had the dash pad off before and left it that way for quite a while because there is tan clay like dust all over the dash under the dash pad. That dust is all over the car. This car must have sat for quite some time with the windows down. All these dash parts need a good cleaning. So does the rest of the interior.
The dash pad is severely cracked in a few places. Has anyone ever used those “dash caps” they sell on eBay? I might try one but they seem kind of expensive for what it is.
ArtH
Well-Known Member
I used a dash cap on a 1987 Trans Am (GM F Body) and it worked fine. But, the Camaro and Trans Am dashes are pretty flat and not complicated with regards to fitment. The cap came with a large tube of adhesive and it was pretty much clean the surfaces, apply the glue and set the cap on. I did this without removing the dash board. It worked fine and looked good.
I have purchased a completely new dash and console lid from this vendor on eBay:
http://www.ebay.com/itm/Mopar-Console-Lid-1975-76-77-1979-Chrysler-300-Cordoba-Dodge-Magnum-Plymouth-/281141565473?pt=Vintage_Car_Truck_Parts_Accessories&hash=item417557d821&vxp=mtr
His product is very good and the fit was fine. You will have to use some vinyl paint to match your interior. I highly recommend him. I think the dash for my 77 Cordoba was around $350 for the dash. I think your car's dash and the same year Cordoba would swap out.
This might work for you:
http://www.ebay.com/itm/1975-79-B-BODY-dark-Brown-DASH-PAD-stereo-speaker-A-C-option-MOPAR-3590614-/370942334723?pt=Vintage_Car_Truck_Parts_Accessories&hash=item565de2d703&vxp=mtr
76 Doba
Well-Known Member
Are there any pictures of the “tucked” bumper? I’d like to see what that looks like. Please post them here.
None that I know for a late b body, but I know of some GMs and Fords that have been done. I was considering a split bumper on my doba.
Billschroeder5842
Well-Known Member
I have a BUNCH of instrument cluster stuff-- speedo, tach, gauges...etc.
PM me
PM me
1778ppr
Well-Known Member
- Local time
- 8:39 AM
- Joined
- Jan 14, 2014
- Messages
- 176
- Reaction score
- 116
- Location
- South West Wisconsin
I have a BUNCH of instrument cluster stuff-- speedo, tach, gauges...etc.
PM me
PM sent.
1toolguy
Well-Known Member
I used a dash cap on a 1987 Trans Am (GM F Body) and it worked fine. But, the Camaro and Trans Am dashes are pretty flat and not complicated with regards to fitment. The cap came with a large tube of adhesive and it was pretty much clean the surfaces, apply the glue and set the cap on. I did this without removing the dash board. It worked fine and looked good.
/URL]
I used a dash cap on my Cordoba, it fits well, was easy to install, and after dying looks good.
1778ppr
Well-Known Member
- Local time
- 8:39 AM
- Joined
- Jan 14, 2014
- Messages
- 176
- Reaction score
- 116
- Location
- South West Wisconsin
Thanks for the leads on eBay. I’d like to get one of those center counsel arm pads. After looking at the eBay listings for the dash pad I might hold off on the dash cap. I’d buy one of the ones on there now but they both have speaker holes in them. The used dash pads are not much more than a new dash cap. Either way I’d end up having to paint or dye unless I find a used one in blue.
1toolguy, how did you dye your dash cap? What product(s) did you use? Please post pictures. Also, where did you buy your dash cap?
Here is more pics of my dash pad. The dash pad is relatively easy to remove from this car. I’ll post more pics of my instrument cluster disassembly later.


I also found the problem with my speedo. The end of the cable where is connects to the gauge was rounded off. Very strange since everything else checks out OK. I have a 24 tooth speedo gear since I have a 2.45 rear end with GR70x15 tires.


1toolguy, how did you dye your dash cap? What product(s) did you use? Please post pictures. Also, where did you buy your dash cap?
Here is more pics of my dash pad. The dash pad is relatively easy to remove from this car. I’ll post more pics of my instrument cluster disassembly later.
I also found the problem with my speedo. The end of the cable where is connects to the gauge was rounded off. Very strange since everything else checks out OK. I have a 24 tooth speedo gear since I have a 2.45 rear end with GR70x15 tires.
Similar threads
- Replies
- 23
- Views
- 568
- Replies
- 15
- Views
- 3K
- Replies
- 7
- Views
- 514
- Replies
- 21
- Views
- 2K


