• When you click on links to various merchants on this site and make a purchase, this can result in this site earning a commission. Affiliate programs and affiliations include, but are not limited to, the eBay Partner Network.

Need Help with Clutch Linkage Chatter

HawkRod

Formerly hsorman
Staff member
FBBO Gold Member
Local time
6:13 PM
Joined
Aug 8, 2011
Messages
6,685
Reaction score
14,222
Location
Lansdale, PA
So I have one (hopefully) final issue I want to address with the Road Runner before I leave for my trip on Saturday:

My clutch linkage "chatters" and is not smooth. Note that this is not the clutch itself, it engages the flywheel smoothly. The car accelerates from a stop smoothly too. It is the pedal itself, as if the entire linkage is binding and not sliding forward and back smoothly.

Details:
  • 1970 Plymouth Road Runner with a 383 and A-833 23 spline 4 speed (built as an overdrive, although that shouldn't matter).
  • I have a new McLeod Street Pro clutch and pressure plate, with a new throw-out bearing. On installation, I greased the inside of the throw-out bearing and all the linkage parts like the pivot point and fingers. I did NOT grease the splines of the transmission, and I made sure all friction surfaces were nice and clean.
  • The car has no vibrations or other issues.
  • My Z bar is completely rebuilt with all new parts. If I disconnect the clutch fork, the Z bar linkage moves like butter - super easy and smooth.

So it seems the issue is in the fork, bearing, or clutch. With the inspection cover off, if the clutch is depressed I swear I can feel the "chatter" coming from the fingers of pressure plate assembly. But I wasn't supposed to grease any of that, was I?

An interesting thing I just thought about was the old clutch did the same thing. That was with a different transmission, clutch and throw-out bearing, but with the same fork and pivot point.

I have limited experience setting up clutches, so I'd appreciate any help to diagnose this. Of course, I also have limited time in that Saturday morning we leave on the trip across country.

As always, many thanks for your help.

Hawk
 
How's your pilot bearing (back of crankshaft), they'll cause all kinds of chatter if they're sloppy.
 
Have you got the rubber bump stop fitted under the dash where the pedal contacts the framwork?
Also check that the main rod between the clutch pedal and Z-bar is around the correct way - it has a curve, so it will rub on the firewall if installed incorrectly.
Also have both rubber dirt seals been installed on the ends of the Z-bar ....assuming this is all new and greased inside, so it can run/slide freely.

Hope that helps. :icon_thumright:
 
How's your pilot bearing (back of crankshaft), they'll cause all kinds of chatter if they're sloppy.

I checked this before I installed the transmission and it seems to be in good shape. Note that this "chatter" in the pedal linkage happens even with the car off. I wouldn't think a bad pilot bearing would do this?

Have you got the rubber bump stop fitted under the dash where the pedal contacts the framwork?
Also check that the main rod between the clutch pedal and Z-bar is around the correct way - it has a curve, so it will rub on the firewall if installed incorrectly.
Also have both rubber dirt seals been installed on the ends of the Z-bar ....assuming this is all new and greased inside, so it can run/slide freely.

Hope that helps. :icon_thumright:

I have the rubber bump stop and both rubber dirt seals are in. All wear items have been replaced on the Z-Bar.
I remember checking the rod when I installed it, as I purposely tried it both ways to be sure it was set correctly. If I disconnect the fork at the transmission, then clutch assembly works smooth as can be. Also, when feeling it with my fingers on various surfaces (car off, up on a lift, inspection cover off), it feels like it is coming from the fork or the pressure plate itself. Of course, it is hard to trace this type of thing...
 
I had the same problem & had a hellacious time figuring it out. Turned out the new clutch fork was not made quite right, the fingers were not touching the TO bearing uniformly causing the bearing to be cockeyed. You can't see this visually, it's a small amount but will eventually show up as uneven wear at the fork pivot point. The source of the problem is that the new fork (at least mine) was just not stamped the same as the originals. You can either shim the pivot bracket which is a trial & error deal or find a good original clutch fork.
 
It almost sounds like you may have an incorrect fork pivot on the bell. I ran into this on a 71 340 Cuda and someone at one time replaced the pivot with and incorrect one. There are quite a few different ones so it can easily happen especially with a used one. Hope you get it fixed up and have a fun and safe trip
Don
 
Sorry, there for a second I was thinking just what in the hell is he doing in that car to make it chatter with it turned off??????? Gotcha now, the pedal chatters while pushing it threw it's stroke?

I would think this is a 2 man job, have someone working the pedal while you rest your finger on one part at a time.

Yup. We did the 2 man job routine last night That's how I think I narrowed it down to the fork or pressure plate. The problem is that the "chatter" vibrates through to other parts so it is hard to exactly pinpoint it.

I had the same problem & had a hellacious time figuring it out. Turned out the new clutch fork was not made quite right, the fingers were not touching the TO bearing uniformly causing the bearing to be cockeyed. You can't see this visually, it's a small amount but will eventually show up as uneven wear at the fork pivot point. The source of the problem is that the new fork (at least mine) was just not stamped the same as the originals. You can either shim the pivot bracket which is a trial & error deal or find a good original clutch fork.

It almost sounds like you may have an incorrect fork pivot on the bell. I ran into this on a 71 340 Cuda and someone at one time replaced the pivot with and incorrect one. There are quite a few different ones so it can easily happen especially with a used one. Hope you get it fixed up and have a fun and safe trip
Don

I think you two have the answer. It must be the fork and/or the pivot. I want recall that my pivot seemed just a little worn. I never realized that it could be that much of an issue. Plus, with a new clutch and everything else pretty much brand new, the fork or pivot are likely culprits; they were not replaced. Unfortunately, I never got a good picture of the pivot or fork either...
IMG_2634.jpg

Now to see if I can get a pivot and/or fork in the next two days...
 
I called Passon Peformance today, and Jamie will be there late tomorrow to allow me to get parts. I will drive up there after work.

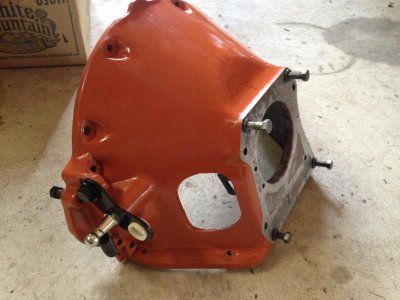
I managed to pull out the fork and pivot without taking the transmission out, although I think getting the fork back in might be difficult. Jamie suggested I bring those two plus my clutch pedal to Z bar rod. While I doubt this is the issue, I will have all three with me so we can compare and replace whatever looks suspect. My pivot is definitely worn on the bottom edge.

Then Friday morning I will replace the worn parts and hope I am all set... :icon_pray:
 
By sheer coincidence another one of my cars I was working on today had the same problem (A-body) & was also determined to be a bad clutch fork. In this case I also had a low mileage original one to compare with. I set them up on a flat surface & measured the finger height using the same pivot bracket & a ruler. The original was dead nuts the same height on both fingers. The repro had uneven fingers, they were at least 1/16" off. As double proof I put in the original & bingo, smooth as silk. This could be a general problem with the repro clutch forks, the fingers are not parallel to the pivot slot. Don't know where the one came from on my B-body, it was there when I bought it. My A-body one came from Brewer's but unlikely they manufactured it.
 
By sheer coincidence another one of my cars I was working on today had the same problem (A-body) & was also determined to be a bad clutch fork. In this case I also had a low mileage original one to compare with. I set them up on a flat surface & measured the finger height using the same pivot bracket & a ruler. The original was dead nuts the same height on both fingers. The repro had uneven fingers, they were at least 1/16" off. As double proof I put in the original & bingo, smooth as silk. This could be a general problem with the repro clutch forks, the fingers are not parallel to the pivot slot. Don't know where the one came from on my B-body, it was there when I bought it. My A-body one came from Brewer's but unlikely they manufactured it.

Thanks for the tip. I will measure my new fork before I install it.

First of all, I want to give some thanks to Jamie Passon. A stand up guy, staying late to make sure I could get the parts I needed, and then he carefully checked out my old parts, showed me where I had issues and ensured I had the right parts to make my transmission work well. He also insisted I call him tomorrow and let him know how it went. You can tell he cares about getting things right. Passon will continue to get my business. He is a very small business, but I like that anyway. I want to support that rather than large conglomerates anyway...

The good news is that I had multiple issues with my fork and linkage. This means that tomorrow I hopefully will be able to report that my clutch issues have been solved. Here were/are my issues:

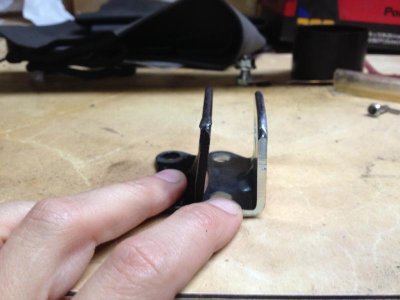
Problem 1: My pivot bracket was bent at an incorrect angle. The one on the left is my old, on the right is the new replacement.
IMG_5143.jpg

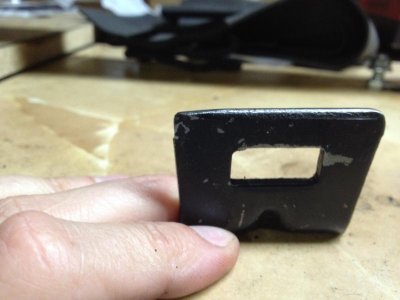
Problem 2: My pivot bracket is worn significantly on one side. Check out the "slope" on the left side...
IMG_5145.jpg

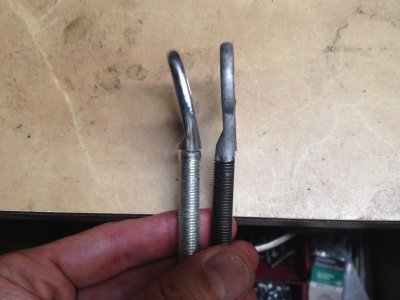
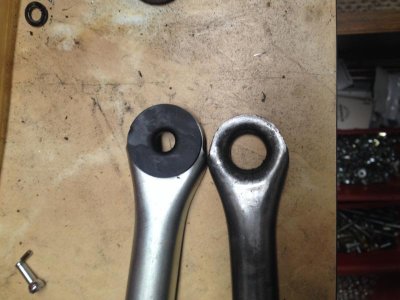
Problem 3: The linkage that connects the Z bar with the fork was not right. It did not have the correct bend at the eyelet. On the left is the replacement, on the right is what came off my car.
IMG_5146.jpg

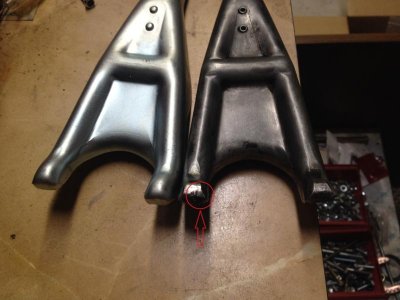
Problem 4: One of my fork "fingers" is severely worn. See the red circle that highlights an area of extra wear.
IMG_5148b.jpg

Problem 5: I didn't have the proper grommet and hardware that connects the end of the fork to the linkage (grommet only shown here).
IMG_5152.jpg

So all this point to the fact that my fork was putting an uneven pressure on my throw-out bearing. Somebody in the past had screwed with it and had it all messed up. Hopefully after I replace all this it will work properly.

What I am not sure about is installing the fork. I pulled it and the bracket out without removing the transmission. Installing it will likely be very difficult as I have to engage both the throw-out bearing fork fingers at the same time as I engage the pivot point. The top clip on the throw-out bearing is almost impossible to get to with everything assembled. If anyone knows any tricks to do this, I'd appreciate hearing about it.

As always, many thanks for all the good tips and help!

Hawk
 
Just wrapped up with my car (65 A-body w/ later 10.5" clutch) & works perfectly now. I thoroughly checked out the finger height difference on the new fork & it was off by around 1/8". The fork I used looks like the new one you bought.

You can fix the finger height problem on the bench. Install the pivot bracket in the slot of the fork, the spring will hold it in place. Place it on a really flat surface & hold the pivot bracket down tightly with one hand (I used a piece of flat steel for this). Place a random object under the pushrod end of the fork so that it's more or less pivoting in the middle. Then with a ruler measure the finger heights. If they are different you will need to shim the low side under the pivot bracket. I have a big selection of different thickness 5/16" washers & those worked great but you could use actual shims too. I would think if you could get the finger heights within 1/32" or so you would be good to go.

Putting the fork in is actually quite easy. Grease the fork at the pivot (including spring). With the inspection cover off, line up the TO bearing clips with the fork tips, make sure the fork pivot spring is entering the hole on the pivot bracket, push it & it should snap right in.

Personally I would not use the factory rubber grommet & washer on the clutch pushrod. Those rubber grommets don't last long, they fall apart & screw up your free play. Replace them with a small block Chevy rocker arm ball. I used Melling MRM-1731, in stock at Autozone for less than $1. Grease it up good.

Excellent write up - Thank you! Much appreciated.

Interestingly, regarding your last comment on the factory rubber grommet: I think I may have had a small block Chevy rocker arm ball on my linkage previously. The new grommet that I got from Jamie Passon was really hard - it was all but impossible to put in by hand so he used a vice to install it. I think I will use that factory setup first, but I will bring the rocker arm ball with me - it was be very easy to swap if needed.

Again, thanks for the write-up and tips!
 
A final update on this: The clutch now operates smoothly!!! :hello2:

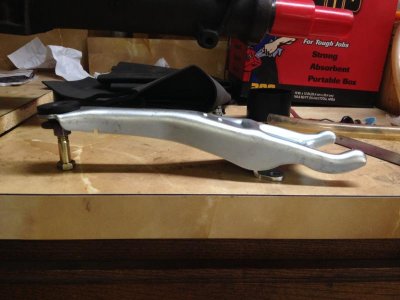
As suggested by 396 Signet, I measured the fork fingers; I used the smooth counter top to get some good measurements. The picture below shows the general setup, although I didn't have enough hands to show the measurement process. I measured almost exactly 1/32" difference between the fingers, so that was pretty good. No shimming required!

IMG_5154.jpg

I then installed the fork. Yes, it does pop right in IF you have everything carefully lined up. I took my time and made sure all dimensions were lined up right: This included centering the spring on the pivot bracket, as well as making sure the fingers were perfectly aligned too. Lots of stuff wiggles back and forth and up/down. But when I had all that ready to go, I was able to pop it in nice and easy.

The only other note relates the Fork Rod (that connects the Z bar with the fork). It turned out my car should NOT have the bend in the Fork Rod. Luckily, Jamie stated that they could be different, so he gave me a straight one too. The straight one lined up nicely and everything now works great.

So once again - thank you FBBO and Passon Performance for helping me get this straightened out! Now time to try and get packed for the trip!

Hawk
 
Glad you are fixed up, i see in #1 pic the pivot was the incorrect one which is what i figured some of the problem was, there are different bends/height/and bolt offset locations in some pivots and i see the base on your old pivot was not correct. Have a fun and safe trip, looking forward to updates

Just wrapped up with my car (65 A-body w/ later 10.5" clutch) & works perfectly now. I thoroughly checked out the finger height difference on the new fork & it was off by around 1/8". The fork I used looks like the new one you bought.

You can fix the finger height problem on the bench. Install the pivot bracket in the slot of the fork, the spring will hold it in place. Place it on a really flat surface & hold the pivot bracket down tightly with one hand (I used a piece of flat steel for this). Place a random object under the pushrod end of the fork so that it's more or less pivoting in the middle. Then with a ruler measure the finger heights. If they are different you will need to shim the low side under the pivot bracket. I have a big selection of different thickness 5/16" washers & those worked great but you could use actual shims too. I would think if you could get the finger heights within 1/32" or so you would be good to go.

Putting the fork in is actually quite easy. Grease the fork at the pivot (including spring). With the inspection cover off, line up the TO bearing clips with the fork tips, make sure the fork pivot spring is entering the hole on the pivot bracket, push it & it should snap right in.

Personally I would not use the factory rubber grommet & washer on the clutch pushrod. Those rubber grommets don't last long, they fall apart & screw up your free play. Replace them with a small block Chevy rocker arm ball. I used Melling MRM-1731, in stock at Autozone for less than $1. Grease it up good.
 
Shake it down. Keep us posted. When two of us go to LA, the trunk and rear seat is full. Take pictures. Good luck.
 
Hawk- Glad you got it all working smoothly before you hit the road. I want to reiterate what Hawk said about Jamie Passon. He's a stand up guy and knows his stuff. Jamie did the conversion on my 70 RR from auto to 4 speed. I supplied him with some parts and Jamie pointed out how they would not work ( clutch rod I got from Classic Industries, which had the wrong bend angle too). He's a true Mopar guy and his helping Hawk out was very cool.
 
Very cool thread. Once again, great attention to detail Hawk. Glad you're back up and running. Let the adventure begin!
 
Auto Transport Service
Back
Top