• When you click on links to various merchants on this site and make a purchase, this can result in this site earning a commission. Affiliate programs and affiliations include, but are not limited to, the eBay Partner Network.

New air compressor finished

dpstark2

Well-Known Member
Local time
9:35 AM
Joined
Feb 27, 2012
Messages
323
Reaction score
145
Location
Livermore, CA
I got tired of my worn out 25 gallon Crafstman compressor (30 years old) not keeping up with with tools, so I invested in this 60 gallon Quincy unit. A friend has the 80 gallon unit, and it's fantastic, but I couldn't justify the 50% price premium for 33% more capacity and < 2cfm more. I plumbed four drops in the garage using the RapidAir Maxline system. It is easy to use, but what a PITA to straighten the tube... that's a two man job, minimum. The compressor outlet has a coarse filter, regulator, and fine filter attached. In the future, I'll be adding a desiccant system.
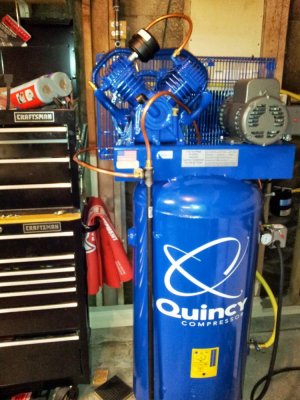
2013-06-08 08.49.45.jpg

However, the desiccant's job is greatly reduced by the addition of an aftercooler. It's a B&M trans cooler with a 230V, 1100 cfm fan wired off the compressor motor. This thing is flat amazing (bonus points go to my friend that got this thing rolling for that idea). The cooler drops air temps 200F from the pump to the tank. The tank, previously hot to the touch after filling, remains nice and cool. And the drip leg on the the cooler gets (I estimate) 75% of the water out before the tank! Each drop in the garage has it's own drip leg, and they have yet to produce a single drop of moisture. That fan, by the way, needs a guard. It can remove fingers.
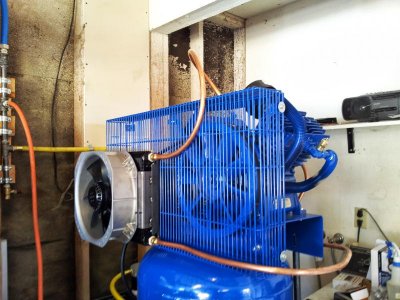
2013-06-09 11.21.46.jpg

This was not a cheap project. But the 50k hour pump should last basically forever it sure makes life easier. Would you believe it's even quieter than my old Craftsman? It is.
 
Love the after-coler.

Mine's got big fins all over the tube from the first stage to the second, and more from that stage to the tank, but I bet yours does a much better job.
 
Sweet!
Looks great.
My Quincy has the BIG vertical 2-stage pump (QP-series) not the V style.
Congrads.
PS: Quincy is a very old and reliable company. I think late "teens" or very early 20's.
Good luck w/ "her"
"super-bee_ski"
 
Yep. Quincy is pretty sweet. By the way- I say "finished" but like I said... that fan needs a guard! You would not want a finger in there. I also need to complete the shroud to really force the air through the cooler. It works great as it is, but I'm sure I'm loosing some efficiency with the fan 1/2" off the cooler and no shroud.

The pump to tank line easily reaches 300F under operation. Fins are great, and the inter-stage line is finned and cooled by the flywheel's integrated fan. The fact that the output of the cooler barely gets above room temperature speaks for itself...
 
What a good idea, make up a ram stack for a guard & improve cooling.
 
Looks great! Trans Cooler works excellent! (Wish I'd thought of that!) How many HP on the motor, and how many CFM on the pump? I've got a 5HP hooked to a Quincy 2 Stage 220 compressor head.

Runs all of my air tools without a hitch. Craftsman pumps have 3450 motors running their pumps, so they advertise double the HP than they actually have. That's why they're so noisy. For rule of thumb,

a good compressor will put out 4.3CFM Per HP. If you can get close to this figure, you've got a winner! Nice Job!
 
Whoaaa, very cool idea!!! (Yeah, excuse the pun ...) Any other pics you'd care to share of the wire up, mounts, etc.? I've got a huge old 5 hp beastie too and with 89%+ humidity the last few days especially, all 12 down drops are tossing out at least a little bit of water.

Congrats on a fine score and for having smart friends!! :D
 
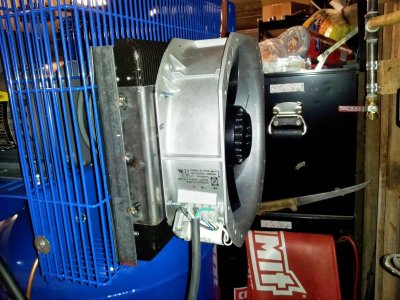
I used a B&M Super Cooler ($95 @ Summit) and a knock-off Taiwanese 230V fan. The fan is 11" square, the cooler is about 11.5" square, so they fit well. A couple pieces of angle iron (1" and 2") make up the mounts. A couple tack welds hold it together. There's a 1" iron strip behind the cage to mount everything together on some 1/4"-20 screws. I wired the fan directly off the motor. Be careful here- you're adding the current draw of the fan to the switch on the compressor, so do your research. It's small compared to a 5hp motor, so it should be fine. Strangely enough, the stock wiring on the compressor has one phase of the 230V hot to the motor at all times. The switch is a double throw, so one phase is wired to both contacts, effectively halving the current through the switch (compared to one phase per contact- that is, if I understand this correctly). So watch for that- one phase to the fan is constantly hot too in my case.

As far as the plumbing, it took 10' of flexible copper tube, a 1/2" black pipe tee, a 1-1/8" u-bolt to hold the tee to the compressor body, a 1/2" ball valve, a 4' 1/2" black pipe, four 1/2" NPT to 1/2" compression fittings (2 for the cooler, 2 for the tee), and two compression nuts for the pump and compressor body. The total parts cost was around $250, even shopping hard for the fan ($75) and cooler. Copper is not cheap.

I also have a Motor Guard M-100 filter on the main feed, and it does a good job of trapping water. It's also cheaper than this setup, so some may consider that before going this route. I did, however, enjoy making this setup.

I want to get the guard made this weekend I'll try to get more pictures then. Here's one of the fan and bracket.

2013-06-08 08.50.10.jpg

The compressor is rated at 15.2 CFM @ 175 psi, 5hp. The Baldor motor is supposedly a "true" 5hp. All I can say is I ran a die grinder continuously for 10-15 minutes and the compressor only ran about a 25% duty cycle.
 
Very cool compressor & after-pump-cooler set up.... great ingenuity
 
Auto Transport Service
Back
Top