• When you click on links to various merchants on this site and make a purchase, this can result in this site earning a commission. Affiliate programs and affiliations include, but are not limited to, the eBay Partner Network.

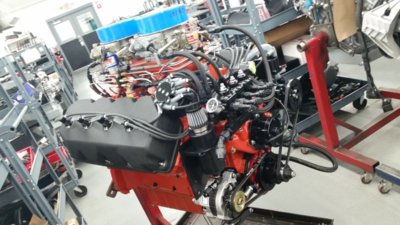
Stock steel valve covers - studs instead of bolts?

That gasket maker isn't the same as the regular silicone sealant. It's different. It might have silicone in it but it's not slippery like the other stuff which I despise.
 
That gasket maker isn't the same as the regular silicone sealant. It's different. It might have silicone in it but it's not slippery like the other stuff which I despise.
I have a tube of the exact same Permatex you show in your pic on my shelf. Black for this job, red for that job, blue for the other job...
 
.........I want to see if it's possible to do it without the goop this time, though. I can always revert to it if need be -

FWIW, I have always used stamped steel valve covers, and have never used any goo or sealant. Probably 1 out of 5 times I'm chasing a leak that is usually fixed after the first attempt.

Good luck. Cool valve covers.
 
I measured and bought all the custom length studs I needed direct from ARP in Stainless Steel for my Hemi. They have many more than advertised offered individually. I studded everything possible.

20160414_201144.jpg
 
FWIW, I have always used stamped steel valve covers, and have never used any goo or sealant. Probably 1 out of 5 times I'm chasing a leak that is usually fixed after the first attempt.
Good luck. Cool valve covers.
Thanks. Yep, first time out I'll go goopless. Just got the rest of everything in from Summit today to do it, in fact.
I'll play with it tomorrow after tractor time if I'm up to it.
 
Thanks. Yep, first time out I'll go goopless. Just got the rest of everything in from Summit today to do it, in fact.
I'll play with it tomorrow after tractor time if I'm up to it.

Take your valve covers one at a time, set it between 2 saw horses upside down length ways. With two hammers, one being a ball peen, set the ball peen down on the valve cover hole, and hit the ball peen with the other hammer to dimple back the metal around the hole.

Use light pressure to tighten, either a simple nut driver or a 1/4" socket set used with one hand over the ratchet mechanism. After it starts it might leak initially, I usually continue hitting each nut another 1/8 turn or so, maybe two or three times, but never really cranking down on them. It is a bit of a feel thing.
 
The great experiment has begun.
Started with driver's side. Straightened bolt holes, out came the RTV black and then the FelPro gasket.
Yes, I backed off of the "install it dry" bit once I checked the inside of the valve covers.
I only used the Permatex on the valve cover side; I'll try dry on the head side for now.

The studs went in beautifully as one would expect from an ARP product. Double nutted them to get them seated. Then the valve cover, which had been sitting gasket side down on the flat workbench, went on next. It had to be aligned perfectly to go over the studs, but when it was, it plunked right down squarely with a reassuring "thunk".
I then found out quickly that there wasn't enough threads on the nut side to stack both the Mopar "spreader" washer and the ARP supplied round one, so the round ones were jettisoned.
Once I did that, the nuts seated nicely against the spreader washers and the washers acted like they were meant to be there, settling into a nice alignment even in the catty corner positions of the two lower corner studs.
IMG_20180828_171934637.jpg

IMG_20180828_171954612.jpg


Stage one complete. Stage two to come.
I now know I need to do something different about a breather (mine isn't this type) as well as procure a "shorty" PCV valve, since the internal baffle isn't allowing the typical longer metal one to seat.
More to come, but so far, so good.
IMG_20180828_172306943.jpg

IMG_20180828_172331272.jpg


P.S. You can see the crud on my new MSD spark plug wires and on the head itself from the slow, weepy leaking the old valve cover was doing.
All that will be cleaned up once I'm done, along with a polishing of the valve cover itself. No sense in doing it right yet.
 
Last edited:
Mercy. The breather I need is sorta pricy but I ordered it anyways from Summit (it's an AMD repro). $56!
amd-337-1068-c_ml.jpg


As far as the PCV goes, I just chose to fetch a generic AC Delco one for $9. I'll replace it with the proper metal elbow looking
deal when I can find a deal on one:
acf-cv774c_w_ml.jpg
 
Experiment over.
I'm declaring victory - at least for now.
To answer the original question I posted to start the thread, at least for stock heads - the answer is "yes". :)

The ARP studs installed beautifully and were the perfect length, just as they advertised they were.
The Mopar "spreader" washers fit like they belonged on there as well.
Finally, and most importantly, the valve covers themselves plunked right down on the studs firmly yet snugly;
the FelPro gaskets saw to that. There was no wiggle or repositioning possible; the covers located in exactly one
position and one position only.

Add an expensive (but Mopar licensed, come to find out) reproduction breather and the generic motors PCV and
things went together just like it should; nothing fought me at all, short of the old valve covers being freaking GLUED
to the heads, so some aggravated gasket scraping commenced.

Results? A wrong-colored (for the year) 440 with a correct (and original!) air cleaner, a "wrong" chrome breather and "wrong" chrome
valve covers:
IMG_20180831_214349862_LL.jpg


IMG_20180831_214403722_LL.jpg


IMG_20180831_214419727_LL.jpg


I kinda like it myself. :thumbsup:


P.S. Wow, those pics turned out lousy. Apologies, I'll get better ones taken soon.
 
:thumbsup: Nice.....
I don't give a crap about "right" or "wrong", it looks great to me, it's YOUR car, if you are happy what else is there?
Thank you both kindly. :)

I've also changed the oil and filter during this brief down time. Trying out Valvoline VR-1 for the first time. Dang dipstick is insisting on 6 quarts to fill?
Who knows whether that's right or not...
Fired the car up and let it warm up this morning, watching for smoke, leaks, anything untoward.
Looks good so far. We'll take it for a long drive today and see how it goes. :)
 
Last edited:
Thank you both kindly. :)

I've also changed the oil and filter during this brief down time. Trying out Valvoline VR-1 for the first time. Dang dipstick is insisting on 6 quarts to fill?
Who knows whether that's right or not...
Fired the car up and let it warm up this morning, watching for smoke, leaks, anything untoward.
Looks good so far. We'll take it for a long drive today and see how it goes. :)

Did you measure how much you drained out of it? Just find a gallon jug or two and fill with the drained oil to figure it out.
 
Did you measure how much you drained out of it? Just find a gallon jug or two and fill with the drained oil to figure it out.
Wouldn't have mattered, since there was no way of knowing the amount in there was correct, either?

We had her out on a nice half hour each way ride today to a show. It's hot as heck here today, temps over 90F.
Checking things out underhood now that she's had a chance to cool back down, there was some evidence of slight oil spritz on some of the drivers' front area (front of air cleaner, intake, etc.).
Slight evidence of some oil weepage along the bottom of both covers, too.
Checked out and snugged down all valve cover nuts again. All of them needed some snugging now that it has heat cycled a couple times.
Different "feel" using these nuts and studs versus bolts, that's for sure - the nuts seem to need a bit a more torqueing.
These FelPro gaskets are pretty darn stiff, too. Hopefully they'll soften up and do their jobs like they always have for me in the past.

Stupid dipstick still isn't quite happy with the amount of oil in the engine, either.
I got news for it, no way that pan & filter takes more than six quarts!
I need to fetch a proper dipstick....
 
Last edited:
Conclusion:
I put 5 quarts in the engine (including the filter already full) after draining all 6 that were in it.
I held back exactly one quart, then the rest went right back in.
Saw where that put me on the dipstick below the FULL mark (measured), then pulled the stick and used
a tubing cutter to neatly whack off that much of the dipstick tube.
Stick now reads exactly FULL. Oil changes in the future will consist of exactly 5 quarts including filter
(I never change oil without a new filter, ever).
Done deal. :thumbsup:
 
I went through the same thing trying to figure out what the new pan held. No info on what the pans capacity was suppose to be. I acually had 5 + 1 = 6 quarts in it for break in. Then changed oil and filter and 5 quarts looked better on the stick WTF! Just changed the oil one more time to drop the weight to 10w30w and 5 still looks right.

Watch that aftermarket dip stick if its chrome. I had chrome flakes coming off of mine from sliding it in and out of the tube. I happen to notice flakes on my rag when checking the oil level. Buffed the finish off of it with a dremel scotch pad.
 
Auto Transport Service
Back
Top